I. K. Lutskaya Doctor of Medical Sciences, Professor, Head of the Department of Therapeutic Dentistry BelMAPO (Minsk)
I. O. Beloivanenko, private practicing dentist (Kiev)
Aesthetic treatment of the frontal teeth requires not only modern functional materials, but also a high level of practical skills of the dentist. The theoretical and scientific training of a specialist is also of certain importance, since he is faced with the task of rational choice of means and methods of work in dentistry [2, 7]. Thus, modern literature reflects numerous clinical observations of the results of orthopedic treatment, including combined or all-ceramic structures. Veneers are popular because they provide high aesthetics with minimal preparation [1, 7]. In therapeutic dentistry, direct restorations, fillings in combination with the production of veneer coatings, and adhesive structures are widely used [4].
In accordance with the provisions of biomedical ethics and the law on health care, the patient’s right to choose a treatment method is respected after being informed by the dentist about the available alternatives to the treatment of a particular pathology [3]. During the discussion, not only the methods of treating this disease are considered, but also the duration of the manipulations, the number of visits, and the financial cost of aesthetic restorations. These factors allow you to make the optimal choice of means and methods of influence in a certain clinical situation, which reduces the risk of claims and complaints from the patient regarding the results of the work performed [5, 6].
Material and methods
The patient's examination and diagnosis were carried out in accordance with approved protocols. Diamond burs (NTI) of various shapes and sizes were used to prepare teeth. The filling was performed with the photocurable composite Admira Fusion (VOCO), which is a universal nanohybrid filling material based on ORMOCER and is indicated for filling cavities of class I–V, as a cushioning material (filling base) in cavities of class I and II, during the reconstruction of traumatically damaged frontal teeth, veneering discolored anterior teeth, correcting shape and color to improve aesthetics, repairing veneers, enamel defects and temporary crown and bridge materials. Thanks to innovative technology, ORMOCER is characterized by low polymerization shrinkage (1.25%) and shrinkage stress. High inertness ensures biocompatibility and color stability. Admira Fusion is universal in use - it meets high requirements for anterior and posterior teeth; An optimally selected color system ensures compatibility when working with several shades.
The bonding system was Futurabond U, a universal dual-cure adhesive. Indicated for direct and indirect restorations made with any photopolymer, self-curing and dual-curing methacrylate-based composites used for filling, core restoration and fixation. Applied in one layer - total working time is 35 seconds, has good adhesion. The total etching technique used Vococid (VOCO) gel. The latter has a blue color for visual control when applied to the tooth. Easily washed off with a stream of water.
Prosthetic methods
The option of dental prosthetics is selected taking into account the problem of a particular patient. Each case is unique and is considered in relation to your overall health.
Installation of crowns
This method is the most popular and is justified if the tooth is damaged by half or more. It is possible to insert crowns on the front teeth even when only a healthy root remains and the walls have crumbled. The condition of tooth remains and periodontal tissues is clarified using diagnostic images.
To insert the upper teeth, or insert the lower teeth, which are in the beauty zone, the requirements for the dentures must be precisely formulated. Rarely, pulpless units are covered with metal-ceramic models. This is a budget option, its aesthetic indicators are average. When the gums are deformed, a gray metallic strip may appear over time, which will be noticeable to others.
Ceramics
A justified option for the restoration of an anterior tooth. In appearance, the material is indistinguishable from natural enamel. Its strength is close to that of real teeth. Light transmission is the same as that of a natural unit. Therefore, the prosthesis is visually invisible. The material requires careful handling - it does not tolerate temperature changes, and biting of hard products is excluded.
Research results
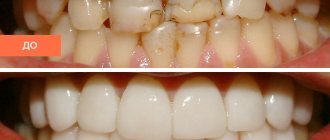
The patient, 46 years old, complained of an aesthetic defect in her anterior teeth (Fig. 1). Objectively: in the 11th and 21st teeth, extensive partial restorations with signs of secondary caries and a violation of the marginal seal are determined. The central incisal line is shifted to the left. Pathological abrasion along the cutting edge. Color 21 slightly changed. According to the patient, the tooth darkened after primary endodontics many years ago. After repeated endodontics, the color did not change. The tooth doesn't bother me. The radiograph shows obturation of the canal to the apex, the periodontal fissure is not widened.
Rice. 1. Defects in the fillings of the 11th and 21st teeth.
In accordance with the clinical picture, a diagnosis was made: secondary caries of the 11th and 21st teeth. The patient was informed about alternative methods of orthopedic and therapeutic restorative treatment of anterior teeth. She chose the method of complete direct restoration of 11 and 21, which is consistent with the opinion of the dentist. This choice is justified by the following factors:
- a large volume of lost tooth tissue dictates the need to correct the crown height and color, which excludes partial restoration;
- the relative cheapness of the method, treatment in one visit is attractive for the patient, in contrast to prosthetics or indirect restoration;
- slight color change 21, time and economic factors excluded intracanal bleaching 21.
The patient signed a preliminary consent to perform the necessary manipulations. Teeth were cleaned of plaque mechanically using a product that did not contain fluoride and oil. For this purpose, Clint paste (VOCO) was applied to a special brush rotating at low speeds. To avoid heating the tooth, an excessive amount of paste was used. Then the tooth was thoroughly washed with a stream of water.
Next, the size, shape, and relief were planned, which is a strictly defined sequence of actions, including odontometry and odontoscopy of the central incisors. Based on visual assessment and measurement results, a rectangular crown shape was planned: the side surfaces are located almost parallel; the horizontal dimensions in the middle and lower thirds are close in value.
Evaluation of signs of teeth belonging to the side showed a predominance in size of the distal angle of the crown. The sign of crown curvature is not expressed. The description of the individual characteristics of the tooth consisted of assessing the type of macrorelief of the vestibular surface.
The selection of the desired shades of the Admira Fusion (VOCO) photocurable composite was carried out in natural light using special standards by comparing them with the intact lateral incisor before installing the rubber dam. The color of the composite was specified by applying a “drop” of the composite to the vestibular surface of the incisor directly from a syringe (Fig. 2, 3). The following syringes were selected: cervical region - A3.5, body - A2, transparent enamel - Incisal. The material allows intuitive selection of shades and makes it possible to create colors using both opaque and enamel shades.
Rice. 2. Selection of enamel shades of the composite.
Rice. 3. Selection of dentin shades.
Considering the slight difference in the color of the 11th and 21st teeth, it was decided to carry out a correction using enamel shades of the material. Thus, for the cervical area of the 21st tooth, a syringe GA3.25 was chosen (the original shade between A3 and A3.5 on the Vita scale), and shade A1 was used for the body of the veneer.
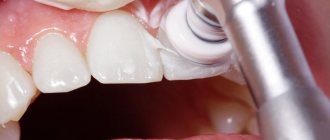
The preparation was performed with medium-grain diamond burs and began with the removal of low-quality fillings, protruding enamel edges, and dentin necrotomy (Fig. 4). The contours of the veneer coating were marked using a small spherical bur in the form of grooves no more than 0.5 mm deep.
Rice. 4. A set of burs for preparing a tooth “for veneer”.
In the proximal areas, to hide the edge of the veneer, the boundaries extended to the contact surfaces. The cervical border of the veneer is located along the border with the gum to avoid the transmission of pigmented tooth tissues. Cervical ledges are formed, internal angles are smoothed. The vestibular surface of the incisors was processed with a fine-grained cylindrical bur (Fig. 5, 6).
Rice. 5. Marked bur in sterile packaging.
Rice. 6. A diamond bur is placed in the turbine tip.
A rubber dam was installed with exposed teeth 14 to 24, which will allow you to focus on the dentition when creating the shape and distributing color areas. The quality control of preparations 11 and 21 was carried out (Fig. 7). Next, the technique of total etching of the prepared surfaces of the central incisors was carried out (Fig. 8).
Rice. 7. The central incisors were prepared.
Rice. 8. Total acid etching.
The gel used was Vococid (VOCO) - 35% phosphoric acid. The gel was washed off with a stream of water, and the teeth were dried with a reflected stream of air. Adhesive preparation was carried out with a universal bond, suitable for any adhesive technique (Fig. 9). A thin layer of Futurabond was applied to the etched surface of the teeth with a brush and cured with the light of a halogen lamp (Fig. 10). Next, the veneers were modeled using the following Grandio dentin shades for the 11th tooth: cervical area - color OA3.5, body - OA2 (Fig. 11).
Rice. 9. Futurabond U adhesive system.
Rice. 10. Adhesive preparation of the 11th tooth.
Rice. 11. Photo-curable material.
The production of a classic veneer began with the application of an opaque composite to the prepared surfaces. A restoration base is created that includes a dentin geometric outline to define the lateral and inferior boundaries of the veneer. The sign of the crown angle is modeled. The first layer of Grandio opaque filling material was placed on the mid-gingival area and moved towards the neck of the tooth. The next layer was placed on top of the previous one and distributed evenly over the entire area. The lateral surfaces of the veneer were not brought into contact with adjacent teeth by 1.0 mm, which is due to the type of transparency of the enamel in this area (Fig. 12).
Rice. 12. Opaque layers of the composite are applied.
In accordance with the instructions for using the composite material, the latter was added in layers no more than 2 mm thick, compacted to the tooth tissue and cured with halogen light. The prepared opaque base, which replenishes the shape and volume of the tooth dentin, was covered with enamel shades of the material. To form a periodontal contour, a portion of enamel composite was applied to the central gingival area of the tooth and smoothed from the center to the periphery.
When modeling the enamel layer, shades A3.5 and A2 were used, respectively. Space is left for the transparent Incisal shade in the area of the incisal edge and side edges (Fig. 13). The formation of contact surfaces was completed by applying a transparent composite, which was distributed taking into account the individual degree of transparency of the enamel. The same transparent material was used to model the cutting edge and cover the corners of the veneer.
Rice. 13. Modeling the enamel layer.
For the restoration of the 21st tooth, dentin colors were chosen similarly to veneer 11. Syringes of the enamel composite are presented in shades GA3.25, A1, Incisal (Fig. 14). Dentin shades for the formation of a veneer on the 21st tooth were applied in layers up to 2 mm thick, which ultimately filled the volume of missing dentin without involving the boundaries of the enamel layer (Fig. 15). Using individual tint enamel syringes, the effect of neutralizing color accents was achieved (Fig. 16). The surface of the restoration was covered with a transparent layer in accordance with the type of enamel transparency.
Rice. 14. Tint composite syringe.
Rice. 15. Opaque layer of the 21st tooth.
Rice. 16. Color neutralization has been completed.
Immediately after the aesthetic structure is manufactured, it is processed: the surface hybrid layer is removed and the relief is enhanced. Contouring and polishing of the vestibular surface of the veneer was carried out using Dimanto diamond instruments (VOCO) (Fig. 17). After removing the rubber dam, adaptation to the bite, grinding, and polishing are controlled (Fig. 18).
Rice. 17. Polishing system.
Rice. 18. Ready-made aesthetic restorations.
The final stage of treatment is coating the enamel surrounding the restoration with fluoride-containing varnish Bifluorid 12 (Fig. 19). Long-term quality control of the work performed shows the high efficiency of using the method of producing direct veneers from a photocurable composite.
Rice. 19. Fluoride varnish.
Artistic modeling and restoration of teeth
| Rice. 631. A - distal side; B - medial side Rice. 632. A - vestibular side; B - palatal side |
The individuality of the forms is created at the next stages of modeling.
The location of the marginal ridges along the vestibular surface is demonstrated: with converging ridges, the shape of the central incisor resembles a triangular outline (Fig. 633), with parallel ridges, a rectangular outline (Fig. 634), with rounded ridges, when the most pronounced width of the crown is in its middle third, the shape of the crown is oval (Fig. 635).
The position and direction of the marginal ridges not only change the shape of the vestibular surface, but also limit the contact edges.
The figures demonstrate how the shape of the crown of the central incisor changes with different positions of the marginal ridges, although the overall outlines of the stump remain unchanged and are set as standard.
The next stage in modeling the crown of the upper central left incisor is to form a flat medial marginal ridge (1), which occupies approximately l/3 of the tooth crown and has a slight rounded bend in the central part (Fig. 636, 637).
After its registration in the area of the cutting edge, an insignificant
| Rice. 636 Fig. 637. 1 - medial cushion; 2 - medial angle; 3 • distal angle |
body elevation, which, combining with the contact medial surface, forms an acute medial angle of the crown (2), sometimes approaching a straight line, which is the leading sign of determining whether a tooth belongs to one side or the other.
Next, we build a gentle distal marginal ridge, which also occupies approximately l/3 of the vestibular surface of the crown (Fig. 638, 639).
A small elevation is formed in the area of the cutting edge, which, when merging with the contact distal surface, forms the distal corner of the crown, which has a rounded shape.
| Rice. 638 Rice. 639. A - medial side; B - distal side. 1 - medial cushion; 2 - distal cushion; 3 - medial angle; 4 - distal angle |
We proceed to the design of the middle part of the vestibular surface (Fig. 640, 641). We fill it with a weakly expressed main longitudinal ridge (3) with gentle slopes, turning into a small elevation at the cutting edge. Thus, form-
| Rice. 640 Rice. 641. A - medial side; B - distal side. 1 - medial cushion; 2 - distal cushion; 3 - longitudinal roller; 4 - medial recess; 5 - distal recess; 6 - equator |
There are three main ridges: longitudinal (3), medial (1), distal (2), which in clinical anatomy correspond to enamel-dentin ridges (mamelons).
At the border of the middle and cervical thirds, the ridges unite with each other, forming the equator of the tooth (6).
After modeling the main ridges, medial (4) and distal (5) depressions located almost parallel to each other are determined, resembling the shapes of grooves, limited to the middle third part of the vestibular surface and forming corresponding notches (medial, distal) on the cutting edge.
After the main elements are formed, we proceed to the final stage of modeling the vestibular surface.
We unite all anatomical zones with each other, recreate the microrelief, and create a finer gradation of the vestibular surface (Fig. 642-647).
| Rice. 642-647. A - medial side; B - distal side; 1 - longitudinal roller; 2 - medial cushion; 3 - distal cushion; 4 - tearing tubercle; 5 - tubercle of the medial carina; 6 — tubercle of the distal ridge; 7 - equator; 8 - medial angle; 9 - distal angle |
The following demonstrates the appearance of the palatal surface of the upper central incisor after the design of its vestibular part (Fig. 648, 649). We proceed to the design of the palatal surface.
Similar to the vestibular surface, a series of photographs is formed, which show options for the location of the marginal ridges on the palatal surface.
With a uniform inclination of the marginal ridges to each other, the shape of the crown takes on a triangular shape (Fig. 650), with relative parallelism of the ridges they speak of rectangular shapes (Fig. 651), with oval ridges the shape of the crown becomes oval (Fig. 652).
Thus, the operator has the opportunity to apply various options for modeling the palatal surface with the same volume of tooth with previously specified overall outlines (tooth stump).
| Rice. 642-647. A - medial side; B - distal side |
| Rice. 650-652. A - medial side; B - distal side |
Initially, we lay out a flat medial roller (1), occupying the l/3 part of the palatal surface, which takes part in the formation of the medial part of the crown, giving it a wedge shape (Fig. 653-656).
After filling the palatal surface with the main morphological elements (longitudinal ridge - (4), medial ridge - (1), distal ridge - (2)) in the cervical and middle thirds, we form weakly defined enamel protrusions (medial - (5), distal - (6 )).
| Rice. 653-656. A - medial side; B - distal side. 1 - medial cushion; 2 - distal cushion; 3 - cervical girdle; 4 - longitudinal roller |
Minor depressions have formed between the longitudinal and marginal ridges: medial - (7), distal - (8) (Fig. 657, 658). Rice. 659-661 demonstrate a modeled palatal surface, with already formed forms and a pronounced microrelief of the surfaces.
| Rice. 657-658. A - medial side; B - distal side. 1 - medial cushion; 2 - distal cushion; 3 - cervical girdle; 4 - longitudinal roller; 5 - medial protrusion; 6 - distal protrusion; 7 - medial recess; 8 - distal recess; 9 - medial angle; 10 - distal angle |
The contact medial surface is formed by combining the medial parts of the vestibular and palatal surfaces (Fig. 662-665).
| a - medial side; 1 - vestibular circuit; 2 - palatal contour; 3 - zone of medial contact; 4 - cervical third; 5 - middle third; 6 - cutting third |
The vestibular (1) and palatal (2) contours are visible, and the surface itself resembles the shape of a triangle.
The zone of maximum convexity of the crown of the central incisor, which subsequently becomes the site of interdental contact, is located on the border of the cutting and middle thirds (3).
It is interesting to note that when observing the vestibular contour from any of the contact surfaces, patterns in the formation of the tooth crown are traced and determined.
Along the vertical plane, the contour of the vestibular surface can be examined, as if mentally dividing it into three parts: in the cervical region, the plane of the created vestibular contour is directed outward (4), in the middle third the plane already has an oral slope (5), and in the area of the cutting edge, the oral direction intensifies (6).
The distal contact surface also resembles the shape of a triangle, the base of which is directed towards the gingival edge, the apex towards the cutting edge (Fig. 666-669).
| Rice. 666. A - distal side | Rice. 667. A - distal side | Rice. 668.1 - distal contact zone | Rice. 669. A - distal contact zone |
The zone of maximum convexity of the crown is located in the area of its middle part (1) and serves as the point of contact with the adjacent lateral incisor.
In conclusion, a series of drawings made from different directions of the modeled upper left central incisor is demonstrated, where the differentiation of surfaces and their versatility are clearly visible (Fig. 670-674).