Carious disease manifests itself in many cases quite unnoticed, very often having a small black dot in the tooth; when visiting the dentist, very deep caries is discovered.
Basically this confuses us and we immediately start thinking about what we should do, what material is better to use and how much it will cost us. We can answer all your questions without difficulty.
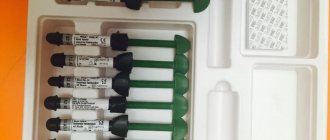
We want to tell you and offer the modern nanocomposite material Filtek. Its application is very wide, from the smallest restorations to filling large volumes of voids. In this article we will tell you about what Filtek restoration fillings are. About the areas in which they are used. We will also talk about the undoubted advantages of this light-curing material. And of course we will tell you about the different types of Filtek fillings.
What are Filtek fillings?
Filtek fillings are the word quality in the highest form of restoration materials from the American manufacturer - 3M ESPE. Similar nanocomposite materials for filling are used all over the world. With their use, it is possible to restore dental aesthetics, excellent anatomical shape and chewing function.
In what areas are Filtek materials used?
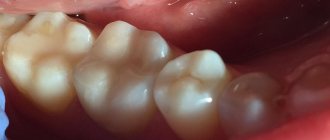
Filtek material is a nanocomposite material, its use is very extensive. Unlike many other materials, Filtek is used not only in the restoration of chewing teeth, but also in cases where it is necessary to restore the aesthetics of the front teeth. This material is universal!
Let's now list the undoubted advantages of this material!
Tetric N-Ceram filling
Tetra N-Ceram is a professional composite restorative material. The reflective filling has a wide range of natural shades. Tetrik Kerom is used for filling grades 1-5, in pediatric dentistry, in the manufacture of direct veneers, and restoration of veneers. The material is used in a dry working area. The material is flexible and easy to use. Used to work on front and side teeth. Has a “chameleon” effect.
Advantages of Filtek fillings
- Filtek fillings are used not only in frontal teeth, but also in chewing ones
- Low landing
- Reproducibility of natural properties of enamel and dentin
- High aesthetics and smoothness.
- Good wear resistance.
- Material from a well-known company provides a guarantee of effective treatment
- Of course, this manufacturer has a huge range of colors.
Now let's talk about the types of Filtek filling material.
What material is better for fillings on the chewing surface?
Most likely, the dentist will offer you a choice of several materials that differ not only in their features, durability, but also in price. Choose the most expensive option available to you; it will last longer and look better.
The most expensive fillings in the world are installed in the UK. One trip to the dentist and an ordinary cement filling, which in Russia can be placed under a compulsory medical insurance policy, will cost a couple of hundred dollars.
At the Clarimed clinic you can fill a tooth for 1,155 rubles (CIS). The consultation is free, as are any questions about fillings, treatment plans, prices, durability, or anything else that worries you before the procedure. Call us, we work around the clock.
Types of Filtek filling material:
There are three types of Filtek fillings: Filtek Z250, Filtek Supreme and Filtek Ultimate.
So, the first one: Filtek Z250 - this material has good density, which allows it to adhere well to the edges of the teeth. This material is used in the so-called layer-by-layer technique, which means the moment when the filling is built up and more than one layer is used. This material minimizes the recurrence of caries to almost zero.
Second: Filtek SupremeXT - this material is great for making veneers or inlays. This material has a large number of shades, which makes it an excellent option for the restoration of front teeth.
And finally the third type: Filtek Ultimate - this material is newer, it was developed to improve and improve the Filtek Supreme material. It's essentially the same thing, but it has an improved formula for long-lasting shine. This material is also more convenient for the dentist to use, which will make the procedure faster.
Filtek Ultimate - instructions for use
Preparation
- Cleaning : To remove plaque, teeth must be cleaned with a water-pumice suspension.
- Shade selection : Before isolating the tooth, using the standard VITAPAN Classic shade scale, select the appropriate shade(s) of the Filtek Ultimate restoration material. The correct choice of shade can be ensured if you follow the recommendations below. 2.1 Shade: Teeth are not uniform in color. The tooth can be divided into three areas, each of which will have its own characteristic color. a) Subgingival area: Restorations in the subgingival area are made from material of a yellow shade of varying intensity. b) Middle part of the tooth: Restorations in the middle part of the tooth are made of material of grey, yellow or brown shades of varying degrees of intensity. c) Incisal region: The incisal edge may have blue or gray tints. It is also necessary to ensure harmony of this translucent area with the middle translucent part of the tooth being restored and the neighboring teeth. 2.2 Restoration depth: The color intensity of the restoration material depends on its thickness. Suitable shades should be selected according to the shade scale from that part of the hint scale that coincides in thickness with the thickness of the proposed restoration. 2.3 Test: Apply the selected shade of restorative material to an unetched tooth. Model the material in such a way as to create a model of approximately the same thickness and area as the restoration. Polymerize. Evaluate the consistency of the shade when illuminated by different light sources. Remove the restorative material from the unetched tooth using an excavator. Repeat this procedure until you achieve an acceptable shade match.
- Insulation : The preferred method of insulation is a rubber dam. You can also use cotton swabs and a saliva ejector.
Direct restorations
- Cavity preparation: 1.1 Filling the anterior teeth: prepare the tooth in the usual way as for any class III, IV and V restoration. 1.2 Filling the posterior teeth: prepare the tooth. The corners formed during preparation should be rounded. Remnants of amalgam or lining material must not be allowed to remain inside the prepared cavity; this will interfere with the passage of light and, accordingly, the hardening of the restoration material.
- Pulp Protection: If pulp exposure has occurred and if the situation requires direct dental pulp protection, a minimal amount of calcium hydroxide should be used at the exposure site followed by a light-curing glass ionomer liner, Vitrebond or Vitrebond Plus from 3M ESPE. Vitrebond liner material can also be used to line deep areas of a cavity.
- Installation of the matrix: 3.1 Filling of the anterior teeth: Plastic strips or crown molds can be used to save the material used. 3.2 Filling posterior teeth: Place thin soft metal or a plastic or metal precontoured matrix of the desired shape and secure the wedges tightly. Polish the matrix strip to reveal the proximal contour and contact area. Shape the strip so that it covers the gingival area to prevent overhanging edges. Note: If desired, the matrix can be installed after etching the enamel and applying the adhesive.
- Adhesive System: Follow manufacturer's instructions for etching, pre-treatment, adhesive application and curing, such as 3M ESPE (Single Bond 2) adhesives.
- Dispensing of composite material: Extract the required amount of Filtek Ultimate restorative material onto the mixing pad by slowly turning the syringe handle clockwise. To prevent material from flowing out after the required amount has been withdrawn, turn the syringe handle half a turn counterclockwise and the flow will stop. Immediately close the syringe with the cap. If the extracted material is not used immediately, it must be protected from light.
- Application: 6.1 Apply Filtek Ultimate restorative material in layers and light cure as indicated in section 7. 6.2 The cavity should be slightly overfilled so that the composite overlaps the edges of the cavity. Shape the restoration with a suitable tool designed for working with composite materials. 6.3 Avoid intense light entering the work area. 6.4 Recommendations for filling the posterior group of teeth: a) To improve the modeling, the first layer 1 mm thick can be added and modeled to the proximal part. b) A plugger (or similar device) can be used to model the material to all sides of the internal cavity.
- Polymerization: Polymerization of Filtek Ultimate is provided under the influence of light from a halogen or LED lamp with a minimum intensity of 400 mW/cm² in the range of 400-500 nm. Cure each layer of material by illuminating its entire surface with high intensity light from a source such as the 3M ESPE Light Curer. During irradiation, keep the light guide as close to the material to be cured as possible.
- Shaping: Contour the surfaces of the filling by grinding with diamond or carbide finishes, burs or stones. Shape proximal surfaces using Sof-Lex sanding strips made for 3M ESPE materials.
- Correction of occlusion: Check occlusion with articulation paper. Check the center and side contacts while driving. Carefully adjust the occlusion, removing excess material with a fine-grit diamond bur or stone.
- Sanding and Polishing: Polish using the Sof-Lex Sanding and Polishing System.
Indirect restorations (inlays, onlays or veneers)
- Medical step 1.1 Shade selection: Before insulation, select the appropriate shade(s) of the universal Filtek Ultimate restorative material. If the restoration has sufficient depth, it is recommended to use a dentin shade. The use of a transparent shade on the occlusal surface will help achieve an aesthetically pleasing restoration. 1.2 Preparation: Prepare the tooth. 1.3 Taking an impression: After completing the preparation, take an impression of the prepared tooth following the manufacturer's instructions for the selected impression material.
- Laboratory step 2.1 Fill the prepared impression with plaster. If the impression is obtained using the one-step “triple tray” method, then pins must be installed in the prepared area at this time. 2.2 Separate the model from the impression after 45-60 minutes. Place the pins in the model and position it as you would for a standard crown or bridge installation. Place the model with the model of the opposite jaw in a suitable articulator. 2.3 If the second impression is not obtained, cast a second model using the same impression. This model should be used as a working model. 2.4 Cut the model of the prepared tooth with a laboratory saw and remove excess or open the edges so that they can be easily processed. If necessary, mark the edges with a red pencil. If required, coat with insulating varnish at this point. 2.5 Saturate the die with water, then use a brush to apply a very thin layer of separator to the prepared tooth model, dry it somehow, and then apply another thin layer. 2.6 Apply the first portion of Filtek Ultimate to the bottom of the prepared tooth model, staying close to the edges, and then cure as recommended in the Direct Restoration section (Step 7). 2.7 Apply and polymerize the following portions of the Filtek Ultimate composite. Apply the last portion (incisal), capturing the contact areas. 2.8 Place the die back into the articulation arch. Add the final portion of composite to the occlusal surface. Provide slight overfill on the mesial, distal and occlusal sides. This will ensure the creation of mesiodistal contacts and proper occlusal contact when closing the opposite jaw with an uncured layer of translucent material. Cure with light for ten seconds only and then remove the model to prevent adjoining surfaces from sticking together. Complete the curing process, following the processing times specified in the Direct Restoration section (Step 7). 2.9 Once the occlusal contacts have been created, begin removing excess composite around the contact areas. Shape the cusps and ridges in accordance with the anatomy of the remaining occlusal surfaces. 2.10 Care must be taken when removing the prosthesis from the model. Break off small fragments of the model around the restoration; The plaster must be carefully removed from the cured restoration until the restoration is completely exposed. 2.11 Using the original model, check the design for shine, undercuts and fit. Adjust as necessary and then polish as described above in steps 8-10 of the direct restoration section.
- Clinical step 3.1 Roughen the inner surface of the denture. 3.2 Clean the denture with soapy water in an ultrasonic bath and rinse thoroughly. 3.3 Cementing: Cement the structure using a 3M ESPE Composite Cement System in accordance with the manufacturer's instructions.
Our clinics
Clinic "Elident" on Varshavskaya
Varshavskoe highway, 75, bldg. 1, Moscow 117556
- Varshavskaya (500 m, closed until 2021)
- Nakhimovsky Prospekt (1,300 m)
Mon-Sat : 09:00-21:00; Sun : 09:00-19:00.
Online registration
+7 (495) 649-41-19
Elident Clinic in Annino
Varshavskoe highway, 154, building 1, Moscow 117405
- Annino (500 m)
- Academician Yangelya (700 m)
Mon-Sat : 09:00-21:00; Sun : 09:00-19:00.
Online registration
+7 (495) 649-41-19
Advantages of the material
Not every filling material has these advantages:
- The high level of density ensures excellent edge seal.
- Photopolymerizability.
- An alternative for the implementation of multi-layer restorations.
- After use, an excellent aesthetic appearance is guaranteed.
- Easy to polish.
- High level of wear resistance.
- Low shrinkage, about 2%.
- Easy to use, does not stick to tools.
- Large selection of shades.
Having such advantages, the material is very popular among dentists.
Prices for caries treatment
| Service | Price, ₽. |
| Examination of the patient, calculation of the cost of services | for free |
| Light polymer (Light) filling Estelite | 2800 |
| Light-polymer (Light) filling Vitrimer | 2700 |
| Light polymer (Light) filling Filtek | 2500 |
| Fuji glass ionomer cement | 2200 |
| Light-polymer (Light) filling Revolution (for a crown) | 1800 |
| Treatment of average caries MOD Estelite | 4000 |
| Treatment of average caries MOD Filtek | 3800 |
| Treatment of medium caries MOD Fuji | 3500 |
| Grinding the filling | 350 |
| Temporary filling with Septopak medicinal preparations | 550 |
| Temporary filling (dentin) | 300 |
| Temporary light filling Clip | 400 |
| Fuji insulating gasket, revolutionary | 450 |
| Light polymer therapeutic pad | 450 |
| Fiberglass pin | 1600 |
| Anchor pin | 800 |
| Titanium pin | 1500 |
| Additional surface no more than one Estelite | 800 |
| Additional surface no more than one Filtek | 600 |
| Additional surface no more than one Fuji | 500 |
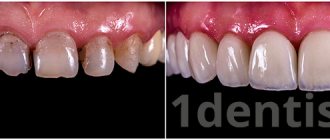
| Aesthetic restoration of anterior teeth according to class III | 3500 |
| Aesthetic restoration of anterior teeth according to class IV | 3800 |
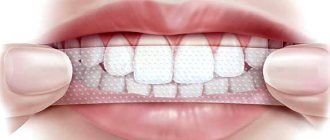
| Clinical/home whitening | 6500-8500 |
Stages of dental filling
- anesthesia for tissue pain relief,
- the area affected by caries is completely drilled out,
- When treating pulpitis or periodontitis, endodontic treatment of the tooth canals is additionally carried out - the dental nerve is completely removed, or if it is slightly damaged, a drug is placed inside the tooth under a temporary filling. Treatment of periodontitis is always carried out in several stages - the product is placed at the base of the dental canals to relieve inflammation of the tissues around the tooth,
- the cavity inside the tooth is treated with antibacterial drugs, disinfected and thoroughly dried. If necessary, a therapeutic pad is placed,
- the filling material is selected according to color, which is especially important when restoring teeth in the frontal area of the smile,
- The filling material is gradually applied to the tooth, carefully compacted inside (so that there are no air bubbles),
- The installed filling is ground and polished, and given the desired shape.
Expert opinion
Elina Ruslanovna Dzagurova Dentist-therapist Work experience 10+
“At the final stage, we invite the patient to take an active part in the treatment process. It is imperative to inform your doctor about the discomfort caused by the filling - this is the only way to fit it perfectly and avoid inconvenience in the future.”
After installing a dental filling
After filling teeth, the patient must follow the following recommendations: refrain from eating for 1.5-2 hours (which is especially important when installing a filling made of a chemical composite, since the material takes time to completely harden). During the day after treatment, it is advisable not to consume foods that can lead to staining of the material.
The durability of the filling depends on the quality of its installation, the tightness of its fit to the tooth and how responsibly the patient monitors oral hygiene: it is necessary to brush the teeth daily and consult a dentist at least 1-2 times a year for a preventive examination and professional hygiene .
Clinical manifestations and diagnosis of superficial caries
Superficial caries is the second stage of initial caries and is characterized by the appearance of a pigmented spot that cannot be remineralized. It has a dirty-grayish color and is often covered with plaque. It acquires its color under the influence of pigments of pathogenic bacteria, and its presence is a sign that the processes of destruction of hard dental tissues have begun. Clinical manifestations of superficial caries are as follows:
- Moderate pain for short periods during which the affected tooth is exposed to thermal, mechanical or chemical irritants;
- When a carious lesion is located on the contact surface of a tooth, inflammatory processes in the adjacent periodontal papilla are often observed, accompanied by swelling and bleeding.
Due to the fact that the symptoms of the disease are not pronounced, patients rarely seek dental care in a timely manner. The disease is detected during preventive examinations, which must be thorough enough for this. When probing the affected tooth, the patient notes pain, and the doctor identifies a shallow cavity filled with softened pigmented enamel.
Indirect restoration
Indirect restoration includes the following stages of work:
- Preparatory work as described above. Selecting the shade and cleaning the surface.
- The tooth is processed for the chosen type of structure.
- The impression is taken.
- A plaster model is made in the laboratory.
- A layer of separator is applied to it so that it can be easily removed.
- As with direct restorations, the composite is applied in layers.
- The design is polished and tried on the model.
- The prosthesis is installed in the patient’s oral cavity and fixed. If revision is necessary, it is returned to the laboratory.
- It is necessary to create a non-smooth surface on the inner surface.
- The prosthesis must be cleaned in soapy water using ultrasound.
- Rinse under running water and dry thoroughly.
- Then the prosthesis is fixed with composite cement.
Some tips for working with Filtek Z250 material:
- Each layer is applied layer by layer.
- For the shade “Filtek Z250” UD, the layer should be no thicker than 2.0 mm.
- Curing time is 20 seconds for shades A1, A2, A3, A3.5, A4, B1, B2, B3, C3, D3, I.
- Each layer should be polymerized.
- Curing time is 30 seconds for shades B0.5, C4, UD.
- Do not create layers thicker than 2.5 mm.
When dealing with modern restoration materials, there are certain rules. This also applies to Filtek Z250. We will consider a description of the subtleties that need to be taken into account when working.
Work technology
Let's consider what the technology for working with the Filtek Z250 material is. The instructions recommend the activities described below.
Preparatory procedures:
- Clean your teeth from plaque. You need to use pumice and water. This will help you determine the color correctly.
- Determine whether there are concomitant diseases and contraindications to the installation of a filling.
- Determine the depth of the restoration. The shade will depend on the thickness of the material.
Typically, the dental plate is divided into three parts:
- Cervical. Use material in yellow shades.
- Average. Yellowish, brownish and gray shades are used.
- Cutting edge. Use blue and gray tones.
For restoration, it is necessary to work with the material to determine the thickness and shape, as well as to select the required shade. A trial application will help you achieve optimal results.
Next, the tooth is isolated from the gum and cheek. To do this, use a rubber dam or cotton rolls with a saliva ejector.
Recommendations and warnings
The presence of polymer resins in the Filtek composite requires careful handling of the material. It is necessary to ensure that the substance does not come into contact with the skin , so manufacturers recommend carrying out the filling procedure with gloves and carefully isolating the soft tissues of the patient’s oral cavity.
If the composite comes into accidental contact with your skin, you should immediately wash your hands with plenty of water. Contact of a substance with a glove requires removal of the glove, washing of hands with soap and use of a new pair of gloves.
Filtek filling material must be stored in tightly closed syringes for 3 years from the date of manufacture.
To ensure that the quality characteristics of the drug are preserved, exposure to direct sunlight should be avoided.
Preparatory activities
Working with the proposed composites requires certain preparatory work.
The first step is standard brushing of teeth using normal hygiene products. Then the dentist performs a complete sanitation of the oral cavity. It includes treatment, inflammation removal and professional cleaning.
The final stage of preparation is the correct selection of the shade of the proposed filling. It is executed in the following order:
- Dividing the tooth into segments. The body of the tooth has some heterogeneity in color tone in different areas.
To reconstruct it correctly, the entire area is divided into 3 segments. Each of them is filled with a composite that matches the color for the given area.The area near the neck of the tooth is restored with yellow material. For the middle, composites of gray, yellow or brown color are used. The upper (incisal) border is made in grayish or blue shades.
- Selection of shade. The color and its saturation of each of these areas is checked using an auxiliary color scale, corresponding to that part of it that is identical to the thickness and color of the desired area of the tooth.
- Checking the correct selection. To control the correct choice of shade, the composite is applied to the desired location.
After its polymerization, a visual assessment is made using different types of light. If necessary, adjustments are made until the desired effect is achieved. - Isolation and protection of the treated area from other teeth is carried out using a latex napkin (rubber dam). If it is not available, then the use of cotton swabs or a saliva ejector is used.
This concludes the preparatory work before the restoration of damaged surfaces begins. It must go through the full cycle, regardless of which method of tooth reconstruction is chosen.