Taking an impression is the most important stage of many dental procedures: diagnostic, orthodontic (bite correction), orthopedic (crowns, bridges, implantation, cosmetic restoration of teeth).
If we use an analogy with photography, a cast (impression) is a negative photograph of the dentition, with all its advantages and disadvantages. Only it is not flat, but three-dimensional, three-dimensional. By filling this three-dimensional negative with plaster or other special material, using it as a mold, the dentist receives a three-dimensional model of the upper or lower jaw.
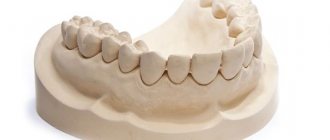
The purpose of a diagnostic cast is to create a model of the dentition. Not all the necessary information can be obtained by examining the oral cavity. The model will allow the dentist to understand and take into account the individual characteristics of the position of the teeth, dental arches, possible anomalies (for example, diastema - a gap between the teeth, etc.), tissue relief and much more.
Once the impression is received, it is sent to the laboratory, filled with plaster and a diagnostic three-dimensional model is obtained, usually of both jaws. Both jaw models are installed in a special device (articulator), which simulates the movements of the jaws during chewing.
The diagnostic model is useful when communicating between a doctor and a patient, because you can clearly demonstrate existing problems and jointly discuss a way out of the situation. Using the model, you can explain to the patient the validity of a particular decision made by a doctor. You cannot do without a diagnostic model when correcting your bite or making prosthetics.
Materials and types of diagnostic casts
Materials
To obtain a diagnostic impression, medical plaster and more modern plastic materials (thermoplastic and elastic masses) are used, which are able to acquire the shape of the dentition and maintain it.
All materials from which the impressions are made do not cause allergies. They are divided into several types:
- Hard (gypsum, dentol). They reproduce the texture of fabrics well, are easy to use, but are excessively rigid. Because of this, imprints of areas of the tooth located closer to the gum are not always successful.
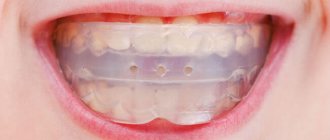
- Elastic (silicone, alginate, etc.). To enhance the strength of the impression mass, special fillers are added to it. When heated, such an impression mass becomes softer and recreates the contours of tissues well. Disadvantage: elastic impressions are not suitable for long-term storage, unlike hard ones. For example, silicone impressions shrink within 3 hours after the impression. The model must be manufactured strictly within this period of time.
- Thermoplastic (gutta-percha, Kerr mass). The material becomes plastic when heated and hardens after cooling. Advantages of this type of casts:
- good separation from plaster during model making;
- Possibility of repeated administration into the oral cavity.
Types of casts
Compression . Made for the lower jaw. Purpose - to determine the distribution of load during chewing for the future prosthesis. Requires materials of high viscosity.
Unloading . They are used in the preparation of prosthetics for people whose activities are related to oral speech. When chewing, the load will be distributed unevenly.
Combined . With their help, dentures are made that evenly distribute the load both during eating and when talking.
Clinical examination
Before deciding to make a complete denture, you must undergo an examination and consultation with an orthopedic dentist. He examines the oral cavity and collects anamnesis. Diagnostics are carried out to identify the following problems:
- remains ;
- the presence of inflammatory processes, exostoses;
- the presence of other oral diseases
It is necessary to conduct a conversation with the patient to find out previous experience in wearing prostheses. If the answer is positive, it is necessary to find out whether it was comfortable to wear the prosthesis, whether psychological or physiological discomfort was observed.
Then the doctor needs to find out the extent of the disorder in the bone and soft tissue of the jaw; X-rays are used for this.
In rare cases, surgery is used to extract teeth growing in the wrong direction or to remove the alveolus of a tooth.
With the help of a clinical examination, it is possible to achieve the production of a perfectly fitting, high-quality prosthesis.
Taking a diagnostic impression
The oral cavity must be prepared
Having agreed with the patient on the type of prosthesis, selecting the materials for the impression and the necessary tools, the prosthetist begins the procedure of taking the impression. It begins with an examination of the oral cavity and determining whether individual teeth require extraction or treatment.
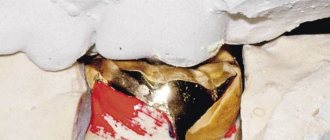
If there are bone growths (exostoses) in the place of the former lateral chewing teeth, the doctor will have to remove them. The oral cavity is thoroughly dried with cotton swabs or a special dental gun. Now it’s time to start selecting a spoon, an instrument with which the impression mass is introduced into the oral cavity.
Spoon selection
Selecting a tray is an important step as there are several types of impression trays. They differ:
- Size . For jaws and dentition of different lengths, sizes and shapes, teeth of different heights, a suitable spoon is required. A standard set of spoons is not suitable in all cases. Sometimes you have to make a spoon individually.
- Material. Spoons come in metal and plastic, with different hardnesses.
- By appointment . A special tray is used to take an impression of the lower or upper jaw.
- A type of cast . Separate trays are provided for compression and decompression (without pressure on the gum) impressions.
Preparing the impression material, applying the material to the tray and taking the impression
Having selected the correct spoon, the prosthetist begins mixing the impression mass. The prepared mass is placed on a spoon, then, using a spoon, into the oral cavity. The spoon is positioned and pressed first in the area of the chewing teeth, then in the frontal teeth. Without waiting for hardening, the prosthetist removes the spoon from the mouth very carefully so as not to damage the impression.
Two-stage and one-stage method of taking an impression
With the two-stage method, the impression is made in two steps. First, the main impression material is introduced, the first impression is made, and dried. Then a corrective composition is applied to it and the impression is made again.
The one-step method involves simultaneous application of the main mass and the corrective composition to the spoon.
The finished impression remains to be washed, disinfected and sent to the denture laboratory for the production of a diagnostic model.
Indications
An individual tray in dentistry is used in the following cases:
- complete loss of teeth, partial edentia with the absence of a large sector of lost units;
- it is necessary to obtain high-precision impressions;
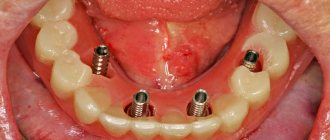
- production of crowns installed on implants of various types;
- with jaw deformities, which makes it difficult to use a standard type spoon.
Optimal choice
As already noted, the open tray method gives a more accurate result than the closed tray method, since the transfer is not removed from the impression and is in the optimal position. Therefore, an open tray is used in the manufacture of prosthetic structures that rely on a significant number of implants, or when they are not parallel.
A closed tray is used for prosthetics of small defects with a small number of parallel implants.
A more detailed list of differences between closed and open spoons is given in the table below.
| Parameter | Closed spoon | Open spoon |
| Clinical picture | Single and parallel implants. Implants in the distal segment. | Multiple and non-parallel implants. |
| Advantages of the method | Quick impression taking. | High accuracy. |
| Flaws | Possibility of damage to the impression when installing transfers. Mandatory requirement for parallelism of implants. | The duration and complexity of taking an impression. A gag reflex is possible when taking an impression. Difficulties in taking impressions in the distal segments due to poor access and long transfers. The patient needs to open his mouth wide; it is impossible to do this with TMJ diseases. |
Making a working model, adjusting and fixing the central relationship between the jaws
This stage is described in great detail in Tony Johnson's manual, “Methods for making complete removable dentures.”
Occlusion is the correct closure of the teeth of the lower and upper jaw, on which chewing and the correct pronunciation of sounds depend.
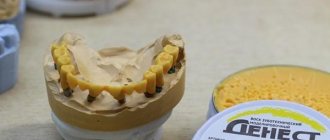
The working model is an exact copy of the patient’s jaw. It not only completely restores the dentition, but also restores the correct contour of the patient’s face. For this purpose, special wax bite ridges are manufactured in the laboratory, which must meet the following requirements:
- ensure complete fit to the model;
- coincide with the previously outlined boundaries for prostheses;
- be of the same thickness;
- have a rounded edge.
After achieving this result, they begin to fix the central relationship of the jaws, namely the position of the lower jaw in relation to the upper.
Making a custom spoon
The initial impression of the jaws is made by an orthopedist using a standard tray. Based on the initial impression, the dental technician designs a custom tray. Its production requires the use of various techniques: wax, gypsum, using polystyrene sheets or plexiglass.
For an individual impression, plaster, thermoplastic material or impression elastic substance is used. The selection of mass will depend on the condition of the soft tissues of the patient’s jaw.
To make an individual wax spoon, you need to draw clear boundaries on a plaster model. After this, the heated plate of dental wax is tightly pressed with a plaster mold on both sides. Excess edges are removed with a hot spatula, along the previously measured border. Using a spirit lamp or gas torch, shape the edges of the spoon.
The wax tray does not make it possible to obtain an impression under pressure. For these purposes, a rigid plastic spoon is being developed.
Stages of clinical and laboratory manufacturing
The production of dentures occurs in close cooperation between an orthopedic dentist and a dental technician. Clinical stages are closely intertwined with laboratory ones, that is, after the first degree of clinical study, the laboratory work phase follows. This interaction occurs until the final production of the structure with its application.
Let's figure out which removable dentures are better
The following stages of manufacturing complete removable dentures are distinguished:
- taking anatomical impressions using a standard tray and impression material;
- production of individual spoons for plaster models;
- adjusting an individual tray, taking functional impressions with it;
- making a working model from a wax base with occlusal ridges;
- regulation, fixation of the position of the upper jaw in relation to the lower jaw using rollers;
- production of acrylic teeth on a future prosthesis;
- placing a prosthesis on the jaws to check fit, occlusion, and aesthetic appearance;
- final production of the prosthesis;
- fitting and application of the finished structure. If the patient experiences discomfort or inconvenience, the prosthesis is sent to the laboratory for revision;
- final delivery of the work to the client.
If, after the final delivery of the prosthesis, the patient feels that the prosthesis does not fit him perfectly, then he can always send it to the laboratory for revision. Modern technology for manufacturing removable structures allows for modifications at any stage of formation.
Custom tray fitting and functional impressions
After making an individual spoon, you need to store it. This procedure refers to the precise fitting of the original structure to the patient's jaw. To do this, the doctor uses the following tests:
- opening the mouth as wide as possible;
- swallowing;
- licking the upper and lower lips;
- the ability to stick out your tongue and reach the tip of your nose;
- trying to suck something;
- the ability to move the tongue along the cheeks and upper palate.
After each test, the location of the spoon is examined. If it rises, it is shortened in a strictly defined area.
Then move on to the next test. Testing is carried out until the initial structure fits snugly to the jaw during any movement. Only after this can you begin to obtain a functional impression.
It has certain requirements:
- clear imprints of jaw tissue and transitional folds;
- same thickness;
- absence of mucus , saliva, voids and pores;
- lack of gaps;
- presence of a rounded edge.
Only after achieving these indicators, trays with impressions can be transferred to the laboratory for the production of wax bases and a functional impression.