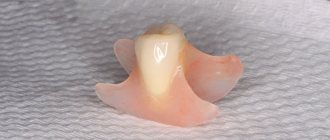
Complete removable prosthetics. Average anatomical setting of teeth mas
Complete tooth loss directly affects a person's quality of life. And we are talking not only about the loss of a vital function of the body - chewing food - and restrictions in its choice, but also no less serious consequences for a person’s social status:
- poorly chewed food leads to various diseases of the gastrointestinal tract;
- impaired articulation and diction affects communication abilities;
- a change in appearance occurs: the chin moves forward, the lips lose their natural color, become pale pink and fall inward, thereby forming large wrinkles, the face takes on an unpleasant appearance;
- a person’s self-esteem decreases;
- the nervous system suffers.
Clinical and laboratory stages of manufacturing complete removable dentures
The mission of complete removable prosthetics can be defined not just as the production of prosthetics, but as the return to a person of his own “I”. The most effective achievement of the goal is possible only in the case of close cooperation between the dentist and the dental technician. Only by making maximum joint efforts and efforts can we return the patient to a full life and help him regain self-confidence.
Pre-forming The initial or preliminary impression is made with a standard tray.
Individual tray In order for the tray to have enough mass for an individual (functional) impression, the comb is filled with wax approximately one to two millimeters thick. This creates a place for the impression mass (Fig. 1 a, b).
Place for impression material (Fig. 1a)
Place for impression material (Fig. 1b)
Functional molding A prerequisite for a well-functioning, complete removable denture is the formation of the functional edges of the denture, the so-called valve zone. The transitional fold between the hard and soft mucosa, as well as all adjacent muscles, folds must be clearly imprinted on the functional cast (impression) (Fig. 2).
Functional molding (Fig. 2)
Individual model An individual model is cast from supergypsum (Fig. 3 a, b). In this case, you need to pay attention to the fact that the edges, cusps of the upper jaw and retromolar triangles are completely cast, otherwise the models are considered unsuitable for the manufacture of complete removable dentures. To prevent this from happening, you need to once again mark the border with a marker - approximately five millimeters from the edge of the spoon (Fig. 4).
Individual model made of supergypsum (Fig. 3a)
Individual model made of supergypsum (Fig. 3b)
Functional molding (Fig. 4)
Functional molding (Fig. 5)
The impression mass is cut along the drawn border and a strip of plasticine or wax is attached. Then an individual model is cast (Fig. 4).
Individual model (Fig. 4)
When processing the model, the transition between the hard and soft mucosa should be clearly visible on the model and should not have any damage. Making bite ridges (Fig. 7 a, b).
Making bite ridges (Fig. 7a)
Making bite ridges (Fig. 7b)
Determination of the bite Determination of the bite and markings on the bite ridges are performed by a dentist without the participation of a dental technician (Fig. 8).
- middle line.
- smile line
- line of the occlusal plane, or line of closure.
- fang location lines.
Determination of bite (Fig. 
Average anatomical articulation of models with ARH The articulator (Fig. 9) sets the average anatomical parameters, Bennett angle and articular path inclination. The articulator stop pin is set to zero. The ARH is then inserted into the articulator (Fig. 10). The marks on the model showing the occlusal plane are transferred to the occlusal ridges in the area of the retromolar cusps (Fig. 11). The occlusal ridges are inserted into the ARH as follows: from the vestibular side, we focus on the point of the incisors, which is pointed at by the incisal needle (Fig. 12). The incisor point is the intersection point of two lines: the line of mouth closure - the occlusal line and the midline of the face. On the buccal side, the occlusal plane passes through the point of the incisors and the upper quarter of the retromolar cusps (Fig. 13). Plastering of models begins with the top model. The upper model is placed in the installed device with occlusal ridges and plastered (Fig. 14). The ARH is removed from the articulator, the articulator is turned over, the mandibular model is placed and then cast (Fig. 15). ARH allows you to quickly and accurately plaster models into the articulator, ensuring compliance with all the rules of average anatomical articulation of the model (Fig. 16).
rice. 9
Figure 10
rice. eleven
rice. 12
rice. 13
rice. 14
rice. 15
rice. 16
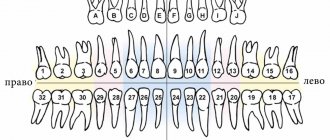
Analysis of models and selection of teeth The correct selection of teeth for the patient is of no small importance. Photographs of the patient taken earlier in his life can help. If there are no photographs, the dentist can make the right choice based on the shape of the patient’s face, the width of the nose, and the shape of the patient’s mouth. It is also very important to determine the optimal enamel color for the patient. If this data is not available, it will be more difficult for the dental technician to make a choice. In this case, correct analysis of the models and knowledge of the average anatomical ratio of the models can help.
Analysis of models The models mark points and places that remain unchanged during atrophy. The dental technician should focus on these points. There are several types of model analysis. Each author of one or another method of setting teeth adds something of his own, but they all rely on a common basis for analyzing the model, and this knowledge is quite enough to perform the work in a high-quality manner. At the same time, analysis of the model of the lower and upper jaws is equally useful for the dental technician. When setting teeth, the technician himself chooses which model to start with. In this case, the setting of teeth begins with the lower jaw.
Analysis of the lower jaw model (Fig. 17)
Analysis of the lower jaw model (Fig. 17):
- transitional fold.
- alveolar ridge.
- positions of the lower canines.
- retromolar cusps.
- middle of retromolar cusps.
- occlusal plane marks.
- guide line for setting lateral teeth.
- guide line for setting the anterior teeth.
- line of transitional fold in the vestibular part.
Application The transitional fold indicates the border of the future prosthesis. The alveolar ridge indicates where the teeth should be placed. The central fissures of the lateral teeth of the lower jaw should pass exactly in the middle of the alveolar ridge. The positions of the lower canines help in choosing the width of the dental set and determine the placement of the lower canines. The shape of the dentition of the anterior teeth of the lower jaw is measured by the Bonvel circle, and the lower canines influence the size of this circle. The medial edge of the canines and the lingual edge of the retromolar cusps form one line (Poundsche Lineia). This line serves as the boundary for the lingual cusps of the lateral teeth of the lower jaw. Violation of this boundary leads to the fact that the patient will constantly bite his tongue when opening and closing his mouth. Retromolar cusps. The upper quarter of the retromolar cusps indicates where the occlusal plane lies. These marks lie at the same level as the occlusal plane marks on the articulator and at the level of the incisal needle. The distal border of the retromolar cusps is the border of the prosthesis. Midpoint of the retromolar cusps from these points: The midpoint of the model is measured if desired by the technician and this helps with identifying the upper quarter of the retromolar cusps. Occlusal plane marks help in articulating and positioning teeth. This is the contact point of the distolingual cusp of the seventh molar. The first and second frontal teeth are placed on the orientation line for setting the frontal teeth. The line of the transitional fold in the vestibular part determines the boundary of the vestibular surface of the anterior teeth. For subsequent orientation when setting teeth, the marks of the occlusal plane, the orientation line for setting the lateral teeth, the line for setting the anterior teeth and the line of the transitional fold in the vestibular part are transferred to the edge of the model.
Analysis of the upper jaw model (Fig. 18)
Analysis of the upper jaw model (Fig. 18):
- transitional fold.
- alveolar ridge.
- tubercles of the upper jaw.
- A-line.
- first large palatal folds.
- incisive papilla.
Analysis of the upper jaw model differs from the analysis of the lower jaw in that here it is necessary to calculate the positions for setting the teeth. If the setting of the teeth begins with the lower jaw, then the setting of the upper jaw is adjusted to the lower jaw. If the setting of teeth begins with the upper jaw, it must be taken into account that with atrophy, the upper jaw becomes smaller and atrophies inward, and the lower jaw atrophies outward and becomes larger and wider, thereby making the setting of teeth more complicated. Selecting the shape and size of teeth Classic selection of teeth remains the best and most reliable method. This method uses models made before the teeth were removed, as well as photographs of the patient smiling.
Selecting the size of teeth using the marks on the occlusal ridges The length and width of the teeth can be calculated from the marks on the occlusal ridges (Fig. 19). The length of the teeth is determined by the distance from the line of mouth closure to the smile line, by the width from the middle of the face to the line of the canine or from canine to canine. The size information is on the teeth bars.
Markings on the occlusal ridges (Fig. 19)
When the dimensions of the front teeth, for example, the lower jaw, are known, it is very easy to correctly select the front and lateral teeth of the upper jaw using the table. For example, for the lower anterior teeth I3, the suitable front teeth would be the upper jaw teeth 33 and the lateral teeth T2 or T3 (Table No. 1).
Selection table for anterior and posterior teeth
With the sizes selected from the table, it is very easy to correctly position the teeth, since they are specially made for each other. The example table is from Primodent.
Teeth alignment according to the mas system; average anatomical teeth alignment
The MAS system includes average anatomical parameters of jaw relationship and tooth alignment. The system consists of two parts:
- ARH (Fig. 20). With the help of ARH, models are articulated into the articulator according to the average anatomical parameters of the jaw relationship in such a way that it remains possible to use the second part of the AFH for setting teeth.
- AFH. With its help, teeth are positioned (Fig. 21).
ARH (Fig. 20)
AFH (Fig. 21)
Teeth setting Teeth setting according to the MAS system begins with the lower jaw. The AFH is installed in the articulator (Fig. 22).
rice. 22
Then the mandibular model is installed in the articulator and the AFH is set based on the analysis of the model. Horizontal guides, pointing to the occlusal plane in the vestibular part, are installed on the canine points (Fig. 23).
rice. 23
In the dorsal part, they are aligned along the marks indicating the middle of the alveolar ridge, touching the retromolar triangles. The lower part of the vestibular plate should face the transitional fold (Fig. 24).
rice. 24
Placement of anterior teeth The first and second anterior teeth of the lower jaw are installed exactly in the middle of the alveolar ridge, without extending the labial plane beyond the middle of the transitional fold. When viewed from the vestibular side, they stand straight and the incisal edge is flush with the occlusal plane; on the incisal side, they are slightly rounded, thereby forming the beginning of the Bonvel circle. The third tooth or canine is placed half a millimeter above the incisal edge of the first and second teeth, the neck of the three is pulled outward and forms an inclination of the tooth. The distal edge should face the buccal border of the retromolar triangle. On the vestibular side, the triplets are slightly inclined inward; on the incisal side, they continue the Bonvel circle and from the distal edge to the buccal border of the retromolar triangle they form a guideline along which the buccal cusps of the chewing teeth are aligned. From the medial edge to the lingual border of the retromolar triangles there is a Pounchet line indicating the border of the lingual cusps of the posterior teeth.
Positioning Teeth with AFH Once the AFH has been placed in the articulator, it is opened and the anterior teeth are positioned from the incisal point (middle) to the right and left. The first and second ones are placed with the cutting edge on the vestibular plate, and the threes are placed with the tip in the angle formed between the vestibular plate and the horizontal guide. The teeth are then lightly secured with wax (Fig. 25).
rice. 25
The articulator is closed and the teeth are molded with wax to the model (Fig. 26 a, b).
rice. 26a
rice. 26b
The articulator opens, and the placement of the anterior teeth is obtained according to all average anatomical rules (Fig. 27 a, b).
rice. 27a
rice. 27b
Positioning of chewing teeth The first premolar is installed with the buccal cusp at the level of the horizontal guides, and the central fissures pass exactly under them (Fig. 28 a, b). Second premolar (Fig. 29 a, b). First molar (Fig. 30 a, b). Second molar (Fig. 31 a, b).
rice. 28a
rice. 28b
rice. 29a
rice. 29b
rice. 30a
rice. 30b
rice. 31a
rice. 31b
All teeth are positioned correctly, in compliance with all the necessary rules of average anatomical setting (Fig. 32 a, b).
rice. 32a
rice. 32b
The MAS system allows the dental technician to perform tooth alignment very easily, quickly and accurately. Another huge advantage of this system is that once the placement is completed, a silicone key is made on the posterior teeth (Fig. 33).
rice. 33
The silicone key makes it possible to make the next placement with the same teeth sizes even faster. The teeth are simply inserted into the silicone key (Fig. 34).
rice. 34
The silicone key is placed on the horizontal guides, and the teeth are molded to the model with wax. Thus, all subsequent work will take even less time (Fig. 35 a - c).
rice. 35a
rice. 35b
rice. 35v
Installation of ARH in the articulator The articulator is set according to the average anatomical parameters. An incisal needle is inserted into the thrust pin, the ARH is secured with rubber bands, aligned to the marks in the articulator in the center of Bonvel's equilateral triangle and plastered (Fig. 36 a - c).
rice. 36a
rice. 36b
rice. 36v
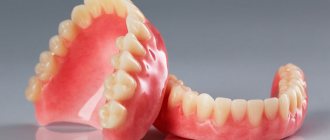
Finished dentures (Fig. 37 a - c).
rice. 37a
rice. 37b
rice. 37v
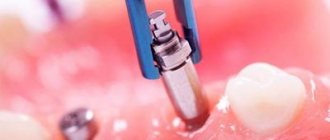
Indications and contraindications for use
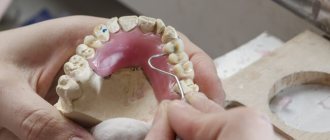
Partial removable dentures are used in cases where the jaw is missing only a few teeth, but there are own healthy teeth that will be used as supporting teeth. Suitable for restoring both chewing and front teeth. The use of removable partial dentures is recommended in the following cases:
- missing several teeth;
- end defects of the jaw;
- atrophied bone tissue;
- the need for temporary prosthetics;
- contraindications to the installation of implants.
There are practically no contraindications to this type of prosthetics, and they are all temporary. These include viral diseases, carious lesions of teeth and periodontal tissue diseases.
Partial dentures - reviews from specialists and patient opinions
In general, reviews of removable dentures from patients and doctors are positive. If there are contraindications to the installation of fixed structures, removable prosthetics are the only treatment option.
However, experts are confident that if there are no restrictions on implantation, the choice should be opted for prosthetics on implants. This option is the most preferable in terms of longevity, aesthetics, safety and prevention of bone atrophy.
Rules for wearing and caring for prostheses
The first time after installation, removable dentures can cause discomfort. As a rule, it goes away by the end of the first week. In some cases, especially when using plate structures, addiction can last up to 3 weeks.
To speed up adaptation, there are general rules and recommendations: rinse your mouth with warm water more often, do not overload the denture with solid food for the first 3-4 days.
Carefully monitor hygiene, rinse your mouth after every meal, and beware of excessive chewing loads. For cleaning, you should not use abrasive cleaners; give preference to special solutions and pastes.
What is the cost of a partial denture?
First of all, the price varies depending on the type of prosthesis and the number of lost teeth. Many are sure that a high-quality prosthesis cannot be very cheap. So what does its cost consist of?
The material of construction plays a big role in pricing. Modern dental clinics work with proven compounds for the manufacture of structures. This guarantees the quality, aesthetics and durability of the product.
All designs are made individually, based on the characteristics of the jaw structure, patient preferences and doctor’s recommendations.
Professionalism of staff and technical equipment. The experience of an orthopedist and dental technician, as well as high-tech equipment, is very important, so the price tag also adds up in terms of costs.
The most frequently asked questions about partial dentures
Is an allergy possible? How long does it take to get used to? Do you need fixing gels when wearing? You can find out the answers to these and other most popular questions in this section of the article.
— Is it possible to have an allergic reaction?
Is it possible. As a rule, an allergy can occur to acrylic when wearing plate dentures. Or on metal if wearing a clasp design. Before installing a prosthesis, a doctor may recommend that particularly sensitive people undergo a special test for sensitivity to materials.
— How long does it take to get used to it?
Sometimes it can take up to 3-4 weeks to get used to it. This usually applies to plate dentures, since they are more noticeable in the oral cavity. Clasp designs do not require so much time.
— Do I need to use fixing gels when wearing partial structures?
Partial structures do not require additional fixation, since they already have fastenings (hooks or clasps).
— Do I need to take off my dentures at night?
It is not at all necessary to remove the structure at night. It is not even recommended to remove the prosthesis for the first 3-4 weeks after installation, since there is an adaptation period. Further, at the discretion of the patient.
— Are there any restrictions when wearing?
Avoid eating excessively hard foods such as nuts or ice. It is also not recommended to eat foods that are too viscous and stick to artificial teeth.