In dentistry and orthopedic practice, special types of medical plaster are one of the most common auxiliary materials. In the catalog of offers, which supplies equipment and materials from the world's best manufacturers, dental plaster is represented by the products of the international group of companies Saint Gobain Formula. Samples from the “FORMULA” line of dental plaster, varied in purpose and physical characteristics, of high quality and affordable price, are used in their work by specialized specialists around the world.
In dentistry and orthopedic practice, special types of medical plaster are one of the most common auxiliary materials. In the catalog of offers, which supplies equipment and materials from the world's best manufacturers, dental plaster is represented by the products of the international group of companies Saint Gobain Formula. Samples from the “FORMULA” line of dental plaster, varied in purpose and physical characteristics, of high quality and affordable price, are used in their work by specialized specialists around the world.
Features of production, chemical and physical properties
Explored deposits of gypsum were formed in nature as a result of natural soil filtration of solutions of sulfate salts and weathering of rocks rich in sulfates. For medical use, mineral gypsum, which is an aqueous calcium sulfate salt CaSO4x2H2O, is converted into a “semi-aqueous” state (CaSO4)2xH2O by firing. Crushed gypsum hemihydrate is able to intensively absorb moisture and quickly hardens, returning to the state of a solid mineral.
To obtain gypsum hemihydrate suitable for medical purposes, the extracted natural mineral is crushed using crushing machines and gypsum mills to a homogeneous powder of the finest fractions. At the next stage of the technological process, gypsum is loaded into special ovens and kept at high temperatures for 10-12 hours. By changing the parameters of the firing process, it is possible to obtain gypsum hemihydrates of various strengths and hardening times:
- “α ” gypsum is a dense substance characterized by lower water requirements, but longer setting times and high strength. In the specialized literature, gypsum that is fired at high pressure and temperature in the range of 110°C-115°C is sometimes called autoclave or supergypsum.
- “β ” gypsum is a material with a more developed capillary-porous structure, high water demand and accelerated setting, but lower resulting strength. It is produced at normal atmospheric pressure by firing crushed minerals at temperatures ranging from 95°C to 105°C.
During the production process, harmless natural dyes and modifying additives can be introduced into the composition of crushed mineral raw materials, which can further improve the physical properties of gypsum and, to some extent, change the setting time. This is important, since when mixed with water, gypsum hemihydrate quickly turns into a dihydrate state and hardens, and in many cases it is more convenient to work with a material that has the property of prolonged elasticity and a longer molding time.
Hand kneading technology
You can get a high-quality plaster cast only if you follow the mixing sequence:
- Distilled water is poured into a special bowl, the amount of which is determined by the class of the powder.
- Gypsum powder is slowly poured into the liquid. According to standards, about 10 seconds should pass from the start of contact of the first particles with water to the end of falling asleep.
- After this, you should wait until the particles are completely immersed in water and only then start mixing with a metal or plastic spatula.
- Movements should be as energetic as possible. The consistency of the complete mixture is creamy and homogeneous.
If too much water is added, the plaster will only absorb the amount it needs. The remaining water will quickly make the structure of the material loose and reduce the accuracy of the impression. Not the best solution would be to add less liquid than required by the technology for producing the mixture. Thick plaster does not make it possible to obtain an accurate imprint due to the formation of air bubbles that simply do not have time to reach the surface due to too rapid hardening.
Taking an impression of the upper jaw on video:
Classification of dental gypsum in international and Russian standards
Depending on the purpose, physical properties and set of consumer properties, based on the domestic GOST R51887-2002 and the ISO 6873/2013 standard used throughout the world, medical plaster is usually classified into one of five main classes:
- I. “Soft” plaster for impressions. It is particularly flexible, which allows you to obtain full or partial impressions of any objects, including jaws without teeth. This type of gypsum quickly becomes hard and has minimal expansion.
- II . Medical plaster . It belongs to the alabaster type materials and has medium – standard hardness. It is convenient to make diagnostic models from such gypsum and to plan orthopedic structures of initial and medium complexity.
- III.Hard plaster for making complex models. Recommended for use in modeling and manufacturing all types of prostheses, including the base of collapsible fixed structures, as well as removable dentures of various configurations.
- IV . Super-hard gypsum , which allows the production of collapsible “master” models, as well as any other particularly accurate and durable combined structures. It has a low expansion rate. It is used in model metal casting and in the production of dental ceramics.
- V. Particularly strong gypsum , designed for the production of models of extremely high precision with a controlled expansion rate. It is rarely used in practical work.
General recommendations for working with dental plaster
Evgeniy Ptitsin, dental technician, consultant, Moscow
Very often, in pursuit of new developments and technologies in the field of metal-ceramic and clasp dentures and other complex orthopedic structures, dental technicians forget that more than half of the alterations, inaccurate fits, and corrections of dentures occur due to errors made at the stage of manufacturing the plaster model .
For successful work of dental technicians and dentists, it is important to know some rules for working with dental plaster and molding compounds. Following these simple instructions will allow you to work comfortably, quickly, and economically. Failure to comply with them leads to a change in the expansion parameters of the gypsum and the emergence of mutual claims between the doctor and foundry technician. Rule 1: Dental plasters should be stored in a dry place. Storage containers must be cleaned before each new filling. Rule 2. Instruments and accessories used when working with plaster must be clean, without remnants of previously used plaster. Rule 3. The portion of plaster should be no more than for two or three casts. Rule 4. You cannot add any means as hardening accelerators; if necessary, use quick-hardening gypsum. Increasing the mixing time by a few seconds is the best way to speed up the setting. Rule 5. It is extremely important to maintain the ratio of powder and water to obtain the desired expansion of gypsum. Rule 6. Water and powder must have a temperature of 20 (+1\-1) degrees C. Rule 7. The powder should be slowly poured into water and allowed to submerge in the water. And only then start stirring with a spatula. Subsequent machine mixing should not exceed 30 seconds. When kneading by hand, this time is 1 minute. Rule 8. The gypsum mixture must be poured into the mold immediately after mixing. The filling time cannot be increased due to vibration and especially by adding water! Rule 9. Plaster begins to harden when the shine disappears from the surface. Rule 10. The plaster model can be removed from the impression when the temperature of the model decreases.
10 Plaster Commandments Preparation Before each new plaster mix, ensure that the mixing utensils are clean and dry. Old plaster residues on a spatula, flask, etc. lead to negative changes in the setting time and expansion of the new mixture. Gypsum of any kind should be mixed, if possible, under vacuum and maintaining the mixing ratio of powder and water. Measurements by eye lead to correspondingly large fluctuations in technical characteristics. The mixing time and mixing intensity must also comply with the manufacturer's specifications. You should first draw water, then add plaster. Water for mixing Dental plaster is usually mixed using well-settled tap water at a temperature of 20 (+1\-1)°C. Very hard water may speed up the drying time. In this case, you need to use demineralized water. Be careful when using supplements. Pour in the powder Pour in the plaster evenly but quickly for approximately 10 seconds. According to the new standards, the countdown begins from the moment the powder and water first touch. Allow the plaster to submerge in water for approximately 20 seconds before mixing with a spatula. Impression plasters (class 1) are mixed by hand with a spatula for approximately 30 seconds, and alabaster plasters (class 2), hard plasters (class 3) or superhard plasters (class 4) are mixed for 60 seconds. Unpacking Usually the frozen model is removed from the cast no earlier than 30 minutes after pouring. Alginate and hydrocolloid casts, after cleaning, disinfection and neutralization, due to the lack of volume constancy, must be cast from plaster. Because they are aggressive towards dental plaster, unpacking must occur after 30 minutes. When using other impression materials, a later unpacking of the model, up to 1 hour, has proven effective. Expansion Every plaster expands at the end of setting. The degree of expansion is affected by the composition of the gypsum, as well as the ambient temperature or air humidity. Comparative measurements of the expansion of various gypsums are possible only under absolutely equal conditions. Expansion parameters are given in accordance with EN 26873 as well as ISO 6373. When comparing, pay attention to the standards and specific time parameters! According to the standard, gypsum expansion should be given according to readings after 2 hours in % and pressure strength in N/mm2 - after 1 hour. If the model sits longer at room temperature and lower humidity, expansion is reduced by approximately 30%. Sometimes the necessary wetting of the model increases the slight expansion of the already hardened plaster. Our plaster, however, has expansion parameters significantly below acceptable standards. However, practice shows that a certain expansion of gypsum is necessary to compensate for the shrinkage of other materials. Mixing Mixing in a vacuum device usually works well on the plaster. When machine mixing under vacuum, you need half the time to obtain a high-quality mixture than when mixing by hand, i.e. manually – 60 sec., in the device – 30 sec. Impression plasters (cl. 1) are usually mixed manually for 30 seconds. It is not recommended to add water or powder if the consistency is too thick or too thin. You thereby interfere with the hardening process and disrupt the crystalline structure of the gypsum. Pouring The finished mixture should be immediately poured into the molds. You should not mix plaster for more than two or three pours, because... pouring is also included during material processing. At the end of this time, crystal formation begins, when further work with gypsum is useless. Once hardening has begun, it is impossible to accurately reproduce small details; the strength of the gypsum also decreases significantly. This should also be taken into account when using a vibrator. Although pouring on a vibrator has a generally positive effect on bubble control, pressure strength and flow, vibrating should never be continued once curing begins. Modeling time As soon as the shine disappears from the surface of the plaster, you can model in plaster for approximately 60 seconds, as well as trim. The hardening time that then begins varies depending on the type of gypsum. We give the hardening time for hard plaster (cl. 3) approximately 10-12 minutes +/- 1.5 minutes. But some super-hard plasters have a longer overall setting time. The hardening time can be adjusted as desired. But no processing can be done during hardening. Surface defects In case of surface defects between gypsum and alginate or hydrocolloid masses, the impression must be pre-treated. For alginate casts, neutralizing trimmer or gypsum powder with water and sealing with an alginate insulating agent prevents uncured areas on the surface of the model from spreading. Hydrocolloid casts must be placed in potassium sulfate or potassium carbonate solutions and neutralized. When using polyester based impression compounds, follow the manufacturer's instructions. Remains of saliva and blood must be carefully removed, because they also negatively affect the hardening of dental plaster. Wetting the model Plaster models should not be subjected to sudden impacts. If, for example, steam blasting of the model is absolutely necessary, then the risk of model destruction can be reduced by pre-wetting the model for 5-8 minutes. Cleaning with a steam jet can lead to surface wear and leveling of contours. Therefore, it is better to clean the model with a soft brush and mild detergent. Fracture on older models during sawing or preparation can also be prevented by briefly wetting. When old models are placed in water, the water becomes saturated with calcium sulfate and, when washed out, lingers on the surface. And lastly: it is necessary to remember that it is wise to use synthetic gypsum in your work. The presence of mineral components in gypsum leads to the fact that the expansion (expansion) of the material in the cast model lasts up to 30 hours or more (depending on the quality of the gypsum itself). It is rare that a technician has the opportunity to wait this time and not begin working with wax. At the wax modeling stage, in this case, errors arise not because of the wax and the correct work with it, but because of the ongoing expansion of the plaster model. So, dear colleagues! The first step in the technician's fabrication of a denture is to cast a plaster model. Get this step right!
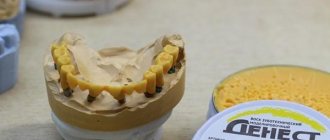
Different types of dental plaster from
In the catalog of auxiliary materials for orthopedics, dental plaster types II, III and IV are presented to the attention of our regular and potential customers. Among them:
- Class II gypsum of the Pro Model and Pro Basic series are white in 25 kg bags and 10 kg buckets, respectively.
- Class III gypsum of the Pro Solid series, blue, packaged in buckets and bags.
- Class IV plaster series Pro Stone 21 (peach color) and Pro-Rock in brown-golden color and various types of packaging.
A diverse range of dental plaster allows specialists to accurately select the material for each type of work, guaranteeing maximum quality in taking impressions, making models and all types of orthopedic structures and prostheses. To place an order, or use the help of our consultants and receive additional information on the practical use of various types of medical gypsum, call +7 (496) 341-1690 or +7 (496) 341-0011.
Application of inhibitors and catalysts
The strength characteristics of prints and models are affected by the rate of hardening. However, dental technicians prefer not to use special accelerators and retarders of the process. Additives can degrade the quality of products.
The optimal solution is to select high-quality raw materials and adhere to production technology (choice of temperature conditions, powder dispersion, intensity of mixing components).
But in rare cases, it is also permissible to use hardening optimizers, which are:
- table salt solution, potassium nitrate (catalysts);
- ethyl alcohol (5%), sugar solution (5-6%), borax solution (2-3%), wood glue (inhibitors).
Accelerators (catalysts) reduce the strength and hardness of future casts. Inhibitors, on the contrary, increase these characteristics. Additives cannot be used when creating jaw models, as the likelihood of errors and inaccuracies increases. Inhibitors and catalysts are added both to water and directly to gypsum powder.
Diverse orthopedic material is widely used in dentistry due to its ease of use, affordable price, and excellent aesthetic and functional characteristics. By following the technique of making impressions and models, it is possible to create high-quality impressions that facilitate diagnostics and measures for dental prosthetics.
How to avoid defects in model making
From the description of the technology for making models from dental plaster, it is clear that there are subtleties that must be observed to avoid defects. Let's list the main ones.
First of all, the condition of the jaw impression being filled with wax: it must be free of saliva. Another important aspect is that the structure of the material used is porous. The use of vibrating tables minimizes the risk of cavities.
If there is no such equipment, watch your own manipulations. Be careful when separating the model from the print; if necessary, tap it with a special hammer. Use isolating solutions before pouring the dental plaster to make it easier to separate the model from the impression.
During work, always pay due attention to maintaining the required temperatures of water and material, their proportions, and consistency. Be aware of proper storage conditions, containers and tools. To achieve the highest quality and fastest results, combine, if possible, manual and machine processing.
Wetting the model
Sudden temperature changes can increase the fragility of the plaster model, which can cause it to wear out quickly.
Therefore, if steam or other heat treatment is necessary, it is recommended to moisten the sample.
Also, short wetting helps prevent the structure from breaking during sawing or preparation.
From the video you will learn how to create a plaster model.
Model defects
To avoid spreading of the sample and other unpleasant surprises, the cavity between the gypsum composition and the alginate mass should be treated.
For this, a neutralizing solution, water or dry gypsum powder can be used . Instructions for using polyester impression material are indicated in the instructions.
Where can I buy
Medical gypsum is produced by companies that produce products for construction and finishing works. Its main difference from gypsum for construction purposes is the degree of grinding, and as a result, faster hardening times. You can purchase plaster for medical practice directly from the manufacturer. One of the leading companies is Volma.