Peter Mann (Peter Mann, DDS, FICOI, FAGD), director of the Smile Arts dental clinic (Manhattan, New York), believes that endodontics is a type of treatment that can be systematized and can not only bring constant profits and loyal patients, but also to be a kind of outlet for the doctor, and not a source of constant stress. To do this, you need an appropriate set of tools and a proven sequence of actions that virtually eliminates the occurrence of emergency situations. This material contains all of Peter’s advice, including a list of tools and a step-by-step description of the algorithm.
Tools
Rotary (machine) files Sybron Twisted Files
Peter considers Sybron Twisted Files (TF) to be the “workhorse” in the field of instrumental channel processing. If desired, they can be found in local dental stores, or you can order them on eBay. The advantages of these files are flexibility and a low risk of tool breakage in the canal. When working from the crown down (crown-down technique), in most cases a 0.04 mm file is sufficient.
Manual C files
The only manual files in Dr. Mann's instrumentation are the 12.5mm C-file from Roydent. These are harder to find than the Sybron Twisted Files. Peter uses these files when working with curved and calcified canals. If the degree of calcification is high, it is better to do the treatment step by step, moving gradually. This is where 12.5mm C files come in handy.
Brasseler EndoSequence Files
Brasseler EndoSequence files are used to complete the instrumentation of the canal.
Gates Glidden Bors
Gates Glidden burs are used to create channel access.
Apex locator Morita Root ZX II
Morita apex locators are known to many dentists. According to Peter Mann, an apex locator connected to a low-speed handpiece (endomotor) is a wonderful thing. Morita Root ZX II can detect excess torque (torque) and switch the motor to reciprocal mode when the file is rotated 90 degrees in one direction and the same amount in the other. In this mode, the risk of file breaking is radically reduced. In addition, the connection between the apex locator and the tip allows you to stop in time and not go beyond the apex.
Other tools and aids
- Endo: plugger (dental plugger), probe (explorer), expander (spreader).
- Irrigation: Sodium hypochlorite (NaOCl), 17% EDTA, 2% chlorhexidine.
- Hand-held gutta-percha condenser (an instrument with a heating element).
- Sealer AH Plus.
Opening of the tooth cavity.
One of the most important stages in endodontics. The quality of the opening of the tooth cavity, the absence of overhanging edges, and a good overview are the most important factors ensuring successful treatment. Americans say (and not only Americans) that access is everything.
The main set includes instruments used in restorative odontology, as well as a number of others adapted specifically for endodontics.
An endodontic probe differs from a conventional probe in its working part; it is much longer (approximately 15 mm), thinner, which helps to localize the canal orifices, and also helps to detect perforations in the bottom of the pulp chamber.
Excavators with long arms are used to remove contents and dentincles from the pulp chamber.
An endodontic mirror is different from a regular dental mirror, which is inconvenient for examining a deep tooth cavity due to image distortion. It has a flat surface that produces a clear image that provides a clear view of the topography of the root canal orifices without distortion.
Endodontic tweezers are ideal for holding paper points, gutta-percha points and root instruments.
Although there are other tools suitable for estimating the working length of root instruments, the endodontic millimeter ruler is still the best method.
An irrigation syringe is an important tool. The barrel-shaped tip prevents the needle from jamming and breaking, and the needle tip is notched to prevent fluid pressure on the periapical tissue. For the same purpose, sometimes the needle holes are placed on the side.
When manipulating in intradental cavities, it is better to use burs with smooth rounded tops, which prevents disruption of the anatomy of the bottom of the pulp chamber.
Endodontic treatment algorithm
Stage 1: access
Before starting work, Dr. Mann usually explains to the patient the need for future restoration of the tooth and thus obtains permission to remove the tooth from occlusion. Then the sequence of actions is as follows.
1. A football bur is used to level the occlusal surface. This step facilitates future access and minimizes postoperative discomfort for the patient.
2. Opening the cavity. A ball bur is used.
3. Search for all channels, for which Explorer is great.
4. Beginning of instrumentation, the first step is expansion of the coronal third and removal of the pulp using a Sybron TF 0.10 rotary file.
5. The canals appear in the field of view, you can proceed to expanding the coronal part with a Gates-Glidden bur. This step allows for adequate instrumentation and irrigation and reduces the risk of file breakage. Access to all channels should be unhindered.
Stage 2: Instrumentation and Irrigation
Irrigation is the most important component of the endo, ensuring predictable performance in the canals. Generous rinsing after each file is a mandatory step. The file cannot clear all the tissue from all the side canals, irrigation helps solve this issue as the solution kills bacteria and dissolves the soft tissue. Dr. Mann's usual recipe is 25 cc per channel, 5 syringes of 5 cc, plus 5 cc of EDTA and 5 cc of 2% chlorhexidine. The sequence of actions at this stage is as follows.
1. Processing with several Sybron TF 25 files with cones from 0.10 to 0.80 and from 0.60 to 0.40. In most cases, a full depth cut will produce a 0.40 file. In wide palatal or distal canals a 0.60 file may be required.
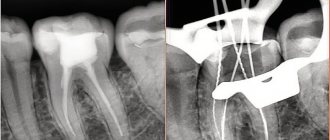
2. Treatment with Brasseler EndoSequence rotary files, crown-down technique, which involves the gradual passage of canals with different files from crown to apex. 3. To ensure that the canal has been penetrated to its full depth, a periapical photograph with gutta-percha should be taken. Using a gutta-percha pin for this purpose is better than using files, as it will not break or bend.
As part of his endodontic algorithm, Peter Mann handles hand files only in cases where the canal is curved or calcified. His choice is C-files (in the Russian-speaking environment, the designation “C-files” is found), which Dr. Mann considers multifunctional and eliminates the need to use other files. If the canal is severely curved and narrow, hand C-files may be the only instrument used, meaning no machining is performed at all.
Stage 3: obturation
Dr. Mann's suggested sequence for this step is as follows.
1. First, dry the canals thoroughly with paper points.
2. Then you need to insert a gutta-percha pin with a sealer applied to it (AH Plus) into the canal, push it to the entire working depth and remove it.
3. Next, you need to apply more sealer to the same pin and insert it into the canal not in one movement, but in several successive presses, each of which pushes the pin a little deeper. In this case, after each press you should move the pin back a little. This ensures complete filling of the canal with sealer and sealing of the apex.
4. The next step is cauterization of gutta-percha in access to the canal. During the process, you should lightly press the capacitor.
In case of irreversible condition of the pulp.
And even more so, with its necrosis, the walls of the root canals undergo changes that are largely reminiscent of changes in dentin caries. The most superficial layer is the decay zone, necrotic, destroyed dentin. Of course, as with caries, not all dentin around the circumference of the canal is destroyed to the same extent. But if in a carious cavity inspection and additional methods (including preparation) provide the ability to determine the most damaged areas and purposefully excise them, then in the root canal one can only rely on tactile sensations and the nature of sawdust (or decay) and the degree of contamination of the instrument.
Further, behind the decay zone there is a zone of infected dentin and a zone of demineralized dentin. However, most authors believe that the zone of infected dentin rarely reaches 1.0 mm in depth, and beyond that the dentin is almost sterile.
Of course, the less the dental pulp is involved in the process, the less dentin is destroyed. But this, by the way, does not determine the greater ease of endodontic intervention for pulpitis than for periodontitis. On the contrary, in most cases, with total necrosis of the pulp, in teeth with granulomas, endodontic interventions themselves are easier to perform, since the walls of the canals are softened, and the operator, despite spending more time on mechanical cleaning, more freely carries out the procedure. On the contrary, with pulpitis, especially in poorly traversed canals, sometimes these interventions, due to the dense and often sclerotic walls of the canals, encounter significant difficulties.
Today's technological availability allows (again, of course, this is patience, knowledge and time - these are the factors that primarily determine the success of treatment) in almost all teeth requiring endodontic treatment, to obtain a predictable result.
To achieve these goals, the endodontic practitioner must have at his disposal a minimum of necessary instruments, each of which is designed for a different purpose. Some of the tools have been in use for years, others are more recent. And I wouldn't be surprised if, before this book comes out, new tools (and materials) appear on the market that we haven't heard of yet. Increasing technological innovations lead to a situation where it becomes important to evaluate the function of a tool and the limitations to its use, especially when there are many varieties of tools that perform the same task.
Possible problems and ways to solve them
File fragment
File breakage in a canal is probably the most common problem dentists encounter when working in canals. To avoid, Dr. Mann recommends
- carry out irrigation every time the file is changed,
- do not put pressure on the file, but click on it easily.
If the file still leaves the channel incomplete, you must:
- take a periapical photograph that will show where the fragment is located (there is a high probability that the file broke at the bend of the canal);
- begin the passage of the canal with the 6th or 8th C-file in order to bypass the fragment and reach the apex (the process may take from 30 to 40 minutes, irrigation is required in abundance);
- After passing the canal to its full depth (usually with a 15th C-file), irrigation should be carried out and the canal should be obturated.
Leaving the fragment in the canal and using it as part of a filling is a logical solution. At the same time, sometimes as a result of abundant irrigation, the fragment can come out.
Sodium hypochlorite damage
If sodium hypochlorite gets behind the apex, which may be the result of improper instrumentation, swelling will immediately appear on the patient's face. In this case, the procedure may be as follows.
1. Irrigate immediately with saline solution.
2. Make a cold compress and apply it to the swelling.
3. Prescribe pain medication and antibiotics to the patient, explaining the situation and emphasizing the fact that he will be fine.
In such cases, a good relationship with the patient is especially important.
Many patients ask many questions and strive to understand the dentist's actions. If you decorate the walls of your clinic with dental posters from Stomanet.ru, they will be able to obtain the required information without your participation.
https://lavka.stomanet.ru
What does it look like? Here is an example from Krasnodar:
And here are dental posters in beautiful frames that decorate the walls of clinics in Tobolsk:
(click on photos to enlarge them)
Delivery within Russia is free. We accept payments from legal entities.
Go to the store
Based on the material
Step-by-step procedure to simplified and efficient root canal techniques
The optimal treatment result is achieved.
Only in case of careful mechanical processing of the canals. In the first place is (with the inclusion of antiseptic treatment, of course) the problem of mechanical excision of necrotic tissue (as with caries, in the presence of necrotic tissue one cannot rely only on medications) and the creation of a canal configuration acceptable for complete obturation.
The formation of the apical part of the tooth canal is no less important. This stage should be given due attention, since it is poor-quality obturation of the apical foramen that is the reason for unsuccessful root canal treatment. The importance of filling materials here is enormous, but no less important is the apical section of the root canal, correctly formed by mechanical influences.
Thus, as in the treatment of caries, the main point is the complete excision of pathologically changed tissues and complete long-term obturation of the cavity with filling material.
Consequently, complete mechanical treatment of the root canal is one of the main components of the effective treatment of complicated caries.
As a rule, treatment of complicated caries begins with preparation of the carious cavity. All carious dentin should be removed prior to the actual endodontic intervention to avoid iatrogenic infection of the root canal system. In this case, according to indications, the proximal surfaces should be restored, preferably with permanent filling material in order to prevent the contents of the oral cavity from entering the dental cavity. In such cases, we recommend preliminary filling of the carious cavity and subsequent provision of access to the root canals through the filling.
Main manufacturers
Gates Glidden tools have a tail piece (inserted into a drill) and a rotating drill bit. The working area is made in the shape of a drop with 3 spiral cutting edges, its length is 2.5-3 mm. The drill is made of a stainless alloy containing chromium and nickel.
Gates Glidden used:
- For mechanical expansion of the first third (orifice) of the root canal. The blunt tip of the working part eliminates tooth perforation and provides high-quality access for further work.
- For unsealing and removing fragments of gutta-percha from a previously treated canal.
The Largo end drill has a similar structure, but the length of its working part is 7-8 mm. Has 2 cutting blades in the shape of a spiral.
Largo is used:
- At the initial stage of passage of the canals of the incisors and canines.
- During prosthetics with stump inlays to form an ostial bed.