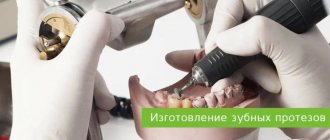
New technologies are constantly emerging in dentistry, thanks to which higher-quality dental restorations become possible. These innovative techniques include dental modeling. It allows you to obtain perfectly matching prostheses for a specific patient. With the help of modeling, it became possible to accurately reproduce the anatomical forms and functional features of the dentition. The result is high aesthetics of the entire oral cavity.
There are two types of dental modeling:
- The direct method is diagnostic imitation using wax.
- The indirect method is modeling, so to speak, in full size.
Indirect modeling steps
Indirect modeling takes place in several stages:
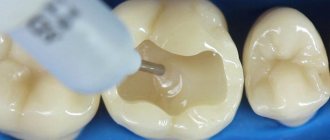
- First of all, impressions are taken from the upper and lower jaws. This is done using silicone, and the most important thing is that it is of high quality. At the same stage, the jaws are fixed in the usual closed state with the preparation of the bite ridges and registration taking into account the face bow.
- Working with a specific device that allows you to obtain an accurate model of the movement of the lower jaw and adjust all movements of the masticatory apparatus at the time of its functioning. If the bite is low, the device, taking into account facial characteristics, calculates how much it needs to be raised.
- Installation of the resulting silicone model on a plaster base in an article (special device) for analysis. At this stage, the dental technician takes into account the wishes of the patient and the doctor regarding functionality and aesthetic data. Next, a wax model is made, shown to the patient and, if necessary, adjusted.
If all of the above stages pass without any difficulties, then a permanent prosthesis is made in the laboratory.
Purpose of application
The need for Wax-up is due to the following factors:
- Reproduction of dental units from wax is the starting stage of restoration work. It is required for planning future work of dentists. Wax impressions help to track the individual characteristics of the structure of teeth and avoid errors during implantation.
- Calculation of the cost of upcoming dental procedures.
- Temporary prosthetics. The specialist takes samples for the production of intermediate prosthetic restorations made of plastic. The technology is used when additional time is needed to create fixed prostheses.
Our team of doctors
Maxillofacial surgeon, Implantologist
Bocharov Maxim Viktorovich
Experience: 11 years
Dental surgeon, Implantologist
Chernov Dmitry Anatolievich
Experience: 29 years
Orthopedist, Neuromuscular dentist
Stepanov Andrey Vasilievich
Experience: 22 years
Endodontist, Therapist
Skalet Yana Alexandrovna
Experience: 22 years
Orthopedic dentist
Tsoi Sergey Konstantinovich
Experience: 19 years
Dentist-orthodontist
Enikeeva Anna Stanislavovna
Experience: 3 years
Contraindications to the procedure
In some cases, you have to postpone it for a certain time or completely abandon this idea. Restrictions can be temporary or absolute. The first includes:
- insufficient level of oral hygiene;
- inflammatory processes;
- periodontal diseases;
- malocclusion;
- significant destruction of the dental unit;
- diseases of the jaw joint.
These shortcomings can be eliminated. The presence of metal-ceramic crowns at the site of the proposed restoration completely rejects the idea of restoration with a composite or ceramic, since these materials are incompatible, and the result of the efforts will be short-lived. Also, dentists at the Dentika clinic do not recommend installing veneers and lumineers for bruxism and pathological tooth wear.
Stages of direct modeling
Direct modeling is carried out by the doctor directly in the patient’s oral cavity. In this case, it is possible to accurately determine the appropriate shape of the prosthesis. This procedure can be figuratively compared to trying on a dress:
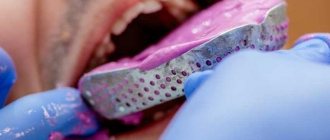
- The doctor makes impressions of the teeth using silicone, where special attention is paid to the palatal part, without which it is impossible to obtain a full-fledged impression. The silicone impressions are filled with a composite mass, usually a different color from the teeth, and then the copy is placed on the patient’s jaw.
- The resulting impression is taken and excess composites are removed, and adjustments are made if necessary.
- Next, the patient’s teeth are cleaned of plaque using special accessories; they are not sawed or ground down, thereby maintaining their integrity.
- The base shade of enamel is applied to the template itself, then the remaining layers are applied one by one. Thus, the tooth is restored taking into account all the details of its surface. The structure is restored gradually, and finally the corresponding shade of enamel is applied.
When the surface of the model is completely dry, it is processed mechanically. The dentures are treated with a specific glue and attached to the prepared model. The patient is allowed to spend a certain time with temporary prostheses, thereby observing his own sensations and deciding whether further correction is needed. In the meantime, the doctor will be able to study the reactions of the lower jaw joint. The technician is allowed to make several models at the same time, then the patient has a chance to choose the most optimal option.
If the client does not make any complaints, then the resulting models are sent to the laboratory for the production of permanent prostheses. Direct restoration is especially suitable for patients who need to improve their bite and those who have severe enamel wear. Including models, prosthetics on implants is not complete.
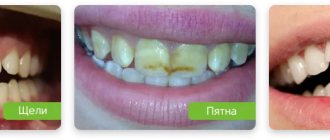
Restoration of anterior teeth
Artistic restoration of the front teeth requires even higher demands on the aesthetic side of the issue, because a beautiful smile is one of the most important components of everyday communication between people and an indispensable part of the image of a successful person. The best way to give your front teeth a flawless appearance is to install ceramic veneers.
Dental porcelain, used for artistic restoration of front teeth, is a unique material with many advantages:
- it imitates with perfect accuracy many of the properties of tooth enamel (translucency, degree of light reflection, etc.), and surpasses it in terms of strength;
- Over time, ceramics do not lose their color or become stained;
- Dental porcelain eliminates any allergic reactions of the body.
True, the cost of artistic dental restoration with ceramic veneers is very high and not affordable for everyone.
Restoring anterior teeth with composite materials also has a number of advantages. This is a moderate cost, quick implementation of all dental procedures (usually in one visit), minimal intervention in the structure of dental tissues. However, in terms of aesthetics, strength and resistance to dyes, the composite is very inferior to ceramics.
The question of how much artistic dental restoration costs cannot be answered unambiguously: it depends on the chosen method, the material used, the amount of work and many other factors. Approximate prices at the Doka-Dent clinic are shown in the table on this page.
Advantages of modeling
Artistic modeling of teeth can do a lot - from deepening or protruding a tooth to correcting the shape of the entire dentition. This type of prosthetics has many advantages:
- Demonstration to the patient of a visual, final result.
- Elimination of any defects at the very beginning.
- Absent future discomfort.
- Quickly addictive.
- The adjacent teeth are not damaged.
- All wishes of the patient are taken into account.
- It is possible to adjust the model.
Completely finished models can only improve the final result of the restoration if they are of good quality. Therefore, it makes sense to contact the highly qualified Implantmaster clinic in Moscow, where professionals work exclusively with modern equipment, which guarantees high quality of the final result.
Author:
A systematic approach to modeling anterior teeth
The anterior teeth of the upper jaw are characterized by both functional and aesthetic parameters. By their nature, these are the teeth that are visible both when talking and when smiling. That is why there are such a significant number of approaches trying to imitate as much as possible all the subtleties of the anatomy of the teeth of the upper jaw. Considering that in addition to shape, the technician must also understand the characteristics of color, texture, rotation and spatial position of the teeth, it is quite easy for him to get lost in all these details. That is why in this article we will focus not on individual modeling elements, but on a systematic approach to restoring the morphology and structure of the frontal group of teeth.
After completing the modeling of the basic shape, the technician can begin to restore the individual characteristics of the tooth, following the proposed protocol, thereby saving a huge amount of time.
The described approach is unique in both modeling all six anterior units and restoring the shape of a single tooth, regardless of whether the technician is working with wax or final structures, in conventional or digital mode. After all, the most important thing lies in the details, which are emphasized after modeling the basic form of future restorations.
Step by step protocol
1. When restoring several anterior teeth, modeling should always begin from the middle of the row, namely from the labial cutting edge of the central incisors. The middle of the restoration is determined by the median anatomical landmarks of the face: along the line connecting the bridge of the nose, the apex of the nose and the center of the chin. The second interpupillary line (photo 1) is modeled perpendicular to the midline of the face: the cutting edges of the incisors on the labial side should be parallel to the interpupillary line.
Photo 1. Facial landmarks and transfer of the interpupillary line to the horizontal plane of the central incisors.
2. After this, contact points are modeled: the position of those from the incisors to the canines shifts more and more towards the cervical area, as shown in the photo with a red line (photo 2 - 3).
Photo 2. The area of contact points shifts more cervically from the incisors to the canines.
Photo 3. The area of contact points moves more cervically from the incisors to the canines (red lines).
3. At the next stage, the lingual surfaces are modeled. Since all teeth take part in the act of chewing, it is therefore simply impossible to model their lingual surface without taking into account the interaction with antagonist teeth. The cutting edge of the teeth, in essence, is their cutting ridge; in the photo, the line of the cutting edge on the labial side is shown in red, and on the lingual side - blue (photos 4 - 5). These edges are the boundaries of the cutting ridge. We should not forget that the lingual edge of this ridge is not only an aesthetic, but also a functional component that interacts with the lower incisors during chewing, while the labial edge of the upper teeth is visualized when the patient smiles and talks. The labial margin of the restoration can be lengthened or repositioned as long as it does not compromise the function, esthetics and phonetics of the teeth being modeled. The cutting edges are rarely symmetrical and parallel (photos 4 - 5). Simply put, the function of the lingual side of the incisors is derived from their labial contour.
Figure 4. The incisal ridge consists of a labial edge (red line) and a lingual edge (blue line).
Figure 5. The incisal ridge consists of a labial edge (red line) and a lingual edge (blue line).
4. The mesial angle line, which is represented in the photo by a black line, is the next element for modeling (photo 6). If you look at the teeth from the front side, they can be divided into segments vertically (photo 3): the central one can be divided into three parts, the lateral incisors and canines into two. The line of the mesial angle of the central incisor begins near its contact point and ends in the cervical part of the tooth in the region of the mesial third of its lateral side. The line of this angle should correspond as much as possible to the line of the adjacent central incisor. A similar lateral landmark for the lateral incisor begins at or above the contact point and ends in the cervical region near the middle of the tooth side. The line of the mesial angle of the canines also begins above the contact point and moves towards the middle of the tooth.
Photo 6. Mesial angle line (black line).
5. After this, they begin to model the lines of the distal angles (photo 7), again moving from the area of the central incisors to the canines. These landmarks should coincide as much as possible between the teeth on the right and left sides. Of course, the width of a symmetrical tooth may differ, but they can be optically modified to ensure that the lines of the distal angles coincide as much as possible.
Photo 7. The distal angle line moves from the incisors to the canines.
6. The height of the cervical contour, drawn with a white line (photos 8 - 9), should follow the contour of the soft tissues (pink) as much as possible. Therefore, when modeling this parameter, it is necessary to use a duplicate of the soft tissue position. The apex of the cemento-enamel junction of the central incisor is located in the area of the distal third, and the lateral incisor and canine are in the area of the middle of the tooth (photo 6).
Photo 8. The height of the cervical contour (white line) follows the contour of the soft tissues.
Photo 9. The height of the cervical contour (white line) follows the contour of the soft tissues.
7. The last step in modeling is to adjust the labial component of the incisal edge. The shape of this formation (photo 10) can vary greatly, since it does not interact with the cutting edges of the lower incisors during chewing.
Photo 10. Shape of the labial edge.
Typically, the labial edges of the central incisors and canines follow a horizontal line, but during modeling the author uses a Kois Waxing Guide (Panadent) (Figure 11) to ensure that the incisors and canines are exactly in the same horizontal plane.
Photo 11: Kois Waxing Guide is used to check the horizontal plane of the incisors and canines.
If you outline the main forms of modeling without teeth, then everything becomes simple and clear (photo 12). It is important to correctly fill in these lines during restoration and connect the corresponding points correctly. After rough modeling, the technician begins to restore individual parameters. With the vestibular view of the teeth, the distal side of the canines disappears from the field of view or is very faintly traced (photo 13), so the visual shape of the dental arch can be expanded due to better visualization of the distal side of the third teeth.
Photo 12. View of the base lines without teeth.
Photo 13. In the vestibular view, the distal part of the canines is faintly visible.
conclusions
Recreating the aesthetic contours of anterior teeth requires considerable experience, knowledge and skill. During this process, all constituent aspects are important: dental morphology, facial aesthetics, soft tissue contour, as well as occlusal parameters. During modeling, it is important not to focus on any particular shape or tooth, but to take into account the entire concept of the dentition based on a basic optimal algorithm. In the future, the modeling elements can be individualized, significantly saving time in the process of restoring the necessary dental characteristics.
Posted by Steve McGowan, CDT
Price
Installation of certain types of orthopedic structures in the oral cavity using wax modeling is an expensive dental service. The high cost of the technology is explained by the price of the starting material, the use of special equipment and the high accuracy of the process.
The approximate cost of creating a wax model for 1 unit of dentition varies from 1200 rubles. up to 1500 rub.
The cost of the service may increase if several units need to be restored at once or the defect being corrected is very complex.
The final figure for the use of wax-up modeling is usually announced by the doctor after a visual examination of the oral cavity and examination of x-rays.
The video provides additional information on the topic of the article.
Peculiarities
In dentistry, modeling teeth using wax is called Wax-up technology. Dentists use two methods of such modeling. One is the formation of a sample of the future tooth on stumps (gypsum bases), and the second is a combination of Wax-up and Mock-up techniques, creating a composite model directly in the mouth based on wax.
This is a mandatory procedure when performing orthopedic correction of defects in the oral cavity. Models need to be made for many purposes. First of all, it is necessary for the doctor to draw up a plan for the upcoming restoration. The wax model serves as a test material, using it the orthopedist and technician establish the method of restoration of the damaged tooth, discuss the scope of further work and possible difficulties in prosthetics.
If you have a model, it will be easier for the patient to explain all the features of the treatment and agree on the final appearance of the teeth. Carrying out this work will allow us to eliminate all inconsistencies and inaccuracies at the initial stage of prosthesis manufacturing.
Wax is the most suitable material, which lends itself well to processing, and after it cools, it quickly and easily takes the desired shape. To perform such work, it has excellent characteristics, namely:
- quite flexible;
- dense;
- lasting.
Thanks to these properties, the technician is able to very accurately recreate the required dimensions of the tooth so that the prosthesis made is as similar as possible to his own. Wax modeling of teeth is necessary to work out the nuances of future work to restore the functionality and aesthetics of the dentition.
Advantages and disadvantages
Creating wax models is additional work for orthodontists, requiring more time and expense to achieve a Hollywood smile.
Despite this, experts recommend the procedure, citing the following criteria:
- during the creation of an artificial smile, all the nuances can be corrected at the modeling stage;
- making wax samples allows the client not to waste time getting used to permanent structures;
- elimination of many inconveniences - discomfort, pain, wear, addiction;
- after the wax reproduction stage, the preparation process is more gentle;
- the client is fully involved in the process of adjusting artificial teeth using the direct method;
- with the indirect technique, the client may not spend additional time in the dental chair; the production of artificial dentures can be carried out without his presence.
The disadvantages of this procedure include small losses of accuracy with the indirect reproduction method. This is due to the fact that when the wax cools, it slightly changes its previous volume.
Strength of the restored jaw and recommendations for care
The service life largely depends on how clearly the patient follows the recommendations of the attending physician. According to standards, composites last about 5 years without changing their basic characteristics, ceramics - 15, lumineers - 20. But this is only with careful treatment, quitting smoking, and maintaining oral hygiene.
Otherwise, marginal pigmentation quickly appears, shine is lost, and the risk of caries increases. It is very important to follow the restrictions on the first day. To do this, you can eat food no earlier than 2-3 hours after the procedure. It is better to drink tea, coffee, juices with a high acid content and intense coloring only after 1-2 days. It is also advisable to refrain from applying lipstick during this time.
Preparatory process
Before doing wax modeling of teeth, you need to complete a number of appointments, one of the first is conducting diagnostics of the oral cavity. If necessary, an x-ray and computed tomography of the jaw should be performed. It is also noted that in case of oral diseases, it is necessary to undergo a course of treatment. Don’t forget to sanitize and follow hygiene rules.
Only after a full examination and treatment course has been carried out, the doctor begins to create impressions.
Indications
Wax-up technology is recommended and used for any indirect aesthetic restoration, namely for crowns, lumineers, bridges, veneers.
Thanks to the creation of wax models, the final result from the production of these products is calculated as accurately as possible.
The technique is also applicable for correction of parameters (shape and size) of the crown part, as well as for complete reconstruction of the dental form. In the second option, the technology is used:
- in the production of temporary orthopedic products on samples with prepared units;
- for planning the placement of removable and non-removable systems;
- when determining the amount of teeth grinding;
- to evaluate the result of occlusion correction on a diagnostic model;
- when planning the exact placement of implants with immediate subsequent loading.
Wax modeling can also be used for orthopedic correction of defects in the location of teeth, for example, when correcting the progenic conformity of the jaws.
Material requirements
During the Wax-up procedure, two types of beeswax are used:
- Type I It is actively used when modeling the direct method directly in the patient’s oral cavity.
- II type . Effective for indirect technique. This version of wax is slightly lower in quality, but does not affect the final work in any way.
When choosing, storing and using modeling material, you should pay attention to some rules:
- to achieve a clearer contrast, it is worth using colored waxes, namely, red and blue shades are widely used;
- after hardening, the forming material must be rigid and not crumble;
- when heated, the mass cannot contain any impurities or crumbs; their presence can affect the quality of the work, creating a rough surface with reliefs;
- when scraping while giving the required shape, the wax should not chip or fall off in pieces;
- storage periods should be strictly observed;
- choose the right type of material when choosing a technique;
- You should give preference to soft varieties of beeswax or wax.
Reviews
How many negative sensations and experiences do deformed, missing or chipped teeth bring to a person?
To correct these defects, when turning to a dentist, he cannot always clearly explain his vision of the result in words. Wax modeling allows you to resolve this situation.
You can share your experience and impressions of Wax-up modeling by leaving a review in the comments to this article.
If you find an error, please select a piece of text and press Ctrl+Enter.
Tags wax modeling fixed dentures
Did you like the article? stay tuned
Previous article
Features of removing a dental cyst using cystotomy
Next article
What problems can be eliminated by relining a removable denture?