The development of modern restoration methods makes it possible to functionally and aesthetically restore teeth. One such method is the technology of using a silicone key.
A silicone key in dentistry is a technique for restoring the anatomical shape of teeth using silicone impressions. These keys are made using a plaster model. The defect is restored with wax.
An occlusal silicone key is used to accurately follow the anatomical shape. This is especially true for the palatal surface. The template is used for the restoration of both frontal and lateral molars. To obtain the most reliable copy, the template must cover the gum area and adjacent teeth.
The template is made from A-silicone directly in the oral cavity, an impression is taken, and the cutting edge of the tooth being restored and two adjacent ones on opposite sides are captured for reliable support. The resulting impression is cut along the line formed by the cutting edge.
Features of restoration
The silicone key method in therapeutic dentistry is an innovative development that allows for maximum aesthetic appearance and anatomical shape of the tooth being restored.
This technique significantly reduces the time required for restoration. This technology is also used to eliminate hidden forms of caries characteristic of molars of the chewing group. The carious cavity is filled with composite material, and the final portion is modeled with a template. At the same time, to eliminate the influx of material, outlet channels are created in the key.
The impression can be made without using a spoon. The restoration procedure can be performed in several stages with layer-by-layer application of the material. Instructions for using a silicone key in dentistry can be seen in the video.
Features of the silicone key method in dentistry
The development of modern restoration methods makes it possible to functionally and aesthetically restore teeth.
One such method is the technology of using a silicone key. A silicone key in dentistry is a technique for restoring the anatomical shape of teeth using silicone impressions. These keys are made using a plaster model. The defect is restored with wax. An occlusal silicone key is used to accurately follow the anatomical shape. This is especially true for the palatal surface. The template is used for the restoration of both frontal and lateral molars. To obtain the most reliable copy, the template must cover the gum area and adjacent teeth.
The template is made from A-silicone directly in the oral cavity, an impression is taken, and the cutting edge of the tooth being restored and two adjacent ones on opposite sides are captured for reliable support. The resulting impression is cut along the line formed by the cutting edge.
Indications and contraindications
Indications for the use of a silicone key are the following patient conditions:
- recovery from injuries in the form of chips;
- the need to replace old fillings;
- treatment of caries in the primary stages;
- need for aesthetic restoration.
Since silicone group materials are used, some patients may experience allergic reactions to them. Such cases are contraindications for the use of silicone template technology.
Features of restoration of teeth with crowding. How to work without a silicone key?
Polishing restorations to a super shine When it comes to crowded teeth, the main question is always whether it is possible to correct the situation with the help of restorative material, or whether orthodontic treatment can be recommended to the patient.
To do this, it is necessary to carry out wax modeling, and ideally this should be done by the therapist himself.
In this case, based on the wax-up, it was concluded that major preparation would not be required.
The preparation was carried out within the dentin, the pulp was not affected, and old fillings were removed. If the restoration is complex, a silicone key can be useful to assess the extent of the preparation. It allows you to create the palatal wall and understand what the future tooth will look like.
It is very important to take into account the rule of the golden proportion to maintain the visual relationship of teeth in a row. There is an active debate among experts about what is better: composite restoration or restoration with orthopedic ceramic structures. Many people believe that restoration is better than ceramics, because... the teeth remain “alive” and the procedure does not require high qualifications, as, for example, for restoration with ceramic veneers without turning. One example of an effective solution to the problem of crowded teeth.
There are no particularly serious problems with the central incisors. But attention needs to be paid to the lateral incisor on the left, tooth 22. It is filled too palatally, the zenith of the neck is located too low, and this problem needs to be corrected. Fang 23 is also deployed and needs to be brought back to normal. What was done. The dead tooth had to be removed to reduce the threat to healthy teeth.
The preparation was carried out quite sparingly, caries was removed. The lateral incisors were practically not prepared on the vestibular side. You can go over this surface once with the thinnest yellow bur, or in extreme cases with a red one. Some colleagues prefer sandblasting for orthodontists (not airflow).
At tooth 22, the gum level was noticeably raised due to the use of a ceramic bur. The gums hardly bleed, which allows you to apply a rubber dam and work in comfortable conditions.
After this, it was possible to begin restoring all the teeth one by one. This procedure helps prevent the remaining teeth from drying out and changing their color. It's easy to control whether you hit the color or not.
To ensure a natural-colored restoration, it is useful to use the layering technique. In practice, as a rule, three colors are used: dark dentin, lighter dentin and enamel that matches the color of a particular tooth. In this case, Capo Natural material was used using a fairly simple design. If the tooth has an A3 color, the first dentin color A4 is taken. If the tooth is damaged to a significant extent, you need to take darker dentin. But in principle, dentin is taken 2 shades darker or 1 shade if the defect is very small. Using the first layer of dentin, the transparency of the restoration and the tooth can be matched. The base color is then applied and according to the Capo chart it is easy to select the final coat of enamel to achieve the desired brightness. In this case Incisal medium.
Each tooth is polished and restored separately. The very thin rubber dam practically serves as a matrix. Sometimes, with the help of paints, the effect of partial demineralization of the tooth is created to make it more natural. Restoring a dead tooth has its own nuances. The restoration is done using conventional composite materials, but it is necessary to create a very bright "core" (bulb) of very white opaque opaque material that recreates the pulp.
These measures allow you to recreate the natural appearance of the tooth, which becomes almost indistinguishable from its healthy neighbors. Polishing was carried out only with Enhance and Pogo rubber bands.
Then polishing is done using Dialog Polishing paste containing fine particles of aluminum oxide. Their smallest size allows for high quality polishing.
In this case, the entire dentition was restored in approximately 4 hours. At the same time, the tooth was restored and the crowding was corrected.
Advantages and disadvantages of technology
Silicone template (key) technology allows you to achieve the following results:
- significant savings in recovery time;
- the palatal surface optimally matches the natural one, the occlusal plane is almost natural and suits the patient (at the final stage of restoration, some adjustment is required at the points of closure of the teeth);
- absolute symmetry along the contour between the cutting edges of the canines and incisors;
- controllability of the process of applying composite materials and, as a result, optimal thickness, requiring minimal finishing.
Not without certain shortcomings. These include the following factors:
- silicone is a hard material, which does not make it possible to fully display micro anatomy;
- silicone is subject to deformation when composite materials are pressed;
- work is limited to a single-pack execution technique;
- the use of latex fabric makes it difficult to work with the silicone block.
Recent developments use a carrier (applicator) and fluid composite materials, which allows you to get as close as possible to the anatomical structure when taking impressions.
Stages of dental restoration
Teeth restoration using silicone template technology is performed in the following sequence:
- Definition of color . At the first stage, it is necessary to decide on the color of the incisor or molar to be restored.
- Shape modeling . Wax is used and the shape of the tooth is repeated on the model. The extracted model serves as the basis for making a silicone template. This technique is called Wax-up by dentists.
- Mock-up . Direct modeling of the anatomical shape of teeth in the oral cavity.
- Making a key . The taken silicone impression serves as the basis for making a silicone template of the palate surface.
- Preparation . When using the Mock-up technique, composite materials are first removed from the oral cavity, then grinding (preparation) of the cavity with caries is performed. If necessary, for the purpose of aesthetic restoration, pigment tissue is removed from the enamel surface. To ensure a smooth color transition between artificial and natural tissues, the dentist creates a bevel of the enamel surface.
- Cleaning . Using abrasive pastes and special tools (brush attachment), teeth are cleaned.
- Etching . For etching and application of adhesive material, it is necessary to ensure reliable protection of teeth from contact with saliva secretions.
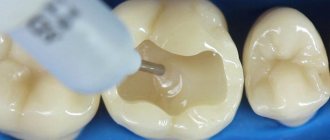
- Securing the key . A composite material of the desired shade is applied to the silicone matrix (cutting edge). The finished silicone template is fixed on the tooth surface from the palatal side. Then a base tint enamel is applied. The process is performed from the palatal surface. Thus, the template sets the shape for further application of the composite in several layers.
- Applying the base shade of enamel . To form the dental approximal surface, it is necessary to install a special matrix. After this, the dentist applies a base shade of enamel.
- Application of dentin . At the next stage, layer-by-layer application of the dentin surface occurs. The restoration is performed in the direction from the oral to the vestibular surface.
- Overlaying color . Applying the required enamel color tone completes the restoration stage.
- Hardening and cleaning . The resulting enamel is dried until hardened and then mechanically cleaned.
- Polishing . At the final stage, the restored surface is polished using special silicone nozzles at low speeds.
As a result, after all the manipulations, the patient has a restored incisor that is practically no different in anatomy and color.
Form styling
Teeth modeling occurs in a direct (Moke-up) and indirect (Wax-up) way.
The Moke-up technique simulates the frontal part of the approximal surface in full size. Particular attention is paid to correcting the appearance of the unit, taking into account the properties of the plane and location.
The Wax-up technique is used to create a wax model on a plaster base with mandatory control of the accuracy of the bite. Based on this method, a silicone key is created with an accurate representation of the palatal plane.
Price
Pricing policies vary and depend on many factors. Raw materials, technological equipment, and the level of personnel qualifications affect the price level for dental restoration using the occlusal key method. Private clinics will offer patients a high-quality level of service, but prices will be higher than when visiting public clinics.
The cost also depends on the number of units restored. You can find out all the information about the price lists for the services provided directly by visiting the websites or by calling medical institutions.
Dental restoration using the silicone key technique is an invasive technology. This technique allows you to restore the functionality of teeth with minimal time.
Teeth treated and restored in this way do not differ from real ones and serve for a long time. Aesthetic restoration allows you to correct defects, shape, color, etc. The patient spends less time compared to traditional methods of dental restoration.
Possibilities of using the “occlusal composite key” in various clinical situations
Tags: 1st grade
A. S. Murashkin
dentist-therapist at the Eurodent dental clinic (Stavropol)
Direct restoration of the chewing group of teeth occupies a separate place in therapeutic restorative dentistry. Treatment of primary caries, replacement of fillings, post-endodontic restoration of teeth are the basic manipulations of a dentist of any qualification.
Achieving a good aesthetic and functional result requires certain manual skills of the doctor, takes a lot of time and is sometimes financially unjustified, and therefore deserves special attention.
By spending most of our time behind the dental chair, we try to increase our efficiency. New knowledge and experience change our attitude towards performing old tasks and force us to move towards resolving more complex situations. Therefore, in conditions of dynamic self-development, we are looking for simpler ways to solve simple problems without compromising quality.
In this article, I would like to introduce you to the “occlusal composite key” technique (microbrush stamp technique), which allows you to quickly restore the chewing group of teeth with good aesthetic results.
The idea of reproducing the original anatomy of the tooth began to arise when the preparation of fissure caries ended with volumetric excision of necrotic dentin and healthy enamel. If you study the geometry of the spread of the carious process, it becomes clear that with the irreversible excision of healthy enamel, the natural anatomy of the tooth is destroyed (Fig. 1, 2).
Rice. 1. A significant amount of softened dentin with minimal damage to the enamel.
Rice. 2. Pronounced enamel structure with extensive damage to dentin.
Occlusive silicone key method
The first attempts to restore the original anatomy of the chewing surface were carried out using a silicone mini-impression. The essence of the technique using a “silicone key” is as follows: we press down the primary anatomy of the tooth with a silicone block, then we carry out preparation, adhesive preparation of the cavity, introduce a volumetric portion of the material into the cavity (one-step technique) or the last portion of the material (with layer-by-layer application and exposure of the composite) and press it with a silicone block, remove excess material from the surface, and expose it to light.
In cases with shallow cavities (no more than 2 mm), in my practice I use the universal nanohybrid restoration material Filtek Z550. This material perfectly adapts to the walls, is easily pressed with a “key” and has an ideal opacity for replacing enamel structures and surface dentin layers using one shade selected according to the VITAPAN® Classical scale. Preheating the composite increases its plasticity and “responsiveness” when pressed. It is better to lubricate the surface of the “occlusal key” with modeling liquid so that the composite does not stick to the “key”.
Clinical case
Initial situation: tooth 28, diagnosis: dentin caries, tooth color A3 according to the VITAPAN® Classical scale (Fig. 3). To achieve an aesthetic and functional result, Filtek Z550 in shade A3 and Filtek Ultimate Flowable in shade A3 were chosen.
Rice. 3. Initial anatomy of tooth 28. Diagnosis: dentin caries. Color A3 according to the VITAPAN® Classical scale.
Before carrying out the preparation, we take a silicone mini-impression. For ease of repositioning, the silicone should overlap several adjacent teeth (Fig. 4).
Rice. 4. Silicone mini-impression.
We prepare the cavity (Fig. 5) and adhesive preparation using Adper Single Bond 2 adhesive.
Rice. 5. Prepared cavity of tooth 28.
We pre-lubricate the walls of the cavity with fluid-flowing restoration composite material Filtek Ultimate Flowable in shade A3 and do not expose it to light, then the material of the primary color A3 is introduced in one portion and pressed with a “silicone block” (in this clinical case, the depth of the cavity allows the use of one portion of the material), exposure - for 20 sec. We perform minimal occlusal correction of the restoration and polishing. The final appearance of the restoration is shown in Fig. 6.
Rice. 6. The cavity of tooth 28 was restored using the Filtek Z550 composite in shade A3.
Thus, we managed to solve two main problems:
- We have restored the original tooth anatomy with individual articulation “paths.”
- We managed to save working time.
But using a silicone key has a number of disadvantages:
- Hard silicone does not allow the microanatomy of the tooth to be revealed.
- When the composite is pressed, the silicone is deformed.
- We work only in a single-pack technique.
- Used in Black class I cases.
- Working in a rubber dam complicates the process of repositioning the silicone block.
Subsequently, for a more detailed removal of the tooth anatomy, they began to use the “occlusal composite key” technique (microbrush stamp technique), which requires an applicator (carrier) and a flowable composite.
Occlusal composite key method
The essence of the technique is as follows: the chewing surface of the tooth is filled with a liquid-flowing composite, the boundaries of the composite must reach the tops of the cusps, then the working head of the applicator is immersed in the composite, and the composite is illuminated. In this way an “occlusal composite key” is obtained. After preparation and adhesive preparation, a portion of the composite is introduced and pressed with an “occlusal composite key”, the excess is removed, the restoration is illuminated, ground and polished. Restoring cavities using an “occlusal composite key” through a carrier applicator allows you to work in a single-pack and double-pack technique, using it in cases of Black classes I and II.
Clinical case
Initial anatomy of the 35th tooth (Fig. 7), diagnosis: dentin caries, class I according to Black, tooth color according to the VITAPAN® Classical scale - A3.
Rice. 7. Initial anatomy of the 35th tooth. Diagnosis: dentin caries. Tooth color A3 according to the VITAPAN® Classical scale.
The material chosen was Filtek Z550 in shade A3, the work will be carried out using a single-pack technique, the volume of the cavity allows for restoration in one portion. After anesthesia, we isolate the working field with a rubber dam. A fluid-flowing composite is applied to the chewing surface (Fig. 8).
Rice. 8. Filling the chewing surface of tooth 35 with a fluid-flowing composite.
We immerse the applicator in the composite and illuminate it (Fig. 9).
Rice. 9. Immersion of the applicator into the thickness of the fluid material and illumination. Obtaining a composite occlusal impression.
We prepare caries-affected tissues; adhesive preparation is carried out using Adper Single Bond 2 adhesive (Fig. 10).
Rice. 10. The carious cavity of tooth 35 was prepared. Adhesive preparation was performed using Adper Single Bond 2 adhesive.
We distribute the fluid-flowing composite Filtek Ultimate Flowable in shade A3 over the walls of the cavity in a thin layer and add the main composite material Filtek Z550 in one portion (Fig. 11).
Rice. 11. Introducing the composite material Filtek Z550 shade A3 into the cavity of tooth 35.
We fit and press out the material using a “composite wrench” (Fig. 12).
Rice. 12. Pressing the material with an “occlusal key”.
We remove excess material, smooth the edges of the restoration with a smoothing iron, illuminate and paint the fissures (Fig. 13).
Rice. 13. Excess material was removed, anatomy was corrected, fissures were illuminated, and fissures were stained.
As a result, we obtained the original anatomy of the chewing surface, which does not require occlusal correction. We polish the edges of the restoration (Fig. 14).
Rice. 14. Type of restoration of tooth 35 after final polishing; no occlusal correction was performed.
Traditional and Sof-Lex spiral discs were used to achieve a quick and predictable shine on the restoration.
Clinical case
Initial situation: tooth 45, diagnosis: dentin caries, class I according to Black, tooth color - A3 on the VITAPAN® Classical scale (Fig. 15).
Rice. 15. Initial situation of the 45th tooth. Diagnosis: dentin caries. Tooth color A3 according to the VITAPAN® Classical scale.
The rather deep volume of destruction does not allow restoration in one portion, so we decide to use a two-pack technique using Filtek Ultimate. We select shades according to the color wheel A3.5B and A3E. We get a “composite key” (Fig. 16).
Rice. 16. We get the “occlusal key”.
We prepare the tooth and perform adhesive preparation using Adper Single Bond 2 adhesive (Fig. 17).
Rice. 17. We remove caries-infected tissues of tooth 45. The volume of the cavity does not allow working in one portion, so the restoration will be carried out using a two-pack technique.
We restore the main volume of the cavity with Filtek Ultimate material in shade A3.5B to the enamel-dentin border. After compacting the material, be sure to apply an “occlusal key” and make sure that the Body shade material does not go beyond the boundaries of the primary anatomy of the tooth. Next we carry out illumination (Fig. 18).
Rice. 18. Restoration of the main volume of the cavity of tooth 45 with Filtek Ultimate material in shade A3.5B to the enamel-dentin border. After compacting the material, be sure to apply an “occlusal key.”
We lubricate the walls of the cavity with Filtek Ultimate Flowable shade A3 and add the enamel shade Filtek Ultimate, A3E, in one portion, press it with a “composite key”, remove the excess, finalize the anatomy, paint over the fissures and illuminate the material (Fig. 19).
Rice. 19. A portion of Filtek Ultimate material in shade A3E was pressed with a “stamp”, excess material was removed, and the fissures were drawn with paint.
We carry out occlusal correction and polishing of the restoration (Fig. 20).
Rice. 20. Minor occlusal correction of the restoration of tooth 45 was made, polishing was performed with Sof-Lex spiral discs.
Clinical case
Initial situation: tooth 47, diagnosis: chronic pulpitis, tooth color according to the VITAPAN® Classical scale - A3 (Fig. 21).
Rice. 21. Initial situation of tooth 47, hidden cavities according to class II, diagnosis: chronic pulpitis. On Rg: close location of the carious cavity to the pulp chamber. Color A3 according to the VITAPAN® Classical scale.
At the diagnostic stage, on an x-ray, we identified hidden deep carious processes of class II, communicating with the pulp chamber. Therefore, before creating the endoaccess, we take a composite mini-impression (Fig. 22).
Rice. 22. Mini-imprint.
The cavity ready for restoration after endodontic treatment is shown in Fig. 23.
Rice. 23. Cavity of tooth 47 after endodontic treatment, ready for restoration.
Adhesive preparation was carried out using Adper Single Bond 2 adhesive. We restore the contact surfaces of Filtek Ultimate in shade A3E (we transfer the class II defect to class I). We restore the main volume of Filtek Ultimate dentin in shade A3.5B, presumably to the enamel-dentin border in several portions, be sure to double-check it with a “key” to avoid overfilling the cavity. We apply the fluid-flowing composite Filtek Ultimate Flowable in shade A3 along the walls (including enamel) in a thin layer, do not expose it, cover it with Filtek Ultimate composite in shade A3E, compact it, press it with a mini-impression, remove the excess, and expose it. The final appearance of the restoration is shown in Fig. 24.
Rice. 24. View of tooth 47 after restoration of the walls with Filtek Ultimate in shade A3E, the main volume of dentin with Filtek Ultimate in shade A3.5B, and occlusal enamel with Filtek Ultimate in shade A3E with pressing with an “occlusal key.”
As we solved simple problems using stamp technology, we began to encounter more complex ones that required additional preparatory steps.
These problems were associated with the restoration of severely damaged teeth, the replacement of bulky old restorations or complex occlusal relationships, that is, with situations where we do not have guide fissures and cusp slopes, and our intuition and experience become decisive. Such restorations often end in failure (disocclusion, extensive hyperocclusion) and require re-intervention.
We solved this problem in 2 ways:
- use of preliminary Mock Up;
- use of pre-wax up.
Source: dentalmagazine.ru
Similar articles:
Dan Lazar
Easy filling in posterior composite restorations
Cancellation
The quality of dental restorations is affected by various criteria, including the experience of the dentist, the type of tooth, the design of the restoration, the type of filling material, the size of the restoration, and the age of the patient.
Dan Lazar Read
Jurgen Manhart
Bulk-fill composite restorations of posterior teeth
Cancellation
For more than 2 decades, composite materials have been used as an esthetic alternative to metal restorations in the occlusal region, which is subject to high chewing loads.
Jurgen Manhart Read
Sergiu Muresan
Step-by-step protocol for restoration of the upper first molar
Cancellation
Most practitioners are faced with the problem of restoring the natural anatomy of the distal teeth, mainly due to the complexity of the morphology of their occlusal surfaces.
Sergiu Muresan Read Mohammed Al Hasani
A simple way to replace an old restoration
Cancellation
Although replacing an old defective restoration may seem simple, it involves many complexities such as restoration of occlusion, contact point, etc.
Mohammed Al Hasani Read Shcherbakov Victor
Methods for restoring the chewing surface depending on the degree of destruction
Cancellation
The main goal of restorative treatment of posterior teeth is functional rehabilitation. Functionality is due to the anatomical accuracy of the design being performed.
Shcherbakov Victor Read
Stankevich Ekaterina
Morphology of mandibular molars
Cancel
The article presents various options for the morphology of the lower molars, accompanied by detailed illustrations.
Stankevich Ekaterina Read Belograd Maxim
Direct restoration
Cancel
Photo report of work
Belograd Maxim Read
Soshnikov Alexey
Treatment of caries according to your own anatomy using the author's silicone key
Cancel
Photo report of work.
Soshnikov Alexey Read
Soshnikov Alexey
The use of a silicone template in the daily practice of a dental therapist
Cancel
Photo report of work.
Soshnikov Alexey Read Belograd Maxim
Direct restoration of posterior teeth. Case No. 3
Cancel
Photo report of work
Belograd Maxim Read Belograd Maxim
Direct restoration of posterior teeth. Case No. 2
Cancel
Presentation of a series of clinical cases of direct restorations of lateral teeth “of our own production”.
Belograd Maxim Read
Olivia Dworkin, Gerard Kugel, Cheen Loo
What is bioactive dentistry? Review
Cancellation
Currently, the biocompatibility of bioactive materials in the field of restorative dentistry is of considerable interest.
Olivia Dworkin, Gerard Kugel, Cheen Loo Read
- ‹
- 1
- …