An impression is one of the important elements of dental work, serving as a means of communication between the doctor and the dental technician. A copy of the jaw row, which is a kind of “sketch,” is used to reflect elements that need correction, as well as to form a prototype of the future replacement structure. Understanding technical capabilities, taking into account nuances to eliminate further adjustments, as well as competent planning and forecasting are factors that determine the successful use of a dental impression.
General overview
From a technical point of view, the impression is a negative, reflecting the position of the elements of the dentition and the surrounding tissues of the oral cavity. Based on the impression, a positive is created - a model that actually copies the anatomical structure of the jaw, which serves to form a replacement structure. The term "impression", which is quite common in dentistry, is usually used to describe a positive, relief prototype made of plaster or silicone. The formulation “taking an impression of the dentition” can be considered as a definition that combines two procedures: taking an impression and forming a model.
The importance of a functional impression in complete removable prosthetics
D. V. Serebrov
Ph.D., member of the Dental Association of Russia (StAR), orthopedic dentist, surgeon
Currently, many articles and other materials on prosthetic dentistry have been published on precision impressions. A separate list contains publications devoted to the working impression for complete removable prosthetics.
In the specialized literature, in numerous studies, the authors emphasize the importance of precision impressions for the manufacture of high-quality complete removable dentures, characterized by high aesthetic and functional characteristics. Nevertheless, many controversial issues related to the technique of obtaining an accurate impression with complete removable prosthetics served as the basis for writing this article.
With complete loss of teeth, functional disorders develop and atrophy of the facial skeleton and soft tissues covering it occurs. Due to these circumstances, prosthetics of toothless jaws is a method of restorative treatment that affects the delay of further atrophy.
Despite the presence of many methods for determining the height of the bite, the central relationship of the jaws, and the dental manufacturing of the structure in the articulator, the working impression is still the basis of high-quality work. Accurate reproduction of the microrelief of the transitional fold and mucous membrane of the alveolar process without deformation will make it possible to produce a precision complete removable denture.
The procedure for obtaining a functional impression is divided into two stages. The first is fitting and shaping the edges of an individual impression tray. The second is to obtain a functional decompression impression.
The first thing to consider when making a custom tray is to isolate the undercuts that are often present on the alveolar ridges in the areas adjacent to the transition crease. This is due to the mushroom-shaped shape of the alveolar process. Most often, the alveolar process of the upper jaw has this shape. The lack of isolation of undercuts on plaster models during the manufacture of an individual impression tray leads to the inability to adequately apply the tray to the prosthetic bed, pain during insertion of the tray and an increase in working time during fitting.
The second is the choice of construction material for the manufacture of an individual impression tray. Today, the most common are cold-cured acrylates and light-curing plates.
When using cold-cured acrylates to make custom impression trays, be aware that these materials are characterized by a high degree of shrinkage. Therefore, in order to avoid thinning the walls of an individual spoon, it is necessary to apply the plastic mass in excess. After polymerization, it is necessary to process the spoon in such a way that the thickness of its walls is at least 2 and no more than 4 mm.
When using light-curing plates for the manufacture of individual trays, you must remember that after polymerization of the material, an inhibited layer remains on its surface, the adhesion of the impression material to which will be minimal. Therefore, after polymerization of the material, it is necessary to remove the inhibited layer from the surface of the individual tray.
The subsequent stage of fitting and shaping the edges of the individual tray depends on the impression material chosen by the doctor. The choice of technique and the impression mass itself is especially important in those clinical cases when we have a thick and loose submucosal layer.
In our clinic, we use Detaseal® function from DETAX to obtain a functional impression. This material has an ideal soft-plastic consistency with an extended curing phase in the oral cavity, which, combined with minimal shrinkage, allows the doctor to obtain a high-quality functional impression even in difficult clinical cases.
When using Detaseal®function we suggest the following procedure. An individual impression tray is fitted in the oral cavity in such a way that the edges of the individual tray do not reach the transitional fold by 1-1.5 mm. The spoon should not have primary stability. When applying the spoon to the underlying soft tissue, the patient should not feel painful or unpleasant areas.
After drying the spoon, it is necessary to treat its inner surface with adhesive for A-silicones or apply multiple perforations. The Detaseal®function mass is added to the individual tray in such a way that the entire inner surface of the tray is covered with impression mass, and the edges of the tray are simultaneously built up. After this, the tray with the Detaseal® function mass is introduced into the oral cavity, adapts to the soft tissues of the alveolar ridge with minimal pressure, the edges of the impression are formed by the soft tissues of the lips, cheeks and tongue. If necessary, subsequent correction of the impression is made using Detaseal® mono material from DETAX.
Clinical case
Patient D., born in 1933, with a diagnosis of third-degree chronic periodontitis of the teeth of the upper jaw, complicated by partial absence of teeth in the upper and lower jaws, mobile mucous ridge of the upper alveolar process, hypermobility of the soft tissues of the alveolar process of the upper jaw in the lateral sections.
Rice. 1. Initial situation. Rice. 2. Mobile teeth of the upper jaw were removed. Bone-forming material is introduced into the sockets of the extracted teeth. The holes are sutured. Rice. 3. Two weeks after the stitches are removed. Rice. 4. Two weeks after the stitches are removed. Rice. 5. Perforation of the surface of an individual impression tray. Rice. 6. Using the Detaseal® function material, a functional impression is obtained. Rice. 7. A functional impression is obtained using Detaseal® function material. Rice. 8. The impression was corrected using Detaseal® mono from DETAX. Rice. 9. The impression was corrected using Detaseal® mono from DETAX. Rice. 10. Using a facebow and a gnathometer, the centric relation was determined. Rice. 11. Using a facebow and a gnathometer, the centric relation was determined. Rice. 12. The impression with the 3D fork was sent to the dental laboratory. Rice. 13. Finished prosthesis. Rice. 14. Finished prosthesis. Rice. 15. Result.
Classification
Differentiation adopted in dentistry involves dividing impressions into two categories:
- Working, or precision – precise impressions used to create functioning replacement structures installed on a permanent or removable basis;
- Auxiliary - as the name implies, this group combines all additional impressions that eliminate information gaps and make it possible to clarify the specifics of the occlusal relief to improve the quality of wearing the prosthesis.
Another category is occlusal recorders, whose task is to functionally complement and combine these types of impressions. If there are a sufficient number of surviving units, their use is not always advisable, but the desire to achieve optimal occlusion and shorten the adaptation period are good reasons for using recorders.
In terms of the number of jaws represented by the impression, there are one- and two-jaw options, with the second option being used much less frequently in dentistry. The effectiveness of using a separate impression for each row of teeth is determined by the quality of the resulting pattern.
Based on the technique of designing the marginal areas, anatomical and functional impressions are distinguished, however, it is quite difficult to establish a clear line of differentiation between them. Functional variation involves the use of clarifying movements of active and passive properties, allowing one to obtain additional information necessary for the formation of a prosthetic system. In turn, anatomical impressions are used for permanent replacement, when technical interest is primarily in the characteristics of the tissue structure of the prosthetic bed, while the marginal design loses its original priority.
Successful impression taking. The first time. Every time
CM. Drobyshevsky, STIdent brand manager for products for orthopedic dentistry and denture equipment
The modern doctor deals with a myriad of "complex parts", especially when preparing and placing indirect restorations and fixed prostheses. Materials for indirect restorations and materials intended for cementation have greatly improved in recent years. In order to be confident in the success of the entire complex of restorations, such as veneers, inlays, crowns, bridges and removable dentures, it is necessary to correctly observe and correctly perform a series of “simple things”. One of these critical “simple things” is the impression.
Although various CAD/CAM systems are already available in today's dentistry, most indirect restorations are fabricated by dental technicians. A good impression accurately depicts the details of the preparation and allows the technician to produce a functional, esthetic restoration with a good fit. Modern precision elastomeric impression materials have excellent physical properties. They have dimensional stability, precision in the transfer of parts, are resistant to tearing and an exceptionally good surface of reproducible parts. Moreover, they are usually mixed using automatic mixers, which ensures the correct base/catalyst ratio and a homogeneous consistency without air pockets. Materials are becoming less and less hydrophobic, which reduces the number of problems associated with oral moisture. Unfortunately, dental technicians report that a large percentage of impressions received by laboratories are unsatisfactory. These prints are replete with problems such as missing or unclear edges, pores and voids, drawbacks and other distortions. Bad prints are produced unintentionally. In fact, sometimes an “acceptable” print is all that can be achieved. Therefore, the prevalence of “weak” impressions suggests that impression materials are often misused and not examined with due attention to detail. Doctors may become frustrated by failures to take impressions and usually begin to look for a better (read different) material to solve their problems. However, material choice is just one variable in the print equation. Even if you have one of the best materials, if you use it incorrectly, you can get an unsatisfactory final result. Over the years, the quality of impression materials has improved significantly, making the choice of the correct impression-taking technique clearer. The choice of technique can make the difference between success or failure in a given print. Despite this fact, during primary or postgraduate training, impression materials are considered in passing, and therefore, due attention is usually not given to this important aspect of prosthetic dentistry. Most practicing doctors learn impression-taking techniques through trial and error. There is nothing wrong with learning by doing, but an informed practitioner can gain more knowledge with less effort. An informed clinician can use the basic principles developed by others to improve his or her impression-taking techniques. Today, orthopedic dentists use a wide range of methods for taking impressions. A full range of different materials with different properties is available to cover these user needs. And clinicians who are aware of these properties can select the most appropriate material for the specifics of each clinical case. The choice of material is influenced not only by its viscosity but also by other factors. For example, some materials may have an unpleasant odor or taste. Some of them require immediate casting of the model, while others, on the contrary, require you to wait a certain time before casting. Some materials are difficult to disinfect or require expensive equipment. From a practical point of view, impression materials can be classified according to just three main characteristics: • Viscosity. • Hydrophilicity. • Hardening time. These properties have a major influence on the choice of impression material depending on the indication, type of preparation and impression technique.
Viscosity.
Viscosity describes the flow characteristics of an uncured material. Materials with high viscosity have a weak degree of fluidity, while materials with low viscosity, on the contrary, are highly fluid. Materials currently available range from low to very high viscosity.
Low Viscosity - Type 3. Low viscosity materials may be known to us as light body or wash materials. They are usually able to flow very well around the surface of the tooth, flowing inward and displaying the smallest details of the tooth, oral mucosa and preparation area. They are rarely used as a single impression material. Typically, low-viscosity materials are used in combination with a second, more viscous material that forces them onto the tooth and holds them in place during the hardening process. Low viscosity materials are usually mixed in modern automatic mixing cartridges.
Medium Viscosity - Type 2 Medium Viscosity materials are very versatile and are sometimes known to us as monophasic. This is why medium viscosity materials can be used as one material when taking an impression. Their viscosity is sufficient to prime a syringe and capture fine detail accurately, but not so low that a second material is required to apply additional pressure and hold them in place during the curing process. Medium viscosity materials can be used in combination with wash materials that require support, pressure and fixation during the curing process. In addition, materials of medium viscosity can be used in combination with more viscous (type 1) or putty materials - in this case they are squeezed out of the syringe. Type 2 materials are conveniently used in cartridges for automatic mixing, squeezed into a spoon or directly through a cannula in the mouth. They can also be supplied in traditional tubes for manual mixing and syringe application.
High Viscosity - Type 1. High viscosity impression materials are known by the English term “heavy body” as impression base materials. Typically, these materials do not have sufficient fluidity to accommodate preparations, sulcus, and other highly detailed tissue surfaces. This means that these materials are primarily used as a print base in combination with “wash” or other less fluid materials. In this case, the high viscosity material provides the necessary pressure to push through the lighter, more fluid material, ensuring good contact with the surface on which the impression is being made. High viscosity materials are used exclusively for the base of the impression. High-viscosity materials are now available in special cartridges for automatic mixing in Heraeus Dynamix® type machines.
Very High Viscosity - Type 0. The most viscous materials are known to us as putty or moldable materials. Like high-viscosity print base materials, they are used in combination with “wash” or “light body” materials. “Putty” materials provide the necessary pressure to support the “wash” material, which imprints the finest details of the print. Putty materials are so viscous that they are only available in jars for manual mixing or in special cartridges for automatic mixing in Dynamix® type machines. Automatic mixing is not only much more convenient to use and saves time, but also improves the properties of the material for reproducing details, which in turn improves the quality and reliability of work when taking an impression.
Hydrophilicity.
Among other things, impression materials are characterized by the degree of their hydrophilicity, in other words, their ability to be moistened. Materials can be identified as: • Hydrophobic. • Hydrophilic. • Hydroactive.
Hydrophobic materials.
Hydrophobic materials (Figure 1) have low hydration capacity and tend to reject any moisture present on the tooth or other oral tissues. A good analogy for the reaction of hydrophobic materials to a humid environment is water droplets on a freshly waxed car body. Although no water absorption will occur, this repulsion may mask the surface to be printed, preventing uniform contact between the material and the surface, thereby reducing the extent to which desired details of the print are visible. Inaccurate details in the impression may result in further inaccurate fit of the final restoration. More moisture means worse results.
Hydrophobic materials: • Provide poor surface wetting. • Imprint surface details to a low degree. • In contact with moisture, they can mask the surface and prevent uniform contact. • Will not absorb moisture.
Hydrophilic materials.
Hydrophilic materials (Fig. 2) have a high ability to wet and are generally considered the most ideal option for taking impressions. Their ability to develop well in a humid environment means that they provide good surface wetting, allowing the material to capture the details of the printed surface to the highest degree. However, their ability to absorb moisture may lead to some dimensional instability or changes in the physical properties of the material in the event of excess moisture in the oral cavity.
Hydrophilic materials: • Provide good surface moisture. • Provide highly detailed surfaces. • May change and become inaccurate when exposed to excess moisture.
Hydroactive materials (artificially hydrophilic)
Since the 1980s, it has become possible to make some inherently hydrophobic materials more hydrophilic through changes at the chemical level. The material that has undergone this process may belong to the class of hydroactive or artificially hydrophilic (Fig. 3). They are usually made hydrophilic by adding surfactants called surfactants (special molecules with a hydrophilic group at one end of the molecule and a hydrophobic group at the other). Hydroactive materials have excellent wetting ability, but unlike truly hydrophilic types of materials, they do not absorb moisture. When an artificially hydrophilic material is placed in contact with moisture, surfactants react and help provide the material with maximum contact with the tooth and oral tissues, allowing for an excellent impression in the smallest detail. Thus, moisture tends to be displaced, but does not enter the impression material. This means that the material properties and its dimensional stability remain unchanged.
Hydroactive materials: • Provide excellent surface hydration. • Provides a high degree of detail display. • Provide dimensional stability. • Displaces moisture from the tooth and tissue surface without absorbing it.
Hardening time.
In reality, setting time is the total time required from the start of mixing until the impression is completely set and can be removed from the mouth without deformation. Within the total curing time there is a period known to us as working time. Working time is measured from the start of mixing until the point where the material can no longer be manipulated without risking distortion of the print. Therefore, the material must be mixed and placed in place before the end of working hours. After which it stabilizes until it hardens completely. Curing times for elastomeric materials range from about 1 minute for fast-curing alginates to about 10 minutes for polysulfides. Based on the hardening time, we distinguish materials as slowly hardening (low set), normally hardening (regular set) and quickly hardening (fast set). As a rule, the hardening time is related to the working time. Thus, materials with a slow curing time have a prolonged working time. In turn, quickly hardening materials have a short working time. Hardening times and working times set by manufacturers are characterized by values that can affect them. Such as: ambient temperature, air humidity and mixing technique applied to the material. The only material with variable hardening time on the Russian market is Variotime® A-silicone material (Fig. 4), produced by the German company Heraeus. Variable hardening time was achieved by increasing the sensitivity of the material to oral temperature. This means that when working with Variotime material, its total curing time, as well as working time, are under the control of the user. Once mixed, the correction material has a working time of 1 to 2:30 minutes. The final hardening time is activated by the temperature of the oral cavity, is 2:30 minutes and always remains unchanged. Thus, the total curing time of the material is controlled by the user.
A-silicones (Addition-curing silicones). Today, A-silicones are used by most qualified orthopedic dentists. These materials are also known as vinyl polysiloxanes or VPS (vinyl polysiloxanes). A-silicones have a more pleasant odor and taste than polyesters or polysulfides. They have a lower percentage of distortion (permanent deformation) than any other existing impression material, making A-silicones a good choice for undercut impressions. For the most part, A-silicones are not as hard as polyesters. Their tensile strength varies and mainly depends on viscosity. Low viscosity A-silicones tend to have lower strength than C-grade silicones, while high viscosity A-silicones have much higher tensile strength than "C" grade silicones. A-silicones have a different hardening mechanism compared to C-silicones and do not release accompanying compounds during polymerization. This means that A-silicones exhibit good dimensional stability, allowing impressions to be cast many weeks later. One of the specific qualities of A-silicones is their sensitivity to sulfur compounds. Because sulfur is used in the manufacture of latex gloves and can also be found in some hemostatic agents, the clinician must be careful to avoid contamination of the material, which could inhibit its hardening process. Automatic mixing is one of the well-tested methods that allows you to fill a stock or syringe without touching the material. Review of techniques for taking impressions.
The simplest way to describe methods for obtaining impressions is by the number of working steps and material requirements. As a rule, each technique uses several types of materials or their combinations. The main group of techniques can be classified as follows:
• One material - one stage. • Two materials - one stage. • Two materials - two stages.
Impression techniques vary in the number of materials used and work steps.
Let's consider the applied impression-taking techniques (Table 1) using the example of the innovative A-silicone material Variotime®, produced by the famous German company Heraeus. With Variotime®, the doctor has the ability to adjust the impression taking process to suit his or her personal requirements. As noted above, Variotime® has flexible working hours and a short hardening time in the mouth, which is very comfortable for the patient and reduces the time of the entire procedure.
The material is supplied in 6 different viscosity options and three packaging options, thereby giving the doctor the opportunity to choose the material “for himself.” The Variotime® material system is multifunctional and has a wide range of indications: • Crowns and bridges. • Inlays and overlays. • Transfers and implants. • Functional impressions.
One material, one stage.
This technique seems to be the simplest, since it uses one material and one stage of obtaining an impression. The base material acts in the same way as the second correction layer, which is why this technique is known to us as monophasic (Fig. 5). Working steps of the monophase technique (using Variotime Monophase): 1. The impression tray is coated with adhesive and dried according to the manufacturer's instructions. 2. The spoon is filled with Variotime Monophase material. 3. Variotime Monophase is injected from a syringe into the gingival sulcus around the preparation margins. 4. The impression tray with the material is slowly inserted into the oral cavity and gently seated in place. 5. Next, the impression is held in place in a calm position, without excessive pressure, until the material has completely hardened (about 2:30 minutes). 6. The impression is then removed from the patient's mouth. 7. Evaluation of the finished print.
Two materials, one stage (first layer and correction):
This method, by definition, requires two different materials that are mixed individually and then used to create the impression in one step. In most clinical cases, a low viscosity material is pressed out around the preparation and a more viscous base or putty material is immediately inserted on top, before both materials begin to harden. When used correctly, both materials are joined monolithically, which allows you to obtain a highly accurate impression. The more viscous base material provides support and hydraulic pressure to the correction material, allowing this less viscous material to imprint fine details on the preparation and surrounding tissue. To obtain an impression with two different materials in one step, there are two options: “double mixing” and “sandwich” method. Double mixing uses a medium to high viscosity material as the base material. The sandwich method uses the highest viscosity putty material as the base layer, combined with rigid, non-perforated spoons that will not deform the putty material under pressure. It is very important to understand the difference between the “sandwich” method and the two-step (“putty/wash”) method, which will be discussed briefly below.
Steps for the Double Mix Method/Sandwich Technique (using Variotime Heavy Tray or Putty in combination with Variotime Medium Flow or Light Flow): 1. A rigid non-perforated tray is coated with adhesive and dried according to the manufacturer's instructions. 2. Variotime Heavy Tray or Variotime Putty is mixed and placed in a spoon. 3. To create space for the teeth, a groove is pressed into the material. 4. A thin layer of correction material Variotime Medium Flow (or Light Flow) is applied to the resulting groove. 5. Variotime Medium Flow (or Light Flow) is squeezed into the gingival sulcus along the preparation margin. 6. The impression tray is placed in the oral cavity. 7. The spoon should be inserted slowly, ensuring smooth pressure. 8. Next, the impression is held in place in a calm position, without excessive pressure, until the material has completely hardened. 9. The impression is then removed from the patient’s mouth. 10. Evaluation of the finished print. The double mixing method is extremely flexible and versatile because it can handle materials of varying viscosities. This method is also suitable for most clinical situations. However, not all materials can be used by this method, since one of its conditions is the simultaneous hardening of two materials in the impression. This is why the most suitable materials for this situation are A-silicones.
Two materials, two stages (putty/wash method):
This method (Fig. 7) also uses two different materials, but they are applied in two separate stages. The first step is to obtain an initial impression using the highest viscosity material (putty). The second step is to make the final impression using a low-viscosity correction material, using the primary impression as an individual tray. Before taking the final impression, the initial impression must be carefully trimmed to remove undercuts and create a uniform space for correction material. To guarantee adhesion of the main layer of the impression to the correction material, it is necessary to clean the primary impression from any contamination (blood, saliva, etc.).
Steps of the Putty/wash method (using Variotime Heavy Tray or Putty in combination with Variotime Extra Light Flow): 1. A rigid non-perforated tray is coated with adhesive and dried according to the manufacturer's instructions. 2. Variotime Heavy Tray or Variotime Putty is mixed and placed in a spoon. 3. To create space for the teeth, a groove is pressed into the material. 4. The impression tray is placed in the oral cavity, pressed lightly and held until the material hardens (about 2:30 minutes). 5. After final hardening, the impression is removed from the oral cavity, rinsed with water, trimmed along the periphery, interdental spaces are removed, and drainage channels are cut out in the area of the preparation boundaries. 6. A mixing tip is placed on the Variotime Extra Light Flow material cartridge and the material is extruded onto the initial impression. 7. The intraoral cannula is placed on the mixing tip of the Variotime Extra Light Flow cartridge and the material is applied into the gingival sulcus around the preparation margins. 8. The spoon is inserted into the oral cavity with short pressure to ensure that Variotime Extra Light Flow penetrates into the required areas. Then the impression is held in a calm position without unnecessary pressure until the material is completely hardened (about 2:30 minutes). 9. The final impression is taken from the mouth and evaluated.
Below we provide a summary table of the individual characteristics of the Variotime family of materials and methods of their application.
Variotime Putty • Soft mixing consistency. • High final hardness for applying pressure to the correction material and low impression deformation. • Easy to trim in a two-step technique. • Available in both manual mixing and Dynamix cartridges for automatic mixing. • For two-stage and sandwich techniques.
Variotime Heavy Tray • High final hardness for precision and dimensional stability. • Exceptional properties for transfer impressions and implant impressions. • Available in Dynamix auto-mix cartridges and manual dispenser cartridges. • Suitable for two-step and double-mix techniques.
Variotime Monophase • Balanced final hardness for consistent impression accuracy and ease of removal. • Pronounced thixotropy. • Can be used as a base material or applied from a syringe around preparation margins. • Available in Dynamix auto-mix cartridges and manual dispenser cartridges. • Suitable for monophasic impressions.
Variotime Medium Flow • Medium viscosity correction material. • Stable hydrophilicity for the periodontal sulcus. • High elasticity and strength. • Ideal for double mixing and sandwich techniques as it is more viscous than Variotime Light Flow, complementing the high viscosity of the impression base materials in these techniques. • Available in cartridges for hand dispensers.
Variotime Light Flow • Correction material with light consistency. • Hydrophilic properties for high fluidity. • Elasticity and tensile strength. • Ideal for double mixing and sandwich techniques as it is more viscous than Variotime Extra Light Flow, complementing the high viscosity of the impression base materials in these techniques. • Suitable for double mixing, sandwich prints.
Variotime Extra Light Flow • Correction material with extra light consistency. • Highest hydrophilicity at the level of polyester for the transfer of details of the periodontal sulcus. • High elasticity and strength. • Especially recommended for two-stage impressions, since the low viscosity of Variotime Extra Light Flow is very suitable for obtaining a thin layer of correction material. • Available in cartridges for hand dispensers. • Suitable for two-stage impressions.
Materials and features of the procedure
To obtain high-quality dental impressions, the preferred option is to combine materials with different viscosity parameters. The high-viscosity formulation provides sufficient rigidity, while fine-grained correction materials improve imaging accuracy. Standard protocols also provide for the possibility of three-phase (the number of phases means the number of compounds) impression taking, with the addition of medium-viscosity material.
One of the elements provided by the technology for obtaining dental impressions is an impression tray. From a technical point of view, this is a design that is mass-produced or made individually, the structure of which repeats the anatomical structure of the jaw and looks like a horseshoe.
To obtain two-phase impressions, a one- or two-step approach is used. In the first case, an individual tray is used for simultaneous application of both compositions, while the corrective mass can also be applied to the surface of the tissue area of the prosthetic bed - followed by indentation of the element. The two-stage method differs in the number of placements of the spoon in the oral cavity - in the second case, the instrument is used twice, first with the base material and then with the corrective material. Practice shows that such an approach provides an accurate result, but leaves the possibility of making a technical error, which is practically impossible to identify before manufacturing a replacement structure.
Obtaining impressions and models
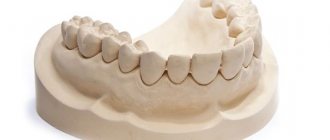
The first necessary condition for making a high-quality denture or crown is obtaining an accurate impression (mold) . Impressions are intended for the production of jaw models (cast in a dental laboratory) - an accurate reproduction of the surface of hard and soft tissues located on the prosthetic bed (organs and tissues in direct contact with the prosthesis) and its boundaries, as well as models of future orthopedic structures.
Impressions are obtained using thermoplastic, elastic or other (except gypsum) masses. An impression or model of the jaw is obtained using plaster based on a previously made impression of the prosthetic bed. If the impression is a reverse (negative) reflection of the surface of hard and soft tissues, then the model of the jaw is a positive reflection of the tissues of the prosthetic bed.
Impressions are taken with special impression trays (standard or individual). The spoon must be well selected, which will ensure high-quality production of the model based on the impression. When choosing a spoon, the anatomical features of the oral cavity are taken into account. Standard spoons are factory made from steel, duralumin or plastic. Metal spoons can be reused after sterilization.
Anatomical impressions are taken with a standard spoon without taking into account the functional state of the tissues of the prosthetic bed. Functional impressions are taken with an individual spoon, taking into account the condition of the soft tissues during chewing, swallowing, and speech. A functional impression is usually taken from edentulous jaws. Functional spoons are made individually from either quick-hardening plastic or polystyrene. Compression impressions are taken using viscous, dense impression materials; unloading impressions (when minimal pressure on the tissue of the prosthetic bed is required) are made using flowable material and a perforated tray.
Double (two-layer) impressions are taken in two stages: the base is made of a dense viscous material, which is then corrected by a second layer of fluid mass. Of the impression materials for obtaining double impressions, silicone materials are most often used, which are produced in the form of two pastes - basic and catalyst. When taking double impressions, a gingival retraction - a pharmacomechanical expansion of the gingival sulcus (pocket) to introduce impression material into it to accurately depict the shoulder, neck of the tooth and the bottom of the sulcus.
Obtaining plaster models of jaws . Impressions are taken to obtain various models of jaws: working (main) models of jaws (dental, maxillary, facial prostheses, devices are created on them), auxiliary models of jaws (models of the dentition of the jaw opposite to the one being prosthetized), diagnostic models of jaws (to clarify the diagnosis, planning prosthesis designs), control jaw models (diagnostic models made at different stages of prosthetics and orthodontic treatment).
Jaw models are made of plaster. To do this, the previously obtained impression is washed under running water at room temperature and then disinfected. To relieve internal stress in the impression material and improve the wettability (fluidity) of the gypsum, the surface of the impression is treated with a special liquid (for example, Hera-SBE, Fixacryl, etc.) Then the gypsum powder is mixed with water, the resulting mass is filled in portions with the impression. After the plaster has hardened, the resulting model is removed from the impression. In orthopedic dentistry, calcined or semi-hydrous gypsum (CaSO4)2xH2O is used. Gypsum was previously used to make impressions, but currently this is not done, since much more plastic and non-traumatic impression compounds have appeared. For the manufacture of models of jaws (prosthetic bed), especially for the manufacture of models of clasp dentures, high-strength supergypsum is used, obtained using saturated low-pressure steam during the heat treatment of gypsum stone.
A shining Hollywood smile from leading dental specialists. Make an appointment!
The basis for high-quality manufacturing of any prosthetics is competent collaboration between the doctor and the technician.
Recommendations for taking impressions
Use non-shrinking impression compounds, capable of long-term transportation and storage, polyvinylsiloxane group A and polyester. Their minimal shrinkage after a long time allows us to obtain highly accurate and high-quality master models. For crowns and structures on implants, it is better to use polyester masses. The impression mass for taking impressions for clasp dentures and beam structures must be of medium fluidity and hardness in order to obtain a decompression, unloaded impression. It is advisable to use individual spoons. The impression trays used for silicone masses are finely perforated or non-perforated with a retention edging along the upper inner edge with a high retaining edge, treated with adhesive varnish.
To produce a high-quality and complete master model, you need a cast that meets the following requirements:
- Complete and clear impression of all hard and soft tissues
- The presence of a clear, completely filmed boundary for odontopreparation of hard dental tissues
- The height of the edges of the impression towards the transitional folds from the gingival contour is at least 6 mm along the entire perimeter of the impression
- Absence of areas of pressed impression material to the bottom and sides of the impression tray
- No ruptures of the impression material, detachments or loose fit to the sides and bottom of the impression tray
- Absence of pores, braces, unresolved areas and foreign inclusions in the impression and impression material, respectively
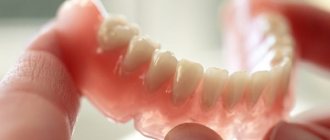
An impression for removable dentures must meet the following requirements: Clearly and completely captured: (for a complete removable denture, the use of an individual impression tray is mandatory)
- On the upper jaw:
boundaries of the transitional fold
- alveolar cusps of the maxilla
- vault of hard palate
- frenulum of lips and cheeks
- border along line A.
- boundaries of the transitional fold both from the buccal side and the mylohyoid lines
Additional recommendations for impressions for partial dentures When taking an impression with a primary crown or crowns with the first part of the lock, the crowns must be well fixed (with temporary cement or correction mass).
Recommendations for odontopreparation
- anatomically consistent odontopreparation of the stump shape
- the presence of a clear continuous edge of odontopreparation for crowns - a ledge
- for aesthetic inlays, veneers, the presence of a clearly defined border (edge) to what extent the odontopreparation of the tooth tissue was performed, without rounding or uneven ragged edges
Volumes of tissue preparation required to create optimal aesthetic and functional restorations
General requirements
- for an aesthetic result, the edge of the ledge should be located below the gum by at least 0.5 mm
- ledge with a rounded inner edge or a pronounced groove (90-105°)
- avoid sharp edges and corners
- minimum fissure depth 2-3 mm (for optimal formation of fissure-tubercle contact)
For metal ceramics and metal composites
- along the cutting edge 1.7-2mm
- volume 1.5-2mm
- in the cervical area from the vestibular and proximal sides at least 0.8-1 mm
- the condition for the formation of a ceramic shoulder without a metal frame is odontopreparation of a ledge of 95-110 degrees, allowing a ceramic thickness of at least 0.5-0.7 mm + metal at least 0.3 mm for precious alloys and 0.2 mm for Cobalt-Chromium
For metal-free restorations (crowns based on Zo02 and e.max)
- along the cutting edge 2-2.5mm
- volume for ceramics with frame 1-1.5mm
- presence of a circular ledge
For veneers
- reduction on the vestibular side 0.7 mm maintain buccal/vestibular contour slightly rounded shoulder parallel to the gingival margin
- proximal edges in the form of a groove during extensions, make the cutting edge flatter and make the pre-prepared border on the palatal side in the form of a small groove Make a small notch to orient alignment during installation
For a quick start and hassle-free cooperation, let each orthopedist fill out the questionnaire, or send him a link to the questionnaire on our website.
Disinfectants for disinfection of dental impressions, denture blanks, articulators
| Home | Information | Disinfectants for disinfection of dental impressions, denture blanks, articulators | Disinfectants | Antiseptics |
Disinfection of medical products in dentistry requires careful selection of the method and means of disinfection.
Let us dwell on the issue of disinfection of dental impressions, denture blanks, suction systems, etc. First of all, the choice of disinfectant should be determined by the type of material from which the objects are made, and the products should also be easily washed off with water.
We present to your attention several disinfectants developed and produced by the Federal State Unitary Enterprise “SSC “NIOPIK” for disinfection in dentistry.
ADS-521 is a disinfectant specially designed for the disinfection of dental impressions made of alginate, silicone materials, denture blanks made of metals, ceramics, plastics and other materials, impression trays, corrosion-resistant articulators. It has good cleaning properties and is easily washed off with water.
Aquaminol Forte is a powerful disinfectant with excellent cleaning properties based on triamine and HAC. The product has a wide range of applications, including recommended for use in dentistry for the disinfection of impressions, denture blanks, articulators and impression trays, suction systems of dental units and spittoons, and dental instruments.
Alaminol Plus is a highly effective, economical universal disinfectant based on aldehydes and QAS. In dentistry, it is used to disinfect denture blanks, articulators and impression trays, suction systems of dental units and spittoons, and dental instruments.
Disinfection modes
| Disinfectant | Concentration of working solution, % (by preparation) | Holding time, min | Application | Microbiology |
ADS-521The product can be used multiple times throughout the day | ||||
| Active ingredients: glutaraldehyde - 1%, alkyldimethylbenzylammonium chloride - 0.5% pH of the product - 3.7-4.7 | Without dilution | 10 | disinfection of impressions made of alginate, silicone materials, denture blanks made of metals, ceramics, plastics and other materials, corrosion-resistant articulators | For infections of bacterial (including tuberculosis), fungal (candidiasis) and viral etiology |
Aquaminol Forte | ||||
| Active ingredients: N,N-bis(3-aminopropyl) dodecylamine (amine) – 8.0%, alkyldimethylbenzylammonium chloride (QAC) – 8.0%; pH of 1.0% product solution – 11.0-13.0 | 3,0 | 15 | Dental impressions (silicone, alginate, etc.) and denture blanks made of ceramics, metals, plastics | For viral, bacterial (including tuberculosis) infections, candidiasis, dermatophytosis |
| 3,0 | 30 | Dental suction systems | ||
| 2,0 3,0 | 60 30 | Saliva ejectors, spittoons | ||
Alaminol Plus | ||||
| Active ingredients: alkyldimethylbenzylammonium chloride (QAC) - 30%, glutaraldehyde (GA) - 0.6%, glyoxal - 6.0% pH of 1% solution of the product - 3.0 - 6.0 | 1,5 2,0 | 30 15 | Dental impressions from various materials | For viral, fungal (candidiasis, dermatophytosis) and bacterial (including tuberculosis) infections |
| 1,0 1,5 2,0 | 60 30 15 | Denture blanks, articulators and impression trays, suction systems of dental units and spittoons | ||
Disinfection procedure
Disinfection of dental impressions is carried out after their preliminary washing with water in compliance with anti-epidemic protection measures. Disinfection of impressions is carried out by immersion in a disinfectant solution. After disinfection, the impressions are washed with water to remove any remaining disinfectant.
Dental impressions, blanks and dentures are disinfected after use on patients and after receipt from the dental laboratory immediately before use.
Disinfection of dental suction systems is carried out after completion of work, for which a solution of a disinfectant recommended for these purposes is pumped through the system; The system filled with solution is left for the time specified in the instructions for use of the product. After the end of the disinfection period, the solution is drained from the system, then washed with running water.
Disinfection of the surfaces of objects located in the treatment area (instrument table, control buttons, keyboard, air gun, lamp, spittoon, headrest and armrests of the dental chair) is carried out after each patient. For these purposes, disinfectants are used that are approved for use in the presence of patients and have a wide spectrum of antimicrobial (virucidal, bactericidal, fungicidal - (with activity against fungi of the genus Candida) action. The choice of disinfection modes is carried out according to the most resistant microorganisms - between viruses or fungi of the genus Candida (in tuberculosis medical organizations - for Mycobacterium tuberculosis).
Single-layer impression using a custom tray
A dental technician is a specialist in the manufacture of dentures or replacement structures. Taking an impression of the jaw arch is one of the main stages of fully conveying the structural features of the elements requiring correction; the impression allows you to create a special “sketch” of the jaw shape. The impression is obtained using an individual impression tray, open or closed.
When turning to dental prosthetics services, you must be prepared for the procedure of creating an individual tray, which allows you to assess the condition of the patient’s dentoalveolar segment. The area where the prosthesis will subsequently be installed is completely covered with the product, placed in part of the relief of the mucous membrane, as well as in the area of the sublingual line. To help patients understand the terminology, dentists often use terms such as “cast” or “impression” to describe the image of the jaw that they create using plaster or silicone materials. In this case, an individual tray means a special orthopedic instrument that fixes dental casts; it is worth noting that such casts are completely individual and are used exclusively for one patient, in contrast to standard models, which are characterized by repeated use, which subsequently leads to a decrease in quality of the final product. You'll often come across the term "cast" to describe a positive or sculpted (relief) prototype made from plaster or silicone materials. Using the definition of “taking an impression of the dentition,” dentists usually mean two actions at once: taking an impression of the jaw and creating an individual model.
Dentists use a custom tray to take the following types of impressions:
- working (precision) impressions (installed on a permanent or removable basis, as well as for the manufacture of replacement structures);
- auxiliary, as follows from the meaning of the name itself, these impressions are used to create all additional elements that make it possible to eliminate information gaps and ensure high quality wearing of the prosthesis by clarifying the specifics of the occlusal relief.
Indications for using an individual tray impression by professional dentists include:
- complete or partial adentia, which implies complete or partial loss of the patient’s dentition;
- the need to obtain accurate casts that allow us to determine in detail the individual characteristics of the prosthetic bed;
- preparation for the manufacture of artificial crowns for implants, as well as for the creation of a removable or bridge-type prosthetic structure;
- deformation of the jaw shape, which does not allow the use of a standard spoon.
Modern medicine offers many ways to make custom impression trays using both traditional and innovative materials, including polymers, wax, metal and rubber. Professionals at the ClearStom clinic in Moscow offer impression taking with an individual tray using a combination of materials with different viscosity properties to achieve extreme imaging accuracy and create the highest quality “sketch”. The combination of several materials provides a high degree of rigidity and high accuracy of display with corrective materials. For many years, our clinic’s dentists have been providing services for taking single-layer impressions using an individual tray.
You can find out the cost of a single-layer impression using an individual tray in our Clearstome dental clinic in the Prices section or by calling for a free consultation by phone or 8(968)444-14-14. Call and make an appointment!
One-step impression. Predictable excellent results
Yu. N. Ivlev
Ph.D., chief physician of the Author's Clinic of Aesthetic Dentistry (Novosibirsk)
The issue of obtaining a high-quality print has been actively discussed in recent years. The main topic of discussion, of course, is obtaining a predictable result, since the preparatory measures for obtaining a dental impression are very labor-intensive and repeating them in the event of a poor-quality impression can negatively affect the condition of the soft tissues.
In attempts to obtain a highly accurate copy, impression materials and methods for obtaining an impression were constantly improved. In our practice, for the last 8 years, we have been using exclusively a one-step technique for obtaining an impression, since, according to a number of authors, it is the most accurate (Fig. 1-7). However, the technique for carrying it out is more complex compared to the two-stage technique. The main problems that doctors encounter when taking a single-stage impression are the presence of pull-offs and poor presentation of the preparation margin. In our opinion, there are several important points to pay attention to when using the one-step impression technique.
Rice. 1. The situation before the start of treatment. Rice. 2. Adhesive preparation of the stumps of teeth 11 and 21 for an impression using the dental fluid composite material Filtek Bulk Fill (hereinafter referred to as the Filtek Bulk Fill material). Rice. 3. Filtek Bulk Fill composite material can be applied into the cavity in one portion up to 4 mm. Rice. 4. Preparation for ¾ veneers. Rice. 5. Impregum DuoSoft impression. Rice. 6. High accuracy in reproducing the preparation boundary. Rice. 7. Fixation of ¾ veneers.
1. Adequate work with soft tissues.
To visualize the preparation border, depending on the biotype of the gum, we use 3M ESPE Astringent Retraction Paste (Fig. or Ultrapak retraction threads (Ultradent). The method of using two threads (Fig. 9, 10) for retraction is presented below. The retraction procedure should performed very carefully using two instruments - a packer and a periodontal probe.
Rice. 8. Using 3M ESPE Astringent Retraction Paste. Rice. 9. Retraction method using two threads. Rice. 10. Condition of soft tissues after removal of the second thread. The required vertical and horizontal displacement of the gingival margin has been achieved.
Technique for taking an impression using the two-thread technique:
1. Diagnostic probing, thread selection.
2. Insertion of the first, unimpregnated, 000 thread (Ultrpak, Ultradent).
3. If necessary, additional tooth preparation / ledge polishing.
4. Maintaining a second thread soaked in a buffer solution of aluminum chloride (no more than 10-15 minutes).
5. Removal of the second thread, irrigation and drying.
6. Applying a low-viscosity impression material to the preparation area, inflating it with a weak stream of air and applying a new portion to the dentition.
7. Placement of the impression tray with the base material.
2. Optimal state of material viscosity.
A-silicone impression compounds have good performance required to obtain a high-quality impression. But a significant drawback of these masses is the polar consistency of the base and corrective material, as a result of which it often happens that the more rigid base layer tears the corrective layer from the tooth stump, and significant delays and pores are formed. To solve this problem, several years ago we drew attention to the polyester dental impression material Impregum Penta Soft (hereinafter referred to as the polyester material Impregum Penta Soft), which was successfully used in fixed and removable prosthetics (Fig. 11-14).
Rice. 11. Upper jaw with installed implants. Rice. 12. Impression made from polyester material Impregum Penta Soft for the manufacture of a removable denture. Rice. 13. Temporary removable nylon prosthesis. Rice. 14. Temporary dentures in the oral cavity.
With the advent of the polyester dental impression material Impregum DuoSoft (hereinafter referred to as the polyester material Impregum DuoSoft), we have almost completely abandoned the use of A-silicone impression compounds, since the polyester impression material Impregum meets all the necessary requirements, namely:
- high accuracy of transfer of details of hard and soft tissues of the oral cavity;
- thixotropy, the absence of uncontrolled spreading of the mass during impression taking;
- hydrophilicity: the material perfectly reflects the relief of not only dry, but also wet surfaces;
- sufficient working time - 2 minutes 45 seconds;
- high final hardness of the impression, excellent resistance to deformation when removing the impression from the oral cavity;
- the viscosity of the base and corrective layers is as close as possible, which almost completely eliminates the occurrence of braces;
- delicate attitude towards soft tissues.
3. Correct insertion and positioning of the impression tray.
To take impressions from Impregum polyester materials, we use standard non-perforated trays with an internal retaining edge and custom-made trays for working with implants (open tray method). The introduction of the base layer into the oral cavity should be carried out parallel to the stumps of the prepared teeth. But this task is often impossible, especially if there are implants in the oral cavity, the impression copings of which can be at different angles. Under such conditions, it is almost impossible to obtain a high-quality print from polyvinylsiloxane. The viscosity of the polyester material Impregum DuoSoft allows some maneuvering of the impression tray without the formation of further pulls and pores (Fig. 15, 16).
Rice. 15. Upper jaw with installed implants. Rice. 16. Imprint made of polyester material Impregum DuoSoft. Ideal material for working with implants.
Another important point is the speed of insertion of the impression tray into the oral cavity. It should be low enough so that the impression material is evenly distributed on the surface of the teeth and soft tissues. Doctors often introduce a spoon with a base layer very quickly, fearing its rapid polymerization. Sufficient working time and mixing of Impregum DuoSoft polyester material in the Pentamix3 apparatus for automatic mixing of dental impression materials allows you to control the polymerization rate and obtain high-quality impressions of any complexity.
The excellent properties of the polyester material Impregum DuoSoft allow you to take uncompromisingly accurate impressions and create ceramic restorations with perfect marginal fit, and this material is also indispensable when working with implants.