Forceps
When removing teeth with forceps, the lever method is used. Such instruments consist of cheeks, a lock and handles:
- The cheeks are the part that secures the crown of the tooth being removed.
- Handles (handles) are the part by which the doctor holds the forceps in his hand.
- The lock is the junction of the handles and cheeks.
All forceps differ in their design - it depends on the anatomy and location of the tooth being removed in the oral cavity.
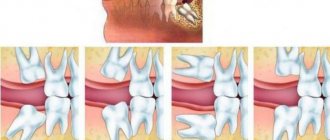
To remove lower teeth
- Beak forceps - used to remove teeth with a retained crown and, in some cases, roots in the lower jaw. Their feature is the perpendicular arrangement of the cheeks in relation to the handle. Beak-shaped forceps can have non-converging or converging cheeks.
- For the lower eighth teeth – used when the patient’s mouth opening is limited or to remove lower wisdom teeth. They have cheeks curved in a horizontal plane.
To remove upper teeth
- Bayonet-shaped (bayonet) - also called universal, since they can remove almost any tooth or root of the upper jaw. Depending on the width of the cheeks, they can be narrow, medium or wide. By design, bayonet-shaped pliers have handles and cheeks parallel to the axis.
- Direct – used to remove permanent and primary teeth of the anterior group. The handles and the working part are located on the same line.
- S-shaped forceps - for removing chewing teeth of the upper jaw. They have an S-shaped bend and their cheeks do not close together. There are S-shaped forceps for molars and for premolars. For molars, in turn, there are right or left (designed to remove the right or left upper molar, respectively). One cheek of such forceps is rounded at the end, the other ends with a spike, which during removal must be placed between the buccal roots of the sixth and seventh teeth.
- For the upper eighth teeth - special forceps designed to remove the upper wisdom teeth. The longitudinal axis of the handles and the axis of the cheeks are parallel, there is a transition part. Both cheeks are wide, rounded at the end, the inner surface has indentations. When closed, such forceps do not converge; they are conveniently inserted deep into the oral cavity, while the lower teeth do not interfere with the extraction procedure.
FORGERS AND ELEVATORS FOR TEETH EXTRACTION
Forceps. When removing teeth, the lever principle is used. In the forceps for removing teeth and roots, there are cheeks, handles and a lock (Fig. 26). Some pliers have a transition part between the cheeks and the lock. The cheeks are designed to grip the crown or root of a tooth. The handles are the part of the forceps by which they are held and to which force is applied during surgery. The lock is located between the cheeks and handles and serves to movably connect them. To better hold a tooth or root, the cheeks have a groove on the inside with a fine longitudinal groove. The outer surface of the handles is corrugated over a considerable extent, while the inner surface is smooth.
The design and shape of the forceps are not the same. Their design depends on the anatomical structure of the tooth and its place in the dentition.
The following types of forceps are distinguished:
1. Forceps for removing teeth and roots of the upper (Fig. 27, 28) and lower jaws (Fig. 29). In forceps for removing teeth of the upper jaw, the longitudinal axis of the cheeks and the axis of the handles coincide, or are parallel.
flat, or form an obtuse angle approaching two right angles (Fig. 30, a-d). For forceps for removing teeth of the lower jaw, the cheeks and handles are located at a right angle or at an angle approaching a right angle (Fig. 30, e).
2. Forceps for removing teeth with a retained crown (coronal) and for removing roots (root). The cheeks of the forceps for removing teeth with a crown do not converge when closed (see Fig. 27, 29, a-d), but for removing roots they do converge (see Fig. 28, 29. e).
3. Forceps for removing individual groups of teeth in the upper and lower jaw. They differ in the width and structural features of the cheeks, their location in relation to the handles, and the shape of the handles (see Fig. 27, 28, 29).
4. Forceps for removing the first and second large molars of the upper jaw on the right and left. The left and right cheeks of these forceps are arranged differently (see Fig. 27, c, d).
5. Forceps for removing teeth of the lower jaw with limited mouth opening. They have a bend in the cheeks in the horizontal plane (see Fig. 29, d).
To successfully perform the operation, you should use forceps, the design of which corresponds to the anatomical features of the tooth being removed.
Removal of the central incisor, lateral incisor and canine of the upper jaw is carried out using forceps that have a straight shape - straight forceps (see Fig. 27, a). The longitudinal axes of the cheeks and arms are in the same plane and coincide. Both cheeks are of the same shape, have a depression (groove) on the inside, and the ends are rounded. The tongs may have cheeks of greater or lesser width.
Removal of small molars of the upper jaw is carried out using forceps having an S-shaped bend (see Fig. 27.6). Their cheeks are located at an obtuse angle to the handles (see Fig. 30, b). This shape of the forceps allows you to correctly apply them to the tooth and, when removing it, avoid obstacles from the lower jaw. Their cheeks are designed in the same way as straight forceps.
Removal of large molars of the upper jaw is performed with forceps that have an S-shaped bend and are similar in shape to forceps for removing small molars (see Fig. 27, c, d). However, their cheeks are structured differently. They are shorter and wider, the distance between them when closed is greater. Both cheeks with inner
the sides have indentations. One cheek has a semicircular or flat end, the other ends with a protrusion (spike), from which a small ridge extends along the middle of the inner surface. When a tooth is removed, the spike enters the groove between the buccal roots. The cheek with a flat end covers the neck of the tooth from the palatal side. In some tongs the cheek with the spike is on the right side, in others - on the left. Depending on this, there are forceps for removing teeth on the right or left side. This arrangement of the cheeks provides a tight grip on the tooth and facilitates its dislocation.
The third large molar of the upper jaw is removed using special forceps (see Fig. 27, e). Between the cheeks
A
they have a transition part with a lock. The longitudinal axis of the cheeks and the axis of the arms are parallel. Both cheeks are the same: wide, with a thin end rounded at the edges. They have indentations on the inside; when the tongs are closed, the cheeks do not meet. The design of the forceps makes it possible to insert them deep into the oral cavity, while the lower jaw does not interfere with the operation.
The roots of the incisors, canines and premolars of the upper jaw are removed with the same forceps as the teeth, only with thinner and narrower cheeks that converge when closed (see Fig. 28, a, b). To remove the roots of large molars, bayonet-shaped teeth are used.
tongs (see Fig. 28 c, d). They have a transitional part, from which long converging cheeks extend with a thin semicircular end and a groove along the entire inner surface. The longitudinal axis of the cheeks and the axis of the handles are parallel (see Fig. 30, d). Depending on the width of the cheeks, bayonet-shaped (bayonet) pliers are distinguished with narrow, medium and wide cheeks. These forceps can be used to remove the roots of incisors, canines and small molars, i.e. the roots of all teeth in the upper jaw and teeth with dilapidated crowns.
Removal of teeth and roots of the lower jaw is carried out using forceps curved along the edge and having a beak-like shape (see Fig. 29). The axis of the cheeks and the axis of the handles form a straight angle or close to it (see Fig. 30, e). All components of the tongs are located in a vertical plane, the handles are one above the other. Depending on the shape of the crown of the tooth being removed and the number of its roots, the cheeks of the forceps have a different structure.
To remove the incisors of the lower jaw, the cheeks of the forceps are narrow with grooves on the inside, their ends are rounded, and they do not converge when closed (see Fig. 29, a). The canine and small molars are removed with the same forceps, but with wider cheeks (see Fig. 27, b).
Forceps for removing large molars have wide cheeks that do not converge when closed (see Fig. 29, c). Each of them ends with a triangular protrusion (spike). On the inside, both cheeks have indentations. When applied to a tooth, the projections fit into the groove between the anterior and posterior roots, ensuring good fixation of the forceps on the tooth.
With limited mouth opening, large molars are removed with horizontal forceps curved along a plane (see Fig. 29, d). They are structured differently than the beak-shaped ones. Their handles and lock are located in a horizontal plane, the cheeks are curved at an angle approaching a straight line and are located in a vertical plane. The working part of the cheeks is the same as that of beak-shaped forceps for removing large molars curved along the edge. Due to the bending of the cheeks and the horizontal position of the handles, they have a small height. Removing teeth with such forceps, unlike beak-shaped ones, is done with movements in the horizontal plane, which can be done if the mouth is poorly opened.
The roots of all teeth in the lower jaw are removed with forceps of the same shape as the incisors, canines and small molars, only with converging cheeks (see Fig. 29, e).
Ways to hold forceps. During tooth extraction, the forceps are held with the right hand. The fingers are positioned in such a way that you can freely bring together and spread the handles with the same hand and move the cheeks of the forceps deeper under the gum.
There are two most convenient ways to hold the tongs. According to the first method, fingers II and III cover the handles of the tongs from the outside and press the tongs against the palm with them IV and V fingers are inserted
on the inside of the handles; The first finger is placed between the handles and the lock from the outside (see Fig. 31.1, a).
The cheeks of the forceps are spread apart by straightening fingers IV and V, and brought closer by bending fingers II and III. When fixing the forceps on teeth IV and V, the fingers are brought out from the inside of the handles and cover the forceps from the outside (see Fig. 31.1, b).
The second method is used only when removing teeth of the upper jaw. The doctor turns the hand with the back surface towards him. The second and third fingers are inserted between the handles. One handle is covered from the outside by finger I, the other by finger IV and V (Fig. 31, II, a). Spread the cheeks of the forceps, moving the third finger outward, bring them closer - bending
IV and V fingers. When moving the cheeks of the forceps under the gum, the end of the handles rests on the palm. After this, the third finger is removed from the space between the handles and placed outside next to the fourth and fifth fingers. Squeeze the handles of the forceps with finger I on one side, III, IV and
V - on the other (Fig. 31, II, b).
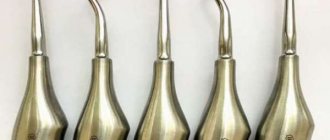
Elevators. When removing teeth with an elevator, just like with forceps, the principle of leverage is used. The elevator consists of a working part, a connecting rod and a handle. There are many different designs of elevators, but three types are most widespread: straight, angular and bayonet-shaped.
Direct elevator.
Its working part (cheek) is a continuation of the connecting rod and, together with the handle, is located on the same straight line (Fig. 32, a). The cheek is convex and semicircular on one side, and concave on the other and looks like a groove, its end is thin and rounded. The pear-shaped handle with longitudinal edges tapers towards the connecting rod.
The direct elevator is designed to remove the roots of maxillary teeth with one root, as well as separated roots of multi-rooted maxillary teeth. It is also used to remove teeth of the upper jaw located outside the dental arch, and occasionally the lower third molar. It is sometimes used to remove severed roots of large molars in the lower jaw.
Corner elevator.
The working part (cheek) is curved along the edge and is located to the longitudinal axis of the elevator at an angle of about 120° fi. 32, b). The cheek is small, one surface is convex, the other is slightly concave with longitudinal notches. Its end is thinned and rounded. The concave surface of the cheek in some elevators faces to the left (towards you), in others - to the right (away from you). During operation with an elevator, the concave surface of the cheek is directed towards the
to the root being laid, convex - to the wall of the hole. The handle and connecting rod are the same as the straight elevator. An angular elevator is used to remove the roots of lower jaw teeth.
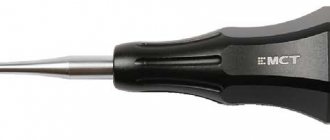
Bayonet elevator (Lecluse elevator).
The connecting rod of the elevator is bayonet-shaped (Fig. 32, c). The working part (cheek) is spear-shaped, narrowing and thinning towards the end section. One surface of the cheek is smooth, the other is rounded. The handle is round, thicker in the middle part, located perpendicular to the connecting rod and the working part. Due to the bayonet-shaped bend, the longitudinal axis of the cheek and the axis of the connecting rod are located in parallel planes.
The elevator is designed to remove the third lower molar.
Elevators
When removing a tooth using an elevator, the principle of leverage is also used. The elevator consists of:
- Working part
- Handles
- Connecting rod
All elevators are divided into straight (wide, medium, narrow - depending on the width of the working part) and angular (toward, away from you). On one side the working part is convex, on the other side there is a “groove”. During removal, the concave part (“groove”) is directed towards the root, and the convex side is directed towards the wall of the hole.
The straight elevator is used to remove the roots of single-rooted teeth or severed roots of multi-rooted teeth in both the upper and lower jaws. Angle elevators are used when removing the roots of the lower chewing teeth.
Features of using various tools for tooth extraction
If it is not possible to save the affected unit, then the patient is prescribed surgery to remove it. All dental instruments must be processed and sterilized to prevent the development of complications after extraction.
Forceps
The doctor chooses the type of instrument that best suits the anatomical features of the tooth being removed. He moves the soft gum tissue so that the axis of the tooth coincides with the axis of the forceps. After this, the instrument is advanced to the neck of the element to ensure its better fixation. The doctor places the forceps in such a position that the axes of the crown of the element and the instrument coincide.
The doctor’s further actions depend on how many roots the tooth being removed has. Single-root units are extracted by rotational movements, multi-rooted ones by pendulum movements. Thanks to this, the nerve fibers of the tooth are destroyed and it is quickly removed from the thickness of the gum. After the destruction of periodontal tissues, the surgeon eliminates the problematic unit using rotational actions. Then the doctor sterilizes the hole and gives instructions to the patient regarding behavior during the rehabilitation period.
Elevator
To remove teeth, the elevator is used as a lever. Depending on the type of element, the surgeon can use a straight, angled or bayonet-shaped instrument. The first is necessary for extracting units located on the upper jaw, the second - for working with the lower teeth. The bayonet elevator is used to extract wisdom teeth or in situations where the patient is unable to open his mouth wide.
Doctors prefer to destroy the crown part of the teeth using a drill or chisel. The elevator is used to remove the root part of the affected tooth and to remove dental plaque.
Luxators
The use of the tool is indicated in difficult cases. The list of such situations includes:
- Abnormal position of the tooth roots relative to the jaw bones.
- Strong periodontal ligament of the tooth.
- Impossibility of tooth extraction due to insufficient filling of the socket with blood and air.
- Tooth extraction in children.
Luxators are designed to prevent severe damage to the soft tissues of the tooth. For each element and its root, a tool of the appropriate size is selected. The working part of the luxator is inserted as much as possible under the gum, as a result of which the vacuum that interferes with the removal of the unit is eliminated.
To remove different types of teeth, doctors use certain tools that best provide access to the roots of the element being removed. During the procedure, it is important for the surgeon not only to choose the right instruments, but also to follow all antiseptic rules in order to eliminate the risk of complications in the future.
Drill
Sawing teeth using a drill is an alternative to chiseling and hammering out teeth. Both straight and turbine handpieces are used.
A straight tip (ball-shaped bur) is used to remove bone tissue that is overhanging or interfering with tooth extraction. A turbine tip (fissure burs) is most often used for sawing a tooth into several parts: separating the crown from the roots, separating the roots in order to remove them later separately.
It is necessary to remind you that when operating the drill, you must use water cooling.
We advise you to read: Tactics regarding primary teeth in adult patients
S-shaped forceps with non-converging cheeks without spines
Premolars of the upper jaw with a preserved crown
Beak-shaped forceps, curved along a plane, with non-converging cheeks, with spines
Lower first and second molars with retained crown, with limited mouth opening
Beak-shaped forceps, curved along a plane, with non-converging cheeks, without spines
Lower third molars with a preserved crown
Complex thread type Polyfilament twisted
Monofilament yarns Polyfilament braided yarns
1. TO REMOVAL THE UPPER INCISERS AND FANGS, THE FORCEPS ARE USED: Straight
2. Conditionally absorbable is a material that: Absorbs over a longer period of time
3. TOOLS USED TO EXTRACT TEETH: Elevator, forceps
4. FRACTURE OF THE LOWER JAW IS MORE LIKELY WHEN WORKING WITH TOOLS: Lecluse elevator
5. WHEN THE ROOT OF A TOOTH IS PUSHED INTO THE POSTERIOR DEPARTMENTS OF THE HYPOGLOUS AREA DURING THE EXTRACTION OF TEETH 3.8 and 4.8, THERE ARE PERFORMED: Hospitalization of the patient
6. TO REMOVAL THE LOWER THIRD MOLAR INSTRUMENTS ARE USED: Forceps curved along a plane
7. TO REMOVAL THE FRONTAL GROUP OF TEETH OF THE UPPER JAW, THE TONGS ARE USED: Straight with non-converging cheeks
8. IN THE EVENT OF GUM RUPTURE DURING A TOOTH EXTRACTION OPERATION, IT IS SHOWN: Applying sutures to the gum
9. TO REMOVAL TEETH AND ROOTS ELEVATORS DESIGN ARE USED: Straight, Angled
10. WHEN REMOVING RIGHT PREMOLARS AND MOLARS OF THE LOWER JAW, THE DOCTOR IS FROM THE PATIENT: To the right and back
11. THE FINAL STAGE IN TOOTH ROOTS REMOVAL IS CURETAGE
12. WHEN PUSHING A ROOT INTO THE MAXILLARY SINUS, THE DOCTOR’S MISTAKEN ACTION IS: Removing the root through the hole
13. WHEN PAMPING THE socket, the iodoform turunda is removed: On days 5-7
14. IN THE AREA OF THE BOTTOM OF THE MAXILLARY SINUS THE ROOTS OF THE TEETH ARE CLOSE: Premolars and Molars
15. POSSIBLE LOCAL COMPLICATION WHEN EXTRACTING MAXILLARY TEETH: Perforation of the maxillary sinus
16. TO REMOVAL THE LOWER PREMOLARS, THE FORCEPS ARE USED: Beak-shaped without spines
17. LOCAL CAUSE OF BLEEDING FROM THE socket IS: Fracture of the intercoronal septum
18. INDICATION FOR URGENT TOOTH EXTRACTION IS: intractable purulent inflammation in the periodontium
19. WHEN EXTRACTING TEETH WITH THE CROWN PRESERVED, THE following are USED : forceps with non-converging cheeks
20. TO STOP BLEEDING WHEN SOFT TISSUE DAMAGE IS USED: Applying sutures to the wound
21. Which of the following suture materials are conditionally absorbable? Silk, polyamide
22. COMPLICATIONS ARISING DURING REMOVAL OF THE EIGHTH TOOTH OF THE UPPER JAW INCLUDE: Fracture of the tubercle of the upper jaw
23. DISLOCATION OF THE LOWER JAW IS POSSIBLE DURING TEETH EXTRACTION: 4.7, 3.7
24. MOST OFTEN, A FRACTURE OF THE LOWER JAW OCCURS DURING TEETH EXTRACTION: 3.8 4.8
25. INSTRUMENTS USED TO REMOVAL UPPER MOLARS: S-shaped forceps with a spike
26. A LOCAL COMPLICATION DURING A TOOTH EXTRACTION OPERATION IS: fracture of the crown or root of the tooth
27. A LOCAL COMPLICATION AFTER TOOTH EXTRACTION IS: Alveolitis of the socket
28. Which of the following suture materials are non-absorbable? Polyolefins, Horsehair, Metal wire
29. TO REMOVE THE ROOTS OF THE LOWER TEETH, THE FORCEPS ARE INTENDED: beak-shaped with converging cheeks
30. LOCAL LONG-TERM COMPLICATIONS AFTER TOOTH EXTRACTION INCLUDE: osteomyelitis of the socket
31. TO REMOVAL MOLARS ON THE MANDIBLE IN DIFFICULT OPENING OF THE ORAL CAVITY, THE following are used: forceps curved along a plane
32. INSTRUMENTS USED TO REMOVAL UPPER THIRD MOLARS: Special forceps
33. TO REMOVE THE ROOTS OF UPPER MOLARS THE FORCEPS ARE DESIGNED: Bayonet-shaped
34. WHEN REMOVING THE LEFT PREMOLARS AND MOLARS OF THE MANDIBLE, THE DOCTOR IS POSITIONED FROM THE PATIENT: In front and to the right
35. A COMMON CAUSE OF PROLONGED BLEEDING FROM THE socket IS: Acute leukemia
36. Synthetic suture materials include : Polyglycolic acid derivatives, polyesters
37. IF A TOOTH ROOT IS PUSHED INTO THE MAXILLIAR SINUS, YOU SHOULD: Refer the patient to the hospital
38. THE LOCAL CAUSE OF BLEEDING FROM THE DEPTH OF THE socket IS: injury to the inferior alveolar artery
39. ROTATION IS PERFORMED WHEN REMOVAL: Maxillary incisors
40. WHEN REMOVING THE SIXTH TOOTH OF THE LOWER JAW, THE FIRST MOVEMENT IS PERFORMED: Luxation to the buccal side
41. TO REMOVAL THE ROOTS OF UPPER PREMOLARS, CHEEK TONGS ARE DESIGNED: S-shaped with converging
42. TO REMOVAL THE LOWER INCISERS AND FANGS, THE INSTRUMENTS ARE USED: Beak-shaped forceps
43. IN THE FIRST VISIT FOR ALVEOLITIS, YOU SHOULD CARRY OUT: Removal of the disintegrated clot and loose introduction of iodoform turunda into the socket
44. Natural organic suture materials include: Catgut, Silk, Cellulose derivatives
45. A SIGN OF OPENING OF THE BOTTOM OF THE MAXILLARY SINUS IS: Positive oronasal test
46. TO REMOVAL DISCONNECTED TOOTH ROOTS 3.7 USED: Angle elevator
47. WHEN OPENING THE BOTTOM OF THE MAXILLARY SINUS THEY PERFORM: Suturing with a flap
48. TO REMOVAL THE LOWER THIRD MOLAR INSTRUMENTS ARE USED: Forceps curved along a plane
49. MOST OFTEN, TEETH DISPLACEMENT INTO THE THICKNESS OF SOFT TISSUE OCCURS WHEN TEETH EXTRACTION: 3.8, 4.8
50. COMPLICATIONS ARISING DURING TOOTH EXTRACTION OPERATION INCLUDE: Luxation of an adjacent tooth, Socket Bleeding
51. THE FIRST MOVEMENT WHEN REMOVAL OF THE SIXTH TOOTH OF THE UPPER JAW IS: Luxation to the palatal side
52. A COMMON CAUSE OF BLEEDING AFTER TOOTH EXTRACTION IS: Hemophilia
53. Which of the following suture materials are absorbable? Catgut, Polyurethane
54. TO STOP BLEEDING FROM THE WALLS OF THE socket, the following is done: compression of the bleeding area of the bone
55. TO REMOVAL THE LOWER MOLARS, THE FORCEPS ARE USED: Beak-shaped with spikes
56. TO TREAT THE HOLE AFTER TOOTH EXTRACTION, USE: A curettage spoon
57. DURING THE OPERATION OF ROOTS REMOVAL OF THE CENTRAL INCISORS OF THE UPPER JAW, THE following are USED: straight forceps with converging cheeks
58. TO REMOVAL THE RIGHT UPPER MOLAR WITH THE CROWN PRESERVED, THE FORCEPS ARE INTENDED: S-shaped with a spike on the left
59. BREAKING OF THE TUBE OF THE UPPER JAW CAN OCCUR WHEN TEETH EXTRACTION: 1.8, 2.8
60. IN THE EVENT OF BLEEDING FROM THE BOTTOM OF THE socket, the following should be carried out: tight tamponade of the socket with iodoform turunda
61. IN THE EVENT OF A ROOT FRACTURE, THE DOCTOR’S INCORRECT ACTION IS: leaving the root fragment in the socket
62. WHEN REMOVING THE EIGHTH TOOTH ON THE LOWER JAW, IT IS RECOMMENDED TO USE A BAYONET ELEVATOR IN THE FOLLOWING CONDITION OF THE DENTH ARCH: presence of stable 6th and 7th teeth
63. AFTER COMPLEX TOOTH EXTRACTION 4.8 SHOULD BE PRESCRIBED TO THE PATIENT: cold on the area of the angle of the lower jaw
64. THE WAY TO STOP BLEEDING FROM THE DEPTH OF THE socket IS: tight tamponade of the socket
65. MOST OFTEN A FRACTURE OF THE LOWER JAW OCCURS DURING TEETH EXTRACTION: 3.8 or 4.8
66. Natural inorganic suture materials include: Metal wire
67. BEFORE THE OPERATION OF TOOTH REMOVAL WITH FORCES, THE SURGEON PERFORMS: separation
68. MOST OFTEN, A FRACTURE OF THE LOWER JAW OCCURS DURING TEETH EXTRACTION: 3.8 4.8
69. WHEN OPENING THE BOTTOM OF THE MAXILLARY SINUS, YOU SHOULD CARRY OUT: Covering the mouth of the socket with iodoform turunda for a period of 5-7 days
70. INDICATIONS FOR ROUTINE TOOTH EXTRACTION IS: Tooth mobility of the 3rd degree
71. PERFORATION OF THE BOTTOM OF THE MAXILLARY SINUS IS MOST LIKELY WHEN TEETH EXTRACTION: 1.6, 2.6, 1.7, 2.7
72. TO REMOVAL THE UPPER PREMOLARS, THE FORCEPS ARE USED: S-shaped without a spike
73. WHEN REMOVAL OF THE SECOND MOLAR OF THE MANDIBLE, THE FIRST MOVEMENT IS PERFORMED: Luxation and rotation
74. LOCAL CAUSE OF BLEEDING AFTER TOOTH EXTRACTION IS: Soft tissue injury
SECTION: PERIODONTOLOGY
Name the instrument – Periodontal probe
Name the tool - Hoe
Name the instrument – Curette (Universal)
Name the tool - Scaler
Name the instrument – Curette (Zone-specific)
Using Luxators
Thanks to the luxator, it is possible to remove an impacted or severely damaged tooth with minimal stress for the doctor and the patient. The procedure is easier than using an elevator and safer.
The handle of the tool is held with the right hand. The index finger is placed slightly above the cheek of the instrument. The working part under the gum is not inserted directly, but at a slight angle. The movements are of an oscillatory (swinging) nature, disintegrating. This helps to separate the periodontal fibers, expand the alveoli and eliminate the vacuum in this area. All this contributes to the trouble-free removal of the tooth from the socket using forceps, and if it has only one root, forceps are not needed at all.
Modern dentistry has everything necessary to carry out the removal procedure efficiently and painlessly for any degree of destruction, even if only a small part of the root remains. There is no need to be afraid of surgery. Clinical observations and patient reviews show that with correctly selected instruments and highly qualified physicians, postoperative complications are reduced to zero.
Author: Natalya Stagurskaya, dentist, especially for Karies.pro
Using forceps to remove teeth
Which forceps are chosen depends on:
- from the jaw on which the manipulation will be performed,
- groups of teeth (lateral, anterior),
- integrity of dental tissues,
- mouth opening width.
The type of forceps used in these cases is noted above.
The main purpose of their use is to extract the dental unit (root) from the socket. This can be done in 2 ways:
- Luxation - rocking. The method is indicated for molars and premolars with multiple roots.
- Rotation is rotation around an axis. Used to extract incisors and canines.
Operating technique using forceps:
- Local anesthesia.
- Cheek placement.
- Their advancement into the subgingival area.
- Fixation.
- Rotation or luxation.
- Extracting a dental unit from the socket.
All stages must follow strictly one after another. The success of the surgical intervention and the absence of complications depend on this.
Auxiliary Tools
In severe clinical cases, when dental units are impacted or severely damaged, it is impossible to remove them using forceps. To do this, use auxiliary tools: elevator, chisel, luxator. Elevators are used in dentistry:
- W. James,
- Kuplanda,
- Cryer.
Recently, doctors have begun to replace elevators, and in some cases, dental forceps, with luxators. This choice is explained by the easy penetration of the instrument into the periodontal zone and low trauma to the alveolar bone. At the same time, the risk of postoperative complications is minimal.
Ways to hold forceps
The tooth extraction operation is performed with the right hand using forceps. The surgeon's fingers should be positioned so that with one hand it is possible to move the jaws of the forceps apart and bring them together. The forceps are held in such a way that they can be moved along the axis of the tooth under the gum. There are two ways to hold the forceps. The first method involves holding both handles of the forceps with the entire right hand, except for the IV and V fingers. These fingers are placed between the handles; if necessary, they can be used to push the jaws apart. When the handles of the forceps are closed, fingers IV and V are removed from the space between the jaws. In the second method, the most suitable for removing teeth of the upper jaw, the thumb covers one handle of the forceps, and the IV and V fingers hold the other handle. The ends of both handles rest against the palm, which helps propel the forceps. The branches of the forceps are moved apart, straightening the third finger, and closed when bending the fourth and fifth fingers. When bringing the third finger out after applying the forceps, they are squeezed with all fingers except the index.
Methods of holding forceps : a, c - when applying forceps to a tooth; b, d - when fixing the forceps on the tooth
Removing teeth using an elevator
An elevator is usually used when the coronal part is severely damaged. To do this, take the handle of the tool in the palm of your right hand, place your index finger on the working part of the elevator, 1 cm away from the cheek. The cheek is deepened into the gap between the tooth being removed and the adjacent tooth in order to disrupt the ligamentous apparatus that holds the root in the socket, and a strong dislocation movement is performed.
After this, the cause of the pain is removed from the socket, sometimes requiring forceps. During operation, the cheek of the elevator rests against a nearby tooth. To prevent dislocation of this unit, it is necessary to firmly fix it in the socket with two fingers.