Over time, dental adhesives have changed—and only for the better. With each new generation, dentists justifiably benefit from improved adhesion quality and more convenient and simpler application techniques. The latest generation of adhesive systems - also known as universal adhesives - are considered to be the new breakthrough in the field of dentistry today.
"Adhesive" evolution
Dental adhesive systems have evolved significantly in two main ways: effectiveness and ease of use.
“Dental adhesives have evolved from 4-bottle systems to single-bottle systems,” says Dr. John O. Burgess (Dr., John O. Burgess, DDS, MS, Professor and Dean of Clinical Research at the University of Alabama, Birmingham).
“Basically, adhesives have become much simpler and easier to use, easier to understand, and faster to work with. Speed of application is a major advantage because it reduces the time window for possible contamination by blood or saliva, which can lead to a significant reduction in adhesion strength. The faster we can apply the adhesive and cure it, the more likely we are to create a strong, long-lasting restoration.”
Simplification, reliability and convenience in creating adhesive restorations go hand in hand in the practice of a dentist, allowing them to also work with various dental materials.
“The evolution of adhesives has created formulations that allow us to achieve adhesion not only to enamel and dentin tissues, but also to metals, zirconium, ceramics, which makes such adhesive systems multifunctional in terms of use and application with various materials,” states Dr. Burgess. “These capabilities of universal adhesives allow them to be used in direct composite restorations and in non-direct restorations. When you need to create a particular restoration, these systems will be as easy as possible - easy to use. The more you work with universal adhesives, the more accustomed you become to them and the more you understand their convenience and effectiveness.”
Adhesive systems for direct and indirect restorations
Dentists use adhesives for two types of restorations—direct and indirect. The methods of application in both cases are different, so the doctor needs to understand how to work with the adhesive in each situation.
Application of adhesive
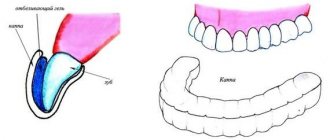
Adhesion in the case of a direct restoration is the procedure of “sticking” a composite material of a specific shade that matches the shade of the tooth being restored. In this case, the procedure is performed to recreate the function or shape, or to restore the color of a damaged tooth. Once the composite material is placed into the tooth cavity and shaped into the desired shape, it can be polymerized.
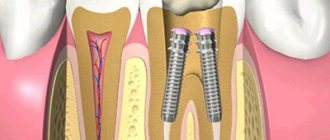
Adhesion in the case of indirect restorations is made with restorations that were created in the laboratory or using CAD/CAM technology in the dentist's office. An impression of the required damaged tooth(s) is created, or electronic digitization of the required area is performed using an intraoral scanner. Next, the data or impressions are sent to the dental technician’s laboratory and he creates an “indirect” restoration for the patient. The finished work is returned to the dentist, who installs it in the patient’s mouth.
Dr. Burgess also reminds us that most dentists use different adhesive systems. However, new adhesives - universal - can be used for both direct and indirect restorations
“If you look at survey data among dentists, most of them use different adhesives in their daily practice,” states Dr. Burgess. “A separate adhesive is used for indirect restorations - when installing crowns, bridges, inlays (inlays/onlays) - and a separate adhesive is used for direct restorations - when using composite materials, Classes I, II, III, IV according to Black.”
“...universal adhesives can be used to create both direct and non-direct restorations...”
The term "adhesion"
Composite materials have been used for more than 30 years in dental practice and they are the ones that receive special attention today. In recent years, it has been possible to significantly improve the physical and optical properties of composite materials, identify new mechanisms of adhesion to dental tissues, and improve the clinical methods of using composites. All this has led to the expansion of indications for the use of composites. They are used for the restoration of anterior teeth with defects of carious and non-carious origin, as well as for the aesthetic and functional elimination of various dental malformations.
In order to improve the adhesion of the material to the tooth tissues, in recent years, special attention has been paid to adhesive agents that improve the fixation of the filling material not only to the surface of the enamel, but also to the dentin. Work on the use of adhesive methods in dental restoration has been going on for almost fifty years.
The word "adhesion" comes from the Latin "adhaesio", which means "sticking", sticking together of the surfaces of two dissimilar solids or rigid bodies. The terms "adhesion" and "adhesive system" in dental terminology describe materials that, when applied to a surface, can bond together, resisting separation and transmitting load through the bonding surface. Attachment force or adhesion force is measured by the force that an adhesive can withstand without breaking.
A closer look at the adhesion process
The two main steps to ensure adhesion, stability and ease of use are etching and polymerization methods.
Etching
In order to create adhesion on enamel and dentin, an “etching” stage is necessary. This is usually done using a solution of phosphoric acid.
There are 3 different etching techniques:
The obvious difference in the three methods presented is the use of phosphoric acid. The technique using orthophosphoric acid provides better surface demineralization of the enamel, but does not increase the patient's postoperative sensitivity. There is no obvious difference in response to cold between total etching and self-etching techniques.
“Enamel etching with phosphoric acid is very pronounced, effective and understandable,” says Dr. Burgess. “If you move to formulations with a pH of 2.3 to 3.2 (usual values for universal adhesives), these materials do not fully open the enamel interprismatic space, which can lead to microleakage and destruction of the restoration in the future.”
Universal adhesives can work in any etching technique and provide good quality adhesion, while total and selective etching techniques show the best adhesion to enamel.
The advantage of universal adhesives is that we can use them in total etch, selective and self-etch techniques,” says Dr. Burgess...
Polymerization
Dental cements are used to create indirect restorations. There are basically three options for curing cements. The curing process is also called polymerization.
There are three types of curing materials:
| Chemical Curing Materials | Light curing materials | Dual Lead Materials |
| Produced using a curing lamp. “Dentists use this polymerization option when there is limited access of the lamp to the illuminated surface or the thickness of the material layer does not provide confidence that the lamp light will be able to provide polymerization to the full depth,” explains Dr. Burgess. | Mandatory use of polymerization light. The composites mainly contain camphorquinone as a photoinitiator during polymerization. Dr. Burgess points out that the best adhesion and color stability is achieved by light curing the materials. | They can be polymerized both with the help of light and chemically. |
Dentists definitely need to know about the curing method of a particular material, because... Light-curing and chemical-curing materials cannot be used at the same time. Dual-cure materials can be used in any application.
“There are differences in the use of each material and some of them cannot be used together,” says Dr. Burgess. “If you use a light-curing adhesive and put a chemical-curing cement on top, that combination will not work.
However, dual action activators have been developed. They are mixed with adhesive. Adding an activator does not mean that the adhesive becomes a dual-cure compound, it means that the adhesive becomes compatible with dual-cure cements.”
Generations of adhesives
Interesting fact: almost every filling, composite, and polymer has its own adhesives that are most suitable for this particular option.
Each adhesive created belongs to a separate generation. The 4th was revolutionary, as close as possible to modern systems. This is what was used most often. Everything that existed before it is not used in modern dentistry, so we will not talk about them. Let's take a closer look at the existing options:
- 4th generation adhesives. Provide high adhesion, include 3 components: bond, primer and conditioner. Disadvantages include the complexity of the work.
- 5th generation. The materials included in the composition combine the properties of an adhesive and a primer, so the work is carried out in a fewer number of stages. They have high levels of adhesion to dentin and enamel.
- 6th generation. During application, self-etching is carried out to a shallow depth, so “plugs” in the channels are not removed. A huge advantage is the absence of postoperative sensitivity.
- 7th generation adhesives. All the necessary components are contained in one bottle, which significantly reduces the time spent on work.
Modern dentistry has made great progress, so by visiting a doctor, you can get high-quality results that will last for many years.
The iOrtho clinic network provides high-quality services for correcting malocclusion with Invisalign aligners, sign up for a consultation now!
How to make the right choice
Among all the variety of adhesives, it is sometimes difficult to make the right choice. Dr. Burgess advises paying attention to products that are backed by clinical studies.
What to look for when choosing an adhesive
“have good adhesion strength... suitable for your technique... proven to have long-term research results... can be used in many clinical situations"
“I would look for materials that have good adhesion strengths that will be sufficient for the clinician, as well as materials that have proven themselves clinically.” says Dr. Burgess. “I firmly believe in the effectiveness of those materials that have long-term research results. If an adhesive does not have enough quality research on its use, I would hesitate to use it in my patients.”
Unfortunately, only a few adhesive systems have long-term clinical studies. Dental adhesive Single Bond Universal has the results of 2 and 3 year studies, according to which it shows 94% better results in adhesion when restoring unprepared class V defects.
In addition, the use of universal adhesive systems that can be used in many clinical situations is not only easier to use, but due to this, the risk of medical errors is reduced.
“In my practice, I choose materials that can be used in a variety of techniques and clinical situations, materials that are versatile,” says Dr. Burgess. “If you use the material in multi-applications, you must understand how to use it. Many doctors during lectures tell me “I thought that these materials could be combined when used,” then I look at them and say “You were mistaken, these materials do not combine with each other.” In systems with many components (or bottles, as is the case with adhesives), it is very easy to get confused about the application procedure. However, when using universal materials, this issue is removed and it is possible to simplify the process of use and reduce the time for the procedure. In my opinion, universal materials are the future.”
Adhesive systems continue to improve and at the moment the latest generation of universal adhesives is the best, providing reliable, stable adhesion while being easy to use in the dentist's practice.
Mechanisms of adhesion of composites to the dentin surface
The main problem in ensuring effective adhesion to dentin is its structure. The diacrylates that make up the composites have fairly high adhesiveness to tooth enamel, but in relation to dentin they behave as hydrophobic substances that do not adhere well to its surface, which is due to the peculiarities of the structure of dentin.
Dentin consists of 45% mineralized components, 30% organic structures, and 25% water. The nature of living dentin is such that its surface is always wet, and drying under clinical conditions is practically impossible. Due to the speed of fluid movement in the dentinal tubules, complete renewal of moisture repeatedly occurs on the surface of the dentin. In clinical conditions, even after drying the carious cavity, unnoticeable residual moisture is observed, which can affect the strength of the bond between dentin and composite. In this regard, dentinal adhesive systems must be hydrophilic, i.e. water compatible.
Another problem in the mechanism of adhesion of the composite to dentin is the smear layer, which is formed as a result of instrumental processing of dentin and consists of hydroxyapatite particles, destroyed remains of odontoblasts and denatured collagen fibers. Depending on the type of preparation, this layer reaches a thickness of up to 5 nm; it clogs the dentinal tubules and covers the intertubular dentin like a gasket. If at first it was considered as an insulator that prevents the penetration of microorganisms into the dentinal tubules, now there is no doubt that it interferes with the adhesion of the composite to the dentin surface and, accordingly, the formation of a strong adhesive connection.
In connection with the above, there was a need to search for completely new mechanisms of adhesion of composites to dentin, different from the mechanisms of adhesion to enamel.
Analyzing various adhesive systems for dentin and their adhesion mechanisms, two approaches are fundamentally distinguished. In the first case, the smear layer is completely preserved on the surface of the dentin and is impregnated with hydrophilic low-viscosity monomers and is directly used as a connecting layer between the dentin and the composite.
In the second approach, by dissolving the smear layer and superficial decalcification of dentin. This approach is the most common currently.
Dentin etching (conditioning)
In 1979, the Japanese physician Fuzayama first used dentin etching, and since then this procedure has been widely introduced into practice in Japan. In Europe, this happened later, when it was proven that pulpitis after etching is not associated with the damaging effect of acid on the pulp, but with the phenomenon of microleakage and depressurization of fillings. In addition, older generation adhesive systems were incompatible with dentin.
Modern dentin adhesive systems include mandatory pre-treatment of the dentin surface with so-called dentin conditioners, which promote the penetration of hydrophilic monomers into the surface layer of dentin and their chemical adhesion to the hydrophobic monomers of the composite.
Dentin conditioning is a chemical modification of the dentin surface using acids such as citric, polyacrylic, lactic, etc. In this case, the smear layer is removed completely or partially, and the dentinal tubules are also fully or partially opened. In addition, demineralization of the surface layer of dentin occurs, exposure of collagen fibers of the organic matrix and activation of dentin ions and apatites.
Conditioners in some adhesive systems must be removed using a stream of running water. The dentin surface must then be slightly dried. One of the main conditions for high-quality adhesion is the degree of moisture of the dentin after removing the etching solution. This is primarily due to the hyphrophilicity of the primer. Thus, the adhesion force decreases sharply when dentin overdries. In this case, collapse and loss of collagen fibers are noted, which impairs the penetration of the primer between them to form a strong bond. Dentin that is too wet also does not provide sufficient adhesion. The main criterion for the degree of dentin moisture is “sparkling” dentin, on which there are no “wet puddles”.
Subsequent application of a dentin adhesive system (primer) ensures the penetration of hydrophilic monomers into the open dentinal tubules, saturating the demineralized surface layer of dentin and adhesion to its exposed collagen fibers. With the formation of a hybrid zone. The hydrophilic resins that make up the dentinal adhesive penetrate into the dentinal tubules; the spaces previously occupied by hydroxyapatite encapsulate collagen fibers. After polymerization of the adhesive, a thin layer of new substance is formed, consisting of adhesive components and dentin collagen fibers. This is called the hybrid layer.
The hybrid layer not only provides reliable fixation of the composite to dentin, but also is an effective protective barrier against the invasion of microorganisms and chemicals into the dentinal tubules and tooth cavity. In addition, it blocks the movement of cerebrospinal fluid in the dentinal tubules and prevents postoperative sensitivity.
This mechanism of action is used, for example, in dentinal adhesives: Gluma (Bayer), Denthesive (Kulzer) and Scotchbond Multi Purpose (3M).
This adhesion mechanism can also be achieved by treating dentin with so-called self-conditioning primers, which contain, along with hydrophilic monomers, one or another organic acid. Under the influence of these primers, the smear layer of dentin is partially dissolved, and the dentinal tubules are also partially opened. The surface layer of intertubular dentin is demineralized and simultaneously impregnated with hydrophilic monomers. The smear layer is not washed off, but is sprayed, and its sediment falls on the surface of the dentin. The adhesion of the composite to dentin is achieved due to the penetration of polymers into the dentinal tubules and the formation of polymer processes and due to the impregnation of the surface layer of dentin with monomers. This mechanism underlies the following adhesive systems: ART – Bond (Coltene), Scotchbond (3 M) and Syntac (Vivadent).
Thus, an adhesive system for enamel and dentin should have the following properties:
provide good initial and long-term bond strength to enamel and dentin;
have good biocompatibility;
minimize marginal permeability;
prevent secondary caries and marginal staining (as a consequence of marginal permeability);
be convenient and easy to use;
have a long shelf life;
be compatible with a wide range of restorative materials;
should not be toxic and cause sensitization to staff and patients;
should isolate the tooth surface from oral fluids.
For dentin adhesive, we add three more requirements:
penetrate into etched dentin;
have hydrophilic properties;
If possible, remove the smear layer.
CONTENT
From the author Introduction Chapter 1. Preparation and organization of the workplace Chapter 2. Preparing the patient for restorative treatment 2.1. Removing dental plaque, determining the color of the composite 2.2. Anesthesia, preparation of hard dental tissues 2.3. Acid etching or conditioning of hard tooth tissues 2.4. Application of adhesive system 2.5. Introducing a composite into a carious cavity 2.6. Grinding and polishing the restored surface 2.7. Treatment of the restoration surface with sealants Chapter 3. Classification and basic properties of composite materials Chapter 4. Filling carious cavities 4.1. Filling class I carious cavities with composite materials 4.2. Filling of class I cavities with standard KepaMnnecKHMk CERANA inlays from NORDISKA DENTAL (Sweden) 4.3. Filling class I cavities with silver amalgam 4.4. Filling cavities of class II 4.5. Filling cavities of classes III, IV 4.6. Filling class V cavities Chapter 5. Restorative technologies 5.1. Making veneers using the direct method 5.2. Crownless method of restoration of a lost tooth using CONNECT or CONSTRACT 5.3. Tooth restoration using an intracanal pin from CONNECT 5.4. Splinting teeth for periodontal diseases using CONNECT Chapter 6. Composite materials from KERR in the aesthetic restoration program References
Preparing the patient for restorative treatment
Methodological principles and sequence of work with composite materials
Having collected an anamnesis and examined the patient, the doctor must prepare the patient in an accessible form for an adequate assessment of the capabilities of the restoration technique. The patient must know all the pros and possible disadvantages of this treatment method. The doctor is obliged to pay careful attention to all the patient’s wishes and take them into account during restoration, if they do not contradict medical indications; answer all questions asked by the patient. It is necessary to begin restoration with complete trust in each other, the doctor and the patient, being in the status of allies, accepting certain obligations.
The patient must clearly understand that the final cosmetic effect of the future restoration can only be assessed after 3-6 days; these are physiological laws. The hard tissues of the teeth must “recover” from the stress they experience from exposure to acid, being in a dry state for several hours.
Great importance is attached to the hygienic condition of the oral cavity before restoration and especially after it. We have already said that restoration can be considered an emergency treatment in dentistry, but it can and should be a delayed treatment measure in case of unsatisfactory oral hygiene. And the patient must understand this, if you want, understand his responsibility. Therefore, ideally, restoration should be carried out only after removal of dental plaque with a scaler and professional teeth cleaning with special brushes with fluoride-free pastes, and, if necessary, possibly after a short course of treatment by a periodontist.
As Dr. Golub-Evans rightly believes (I quote from I.M. Makeeva, 1997), a beautiful smile consists of an intact red border of the lips, healthy gums and intact, correctly positioned teeth. Therefore, if the doctor fails to correct the hygienic condition of the patient’s oral cavity or the patient cannot understand the importance of this stage of treatment, the doctor should remember his medical duty and refuse restoration , although this is, frankly speaking, not easy to do. Payment for restoration work is also a difficult issue, since it is usually higher than the fee for a regular filling. A well-written price list will help avoid any misunderstandings; it is only necessary to discuss all financial issues before the restoration begins.
This is an element of the so-called “directional polymerization technique” of materials, the technique of which we will analyze later using the example of filling carious cavities of class I according to Black.
With well-preserved tooth walls (thick walls), it is necessary to re-polymerize from the side of the carious cavity.
Subsequent layers of material should be no thicker than 1.5-2 mm.
And we always remember: the more layers of composite, the less polymerization shrinkage.
After taking a portion of material from a syringe or unidose, it is necessary to immediately close it with a cap to prevent contact with light and air.
If for some reason the syringe has been left uncovered for some time, then before taking the next portion of the composite it is necessary to squeeze out the material, “cut off” 1.5-2 mm of the material with a smoothing iron and throw it away.
Next rule. The last layer of composite is applied with a slight excess, which is subsequently sanded off. The fact is that at the moment of polymerization, the composite comes into contact with air, forming a DISPERSION LAYER on its surface; it is also called an oxygen-inhibited layer. The thickness of this layer is 15-115 microns, it allows subsequent layers of the composite to be connected to each other without the use of adhesive, so it cannot be damaged (washed, dried) during restoration. If we accidentally violated the integrity of this layer or contaminated it (oral fluid got in), it needs to be recreated. For this purpose, you should: 1. Treat the surface of the composite with conditioner for 15 s. 2. Rinse off the conditioner. 3. Dry the surface of the composite. 4. Apply a thin layer of adhesive using the applicator. 5. Lightly blow the adhesive with air. 6. Polymerize the adhesive for 20-30 s, according to the instructions for the specific material.
At the same time, the oxygen-inhibited layer of the composite is not complete, and if it is left after polymerization of the last layer in the restoration, then before it is erased - during eating and brushing teeth, it will have time to absorb food dyes, which have a negative impact. will affect the aesthetics of the restoration. Therefore, any restoration must be completed with grinding and polishing to prevent this negative phenomenon.
When using composite materials and transparent polyvinyl chloride caps to restore the tooth crown, the composite polymerizes without oxygen, forming a smooth, shiny
a surface devoid of an oxygen-inhibited layer. This surface does not require grinding or polishing, maintaining its gloss for a long time even in chemically cured composites.
| Fig.7. Final result | |
It should also be remembered that during the polymerization process, 20-30% of uncured material remains in the light-cured composite, which can have a toxic effect on the dental pulp.
Therefore, the quality of the restoration, which consists of many components, will be higher if we use modern adhesive systems that reliably protect the pulp and powerful polymerization lamps that polymerize the maximum percentage (70-80%) of the composite.
Polymerization is influenced not only by light intensity and wavelength. The distance from the light source, the composition of the composites and their color are of great importance. Dark composite material hardens to a lesser depth than light composite material. The light intensity is inversely proportional to the square of the distance from the tip of the light guide to the surface of the filling. Therefore, the light flux should be directed as close as possible to the filling material.
The restoration may take several working hours, so the patient should be warned about this and the doctor should plan his work schedule to avoid unnecessary stress due to lack of time.
Working with composite materials has fundamental principles and a certain sequence, knowledge of which will help you feel confident in all the variety of composite materials , making minor adjustments, according to the instructions for a specific material.
The sequence of restoration stages depends on the chosen method of Isolation of the surgical field , i.e. Will the doctor apply a rubber dam or limit himself to retraction threads and cotton rolls. If a doctor works without a dental dam, and in Russia this is the rule rather than the exception, then the first step is to REMOVE DENTAL PLAQUE.
2.1. REMOVAL OF DENTAL PLAQUE, DETERMINATION OF COMPOSITE COLOR
This procedure is carried out with mechanical toothbrushes and rubber cups using special toothpastes that do not contain fluoride and oil, for example, Zirkate (Dentsply).
Having cleaned the tooth of plaque, we proceed to the procedure of DETERMINING THE COMPOSITE COLOR. The color of the composite is easier to determine in the office, where the entire design, as we have already said, is made in pastel colors. The best time is from 10.00 to 12.00 in clear sunny weather. Of course, given our geographical zones and climatic conditions, this is a difficult task, but we should at least know how to do it so as not to make mistakes if possible. Three people should take part in selecting the color of the material: the patient, the dental assistant and the doctor himself. The assistant plays an important role in this process. It is believed that female assistants under the age of 35 generally have better color sensitivity. During the process of determining the color, the patient’s teeth must be kept moisturized all the time, since when dried, the enamel becomes lighter, and if we take into account that during polymerization the material can seem to lighten by half a tone, then the error can be significant.
When selecting a color, we start by giving the VITA color and a mirror to the patient, and he “plays doctor” for 5 minutes (as a rule, he chooses a lighter color than necessary), and then my assistant and I get involved. It should be remembered that the standard VITA shade only meets 80% of the requirements for esthetic restorative dentistry.
Currently, electronic instruments have been developed to determine color, but they are difficult to work with and have significant errors.
In the clinic we often do the following. Having determined the appropriate color, we take a portion of the composite, apply it to a transparent separating matrix and polymerize the material. Of course, with this method
material consumption increases, but the possibility of error is minimized. Now you can start pain relief.
2.2. ANESTHESIA, PREPARATION OF HARD DENTAL TISSUE
We usually use local anesthesia; We select medications taking into account the concomitant pathology and affiliation of the tooth. Most often we use Ultracain DS forte, Ultracain DS (Hoechst) or Septonest 1:100000, 1:200000 (Septodont).
The mucous membrane is pre-treated with anesthetics in the form of XYLOGEL, Xylonor gel (Septodont) or aerosols: XYLONOR SPRAY, PERYL-SPRAY (Septodont). According to indications, we use premedication, as a rule, apodiazepam (S.A. Rabinovich, 2000).
If the doctor works with a rubber dam, the sequence of these stages will be as follows: anesthesia, isolation of the surgical field (application of a rubber dam), removal of plaque, determination of the color of the composite. The next stage in both the first and second cases is PREPARATION OF HARD TISSUE OF THE TOOTH.
The preparation of carious cavities for composite materials has its own characteristics, which, in turn, have undergone some changes in recent years.
In the history of dentistry in 1962, when RLBowen created the first composite material consisting of BIS-GMA and sialanized quartz flour as a filler (a few years earlier in 1955, MGBuonocore discovered the possibility of a sharp increase in the adhesion force between the composite and the dental tissues after processing the latter phosphoric acid), became epoch-making, and, finally, 1977 - the first light-curing composite materials were obtained, polymerizing under the action of the visible spectrum of ultraviolet radiation.
It has been experimentally proven that by cutting the prisms along the edge of the enamel at an angle of 40-42° (creating a bevel, rebate), then treating this surface with acid, thereby removing the organic matrix from the interprismatic spaces, we create conditions for the adhesive system to flow into the interprismatic spaces, forming unique microadhesions between the tooth and the composite, indirectly through the adhesive system. Surprisingly, but true: flowing into the interprismatic spaces, the adhesive system seems to cover each enamel prism, increasing the adhesion area up to 1000 times the size! An increase in the contact surface area between the tooth and the composite by 1000 times due to microadhesion makes it possible to deviate from the classical preparation of carious cavities according to Black.
Moreover, at present, the postulate relating to the creation of a bevel along the edge of the enamel has been preserved only for the anterior teeth; In the area of chewing teeth, when preparing carious cavities, bevels are not necessary.
Using advanced technologies in aesthetic conservative dentistry, leading dentists working in the field of restoration of hard dental tissues use turbine tips less and less during preparation and more and more mechanical ones, preserving the hardest tooth tissues possible. Based on this position, in fact, a tunnel preparation technique was developed, which, in turn, is based on the property of composites to additionally strengthen overhanging or weakened tooth structures.
The preparation of carious cavities should be completed by treating the edges and walls with finishing burs, which reduces the possibility of subsequent formation of so-called “microleaks” at the enamel-filling interface. And one more note: the prepared cavity should not have a box-shaped shape, which is caused by stress during polymerization.
Having dissected the carious cavity, taking into account the above recommendations, let’s imagine that we “fit” within the framework of the initial diagnosis - “moderate caries”.
This is an important point before the next step - acid etching of the carious cavity. We want to emphasize that modern technologies using the latest adhesive systems such as: Optibond Solo Plus -Kerr; Single Bond Adhesive - 3M; Gluma Comfort Bond - Heraeus Kulzer and others do not require the preliminary use (if diagnosed with “moderate caries”) of any insulating or therapeutic pads. Life itself has proven this. We use all these adhesive systems in our medical practice.
2.3. ACID ETCHING OR CONDITIONING OF TOOTH HARD TISSUE
The history of the development of acid etching comes down to the following stages. At first, we were offered to etch the enamel for a minute without applying acid to the dentin, then the enamel etching time was reduced to 30 s, and even later the technology of the so-called total etching of enamel and dentin appeared, when the enamel was etched for 30 s and the dentin for 15 s.
Finally, materials and technologies have appeared in which acid (conditioner) is applied simultaneously to enamel and dentin for 15 seconds and then washed off with water. This, of course, simplifies the work. Below we will look in more detail at the method of total etching; we only want to draw attention to the following circumstance. When etching enamel, you cannot blindly follow only the recommended number of seconds for etching.
The criterion that the enamel is truly etched fully is the appearance of a white (matte) stripe after washing off the acid and drying the enamel. It must be remembered that enamel can be so resistant that 15 or even 30 seconds of acid exposure may not be enough to create conditions for microadhesion of the composite to the tooth. In this case, you should reapply the acid only to the enamel. Fortunately, such clinical cases are becoming increasingly rare.
Orthophosphoric acid at a concentration of 30-40% has a permanent etching effect. If the acid concentration is less than 30%, then poorly soluble brushite (CaHPO4x2H2O) is deposited on the tooth enamel. This compound is difficult to remove with a water jet and prevents the composite from bonding to the tooth enamel.
If the acid concentration exceeds 40%, then rapid precipitation of calcium phosphate compounds occurs, which interferes with the conditioning of the enamel. When etching with 30-40% orthophosphoric acid, calcium phosphate is also deposited on the enamel (but in a smaller amount), and it should be carefully removed with a water jet.
It is also necessary to thoroughly wash the tooth with a water jet in order not to leave acid residues on the enamel, which could interfere with the binding of the adhesive to the hard tissues of the tooth.
After etching, due to different degrees of solubility of the enamel prisms and the interprismatic substance, a microretaining relief is formed (unequal spatial orientation).
There are three types of enamel etching: Type I etching, if the enamel prisms dissolve predominantly. Type II etching, if the interprismatic substance is predominantly etched. Type III etching is mixed, in which enamel prisms and the interprismatic substance are etched. The mixed type of etching has a weaker holding effect on the composite.
Thus, as a result of conditioning, we increased the surface area by creating a microretention relief - microretention . If the surface of tooth enamel thus modified is treated with an adhesive system, then it, penetrating into the spongy structures, micromechanically adheres to the tooth enamel due to a rheological effect.
It is due to the conditioning of tooth enamel and the use of adhesive that micromechanical adhesion occurs, which ensures a tight marginal fit of the filling.
| Rice. 4. After wetting the conditioned enamel surface with a low-viscosity bonding agent during hardening, micromechanical adhesion occurs due to the adhesion of the adhesive to the enamel prisms (rheological effect): (noLutzMAp., 1976) |
Let's consider the method of applying acid to hard dental tissues. If the instructions say that enamel needs to be etched for 30 seconds, and dentin - 15, proceed as follows: 1. Apply acid to the enamel from a syringe with a needle nozzle. 2. After 15 s, we apply the acid to the dentin and wait another 15 s, then we wash off the acid first with a gentle stream of water with the saliva ejector and vacuum cleaner running and, only after making sure that all the acid has been disposed of, we begin treating the carious cavity with an aerosol, i.e. mixture of water and air for 30 s. Otherwise, the acid can be sprayed throughout the oral mucosa (in the absence of a rubber dam), which is fraught with serious consequences. Restoration is a long process, and acid necrosis may subsequently form on the mucous membrane.
Currently, materials have appeared, for example, POINT 4 (KERR), in which acid etching of enamel and dentin is carried out simultaneously within 15 seconds, which is very convenient to use. I would like to warn my colleagues that it is completely unacceptable to use the method of rinsing the mouth from a glass to remove acid. Already with the first portion of water, saliva proteins, mixed with water, will close the etched niches in the interprismatic space, and no microadhesion between the composite and tooth enamel will occur. Moreover, acid residues in the interprismatic spaces, covered with a protein film, will subsequently adversely affect the condition of the hard tissues of the tooth.
What to do if your water-air gun is broken and your saliva ejector and vacuum cleaner are not working?
There are two ways. In the first case, after etching with acid, place a gauze pad or cotton swab on the tongue. Take a five-gram syringe with a needle and a glass of water. By drawing water (preferably distilled) into the syringe, rinse the acid from the syringe; 0.5 glass of water will be enough. During this time, change wet gauze wipes 1-2 times. In the second case, you should simply use the fairly good adhesive properties of composite materials, eliminating the acid etching step. At least you won’t do any harm, and with classic cavity preparation the filling will last a long time.
In our case, after washing off the acid, we begin to dry the carious cavity . This is a very important stage (like the previous ones), during which we must dry the enamel and leave the dentin moisturized - do not dry out the dentin. Otherwise, postoperative pain may occur.
After drying, the edge of the enamel loses its shine and the surface acquires a matte tint. When the dentin becomes too dry (this happens with us too), we take a clean applicator (branche), moisten it in distilled water, lightly blot it on a clean paper napkin to remove excess water, and carefully moisten the dentin with a sponge on the applicator. Moistened dentin will seem to shine when moistened. Consequently, we have ensured that the enamel is dried and the dentin is slightly moistened. We can proceed to the next stage.
2.4. APPLICATION OF ADHESIVE SYSTEM
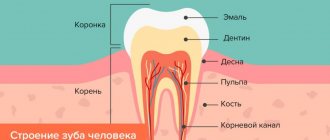
The adhesive system consists of a PRIMER and ADHESIVE. Collagen fibers and dentinal tubules exposed after etching (conditioning) interact with the primer. The primer is essentially a dentin sealant. The primer penetrates through the exposed collagen fibers and, after hardening, forms a so-called hybrid layer between the composite and the dentin surface. At the same time, the primer penetrates the dentinal tubules, forming protrusions after hardening.
The primer seals the dentin, thereby acting as an insulating gasket, and protects the dental pulp from temperature irritants and the toxic effects of residual monomer in the composite. The primer is applied with an applicator or brush onto the etched dentin and rubbed into it with light strokes for 30 seconds, then lightly blown with air (but not dried!), helping to penetrate into the deeper layers. The next step is the addition of the second component of the adhesive system, which is called ADHESIVE.
The adhesive is applied into the cavity with a new applicator (the applicator cannot be used after the primer). The adhesive is applied in a small amount, sufficient to cover the dentin and acid-etched enamel surface. For better distribution and the formation of a thinner layer of adhesive, it is slightly inflated with a gentle stream of air by two short pulses of the air gun button, after making sure that there is only air in the gun, and polymerizes according to the instructions for the specific composite for 10-30 s.
This is how they work with a two-component or two-step adhesive system, consisting of a separate bottle containing the primer and a bottle of adhesive.
Two-component systems have now been replaced by one-component systems, where the primer and adhesive are contained in one bottle. Fluoride compounds and fillers—crushed glass—began to be introduced into such dentin adhesives. Thus, a filled, fluorine-containing, one-component adhesive was obtained, a typical representative of which is Optibond Solo plus from KERR.
The creators of “two-in-one” adhesive systems consider time savings and simpler adhesive application technology to be one of the advantages of this formula. Everything seems to be so, if we omit the fact that in the instructions for using one-component adhesives, some companies suggest applying them twice. Then it turns out that there is no time saving.
Communication with the world's leading dentists working in the field of hard tissue restoration indicates that we are all practically united in our negative attitude towards one-step adhesive systems. You can refer to the statements on this issue by Prof. G. Valletta from Italy, prof. Ulla Pallesen from Denmark, Dr. Haack from Germany and Prof. Norman Feigenbaum is the President of Cosmetic Dentistry in the United States.
In his speeches, N. Feigenbaum always emphasizes the idea that if one-step adhesive systems have to be used, then they should be glass-filled, like Optibond Solo plus or Perma Cwik.
Method of applying one-step adhesive system 1. Apply the adhesive system to the applicator. 2. 30 rub the adhesive into the moistened dentin with light strokes. 3. Lightly inflate with air. 4. Polymerize for 20-30 s, according to the instructions for the specific composite.
2.5. APPLICATION OF COMPOSITE INTO A CARIOUS CAVITY
Before introducing a composite into a carious cavity, the brightness of the illumination of the surgical field should be reduced, since the dental unit's lamp has a halogen bulb, and the composite material may harden under the influence of this light and cannot be modeled. Unfortunately, in the dental literature (even published in 2000) there is a statement by a famous professor that “light-cured composites, due to the absence of time restrictions when working with them, have an advantage over chemically cured materials, since they allow the doctor to simulate a filling in for the required amount of time to obtain the desired result.” Of course, this is not an entirely correct interpretation of the capabilities of light-curing composites.
In order to slightly increase the time for modeling the composite, the focus of the dental lamp should be shifted to the side, i.e. use diffused light. The rule is this: when working on the teeth of the upper jaw, the focus of the light should be on the teeth of the lower jaw or on the chin, while the lamp of the dental unit should be located at arm's length from the dentist.
When working on the PROSTYLE COMPACT (PLANMECA) installation, we achieve dimming of the lighting by pressing a button either on the control panel or on the lamp itself, without changing its position. Of course it's convenient.
It’s good if your office has special sets of tools with titanium coating for working with composite material, but this is not a prerequisite. The following provision is mandatory and fundamental: in order to maximally prevent the inevitable shrinkage of the composite during polymerization, only technology with step-by-step polymerization of the material in layers should be used. In deep cavities their number can reach up to five to seven layers.