Summary
Breakage of nickel-titanium instruments is a major problem in endodontic treatment. A study examining the failure of nickel-titanium files due to torsional loading found that the majority of such failures occurred at the tip of the tool within the last millimeter and in instruments that had a small taper and/or size. Consequently, the tip of small instruments is at higher risk of breakage due to torsional loading, and to prevent this, the use of torque-reducing motors is necessary to reduce apical pressure and prevent the instrument tip from becoming stuck in the root dentin. In contrast, flexural fracture occurs as a result of repeated subthreshold loading resulting in metal fatigue. Numerous studies examining the causes of overload and breakage of machine-assisted nickel-titanium files have confirmed that by pre-expanding the root canal using hand instruments and creating a glide path before using machine instruments, a significant reduction in the rate of breakage can be achieved. This fact highlights the importance of manually pre-expanding the root canal and creating a “glide path” to reduce the incidence of mechanical instrument failure. To pre-expand the root canal and create a “carpet path,” hand-held steel instruments are most often used. Unfortunately, they have a number of disadvantages due to their relative rigidity and the presence of an aggressive tip, which can lead to the formation of ledges or changes in the course of the root canal in curved and/or calcified canals. For this reason, a new PathFile™ (Dentsply Maillefer) set for glide path creation and root canal pre-expansion was recently introduced, consisting of three machine-made nickel-titanium instruments.
PathFile™ are the first instruments specifically designed and intended for the mechanical creation of carpet and pre-enlargement of the root canal. The combination of a low 2% taper, a square cross-section and 4 cutting edges makes these instruments highly flexible, durable and effective, enabling fast and safe treatment of even severely curved and/or calcified root canals. Preliminary scientific research and clinical trials have confirmed that PathFile™ instruments are highly effective in treating severely curved root canals, allowing the creation of a perfect “glide path” without altering the course of the root canal, even if the working length is incorrectly determined.
Reciprocating tip
In 1964, the Giromatic system was introduced for mechanical treatment of root canals. The system was developed to save time on canal processing and is currently represented by a contra-angle handpiece with special files resembling pulp extractors (Ripsi file) or having a screw shape (Hele file). The constant rotation in the tip is transformed into another - a quarter turn movement. In some tips, reciprocating movements in the vertical direction of 0.8 - 1 mm (Endo - Cursor) are carried out every quarter turn.
The poor clinical outcome of these techniques may have been due to the inadequate design of the endodontic instruments used. In the 1980s, these problems were overcome with the development of "Dynatrat" files, S-shaped files with a smooth tip without grooves (guide tip only). They were used to process the coronal 2/3 of the canal, and then the apical third was processed manually.
It should be noted that many works have appeared comparing manual and machine processing of canals. It was noted that during machine processing, especially in curved canals, the canal very often acquired an “hourglass” shape. In addition, the problem arose of clearing the channel from sawdust, and the constant threat of blocking the channel with it. Gaining time in preparation turned into losing time in cleaning the canal. The time required was comparable to or even greater than manual preparation. Losing the “channel sense” led to complications.
Introduction
The use of machine-made nickel-titanium instruments has radically changed the technique of mechanical root canal preparation and the prognosis in difficult clinical situations. Numerous “invitro”1−13 and “invivo”14−17 studies have shown that machine-made nickel-titanium instruments are superior to steel hand files in the quality of root canal formation and the possibility of their use in canals with pronounced curvature, reducing the risk of creating ledges or straightening the canal curvature . Schäfer16 conducted an in vivo study in which 110 root canals were treated with machine nickel-titanium instruments and 84 canals with hand instruments. All canals were processed by 8 experienced doctors. Before the start of treatment and after obturation of the canals, x-rays of each tooth were taken.
Straightening the curvature. Nickel-titanium machine tools.
Work time. Manual steel files.
Rice. 1. Probability of root canal straightening and working time after in vivo root canal debridement using nickel titanium machine tools and hand steel files (adapted from Schäfer et al.16).
Straightening of the root canal curvature was assessed using a computer image analysis program. Root canal preparation using machine-assisted nickel-titanium instruments significantly reduced working time and resulted in less straightening of the canal curvature compared to the use of hand instruments16 (Fig. 1). In another in vivo study, Sonntag et al17 compared the risk of complications in root canal preparation with hand-held steel instruments and machine-operated nickel-titanium instruments. All clinical cases were performed by students. The results demonstrated that even in the absence of sufficient experience on the part of the practitioner, the quality of root canal preparation using nickel-titanium instruments was higher than that using manual steel files, while the number of shoulders was significantly reduced and the integrity of the apical foramen was maintained.17 Unfortunately, the use machine-made nickel-titanium instruments have serious limitations as they are associated with an increased likelihood of file breakage within the canal compared with steel instruments.17,18 Suter et al. When assessing in vivo the possibility of successfully removing a broken instrument from a root canal, success rates are reported to be 87% of cases. Studies of removed instrument fragments confirm that machine-made nickel-titanium instruments break more frequently than hand-operated steel instruments.18 Sonntag et al.16 report that breakage of nickel-titanium instruments is a major problem in endodontic treatment. Studies evaluating the influence of various factors on the breakage of machine endodontic nickel-titanium instruments have demonstrated that file breakage occurs primarily under the influence of torsional load19−25 and instrument fatigue.21,23,26−28 Torsional load depends on the contact area of the instrument with root canal dentin, the taper and diameter of the instrument, the area of the instrument subjected to stress, the strength (cross-sectional shape) of the instrument, the design of the working part, and the torsional load applied to the instrument.27,28 A study on the failure of nickel-titanium files due to torsional load has shown that the majority of such failures occur at the tip of the tool within the last millimeter and for instruments that have a small taper and/or size.24,25,27,28 Consequently, the tip of small-sized instruments is at higher risk of failure due to torsional loading, and to prevent this, the use of torque-reducing motors is necessary to reduce apical pressure and prevent the instrument tip from becoming stuck in the root dentin.27,28 In contrast, flexural fracture occurs as a result of repeated subthreshold loading, resulting in metal fatigue.
The bending load depends on the radius of curvature and size of the root canal, the rotational speed and flexibility of the instrument, the characteristics of the nickel-titanium alloy, the presence of intracanal obstructions, and sudden changes in the course of the root canal (for example, in the case of fusion of canals or the presence of additional canals).27,28 Numerous Studies examining the causes of overloading and failure of machine-assisted nickel-titanium instruments have confirmed that a significant reduction in the incidence of machine instrumentation failure can be achieved by pre-enlarging the root canal using hand files and creating a “glide path” before using machine instruments. In a study of the effect of pre-enlargement of the root canal on the failure rate of 4% taper nickel-titanium machine instruments, Roland et al.29 concluded that “pre-enlargement of the root canal with hand files followed by the use of machine instruments allows the instruments to be used more times before failure than with the isolated use of the crown down technique recommended by the manufacturer.” Peters et al.,30 examining the physical performance of machined nickel-titanium ProTaper instruments in the treatment of curved maxillary molar canals “in vitro”, showed that “even when significant load was applied in some clinical cases, no ProTaper instrument failed in the presence of adequate "carpet path" Blum et al.31, after analyzing the mechanical preparation of extracted teeth using ProTaper machine instruments, determined that “particular attention in a precise root canal protocol should be given to the use of small, flexible hand-held steel files to ensure that each part of the root canal has sufficient space for unobstructed machine access.” tools in the process of further machining...". Berutti et al32 evaluated the effect of manual root canal pre-expansion and torque on failure rates using ProTaper machine instruments. In this study, the authors used 400 plastic training blocks divided into 2 groups. All blocks were processed with ProTaper instruments, but one group had the canal pre-dilated manually using hand instruments to ISO #20 before using machine files. The results of the study showed that after manually pre-expanding the root canal, ProTaper instruments were able to process significantly more plastic blocks before failure occurred32 (Figure 2).
Rice. 2.
Number of plastic training blocks processed to failure by ProTaper S1, without pre-expanding the canal to a #20 ISO file and with pre-expansion. Adapted from Berutti et al.32 No pre-expansion. Pre-extension to ISO file #20.
Finally, Varela et al33 examined the effect of manual canal pre-expansion on the failure rate of three different nickel-titanium machine instruments (ProFile, ProTaper and K3) when used in canals of extracted teeth with curvature greater than 30º. The authors demonstrated a significant reduction in the incidence of file breakage when performing preliminary manual root canal expansion before using machine instruments. In this study, there were no significant differences between the three types of instruments used.33 All of the above studies suggest that the beneficial effect of pre-manual reaming is to reduce the likelihood of the tip of the weakest instruments becoming stuck in the root canal.28−33 In addition, As an explanation for the reduction in machine instrument failure in curved root canals, not only the presence of a smooth “carpet path” to prevent dangerous deformation of the instrument tip must be taken into account, but also the reduction in bending load.28,30,32
Preliminary enlargement of the root canal and creation of a “carpet path” is most often carried out using manual steel files. Unfortunately, these instruments have a number of disadvantages due to their relative rigidity and the presence of an aggressive tip, which in curved and/or calcified canals can lead to the formation of a shoulder or change in the course of the root canal.34 For this reason, the new PathFile™ set was recently introduced (Dentsply Maillefer) for creating a “carpet path” and preliminary expansion of the root canal, consisting of three machine-made nickel-titanium instruments.
Rice. 3.
PathFile™ No. 1−3 (Dentsply Maillefer). PathFile™ No. 1 (0.13 mm). PathFile™ No. 2 (0.16 mm). PathFile™ No. 3 (0.19 mm).
Preparation of root canals. 5th generation of instruments
ROOT CANAL PREPARATION
5 GENERATION OF INSTRUMENTS Dr. Clifford J. Ruddle (USA)
Doctor of Dentistry (DDS), Fellow of the International College of Dentists (FICD), Fellow of the American College of Dentists (FACD)
With the participation of:
Dr. Pierre Machtou (France Doctor of Dentistry (DDS), Master of Science (MS), PhD, Fellow of the International College of Dentists (FICD) Dr. John West (USA)
Doctor of Dentistry (DDS), Master of Science (MSD), Director of the Center for Endodontics
Dr. Clifford J. Ruddle is the founder and director of Advanced Endodontics, an international educational resource, in Santa Barabara, California.
He is an assistant professor of endodontics at Loma Linda University and the University of California, Los Angeles, a clinical associate professor at the University of California, San Francisco, and an associate professor of endodontics at Pacific University School of Dentistry. As an inventor, Dr. Ruddle has developed and improved several tools and devices that are widely used throughout the world. He is well known as an excellent teacher of endodontics, with lectures, clinical articles, tutorials, videos and DVDs in his arsenal. He also has a private practice in Santa Barbara, California. In the early days of modern endodontics, there were many concepts, strategies, and techniques for root canal preparation. Over the past decades, dozens of tools for passing and shaping canals have appeared.
The breakthrough in clinical endodontics occurred with the transition from the use of a long series of stainless steel instruments and multiple Gates Glidden reamers to the use of nickel titanium instruments for canal preparation. Regardless of the techniques used, the goals of mechanical root canal treatment were brilliantly defined almost 40 years ago by Dr. Herbert Schilder1.
With the correct treatment algorithm, mechanical treatment of root canals should correspond to the biological goals of canal preparation, three-dimensional disinfection and obturation (Figure 1).
The purpose of this article is to demonstrate and compare new generations of endodontic nickel titanium instruments designed to improve root canal preparation. It is important that this article will define a new tool system that combines proven design features of the past with the latest innovations of the present, and the operating technique will also be described.
Rice.
1a. Micro computed tomography of the upper central incisor demonstrates a root canal system with multiple exits serving as support for the root apex. Rice. 1b. The radiograph before treatment shows unsatisfactory endodontic intervention on the anterior tooth and denture. The tooth has a fistulous tract.
Rice. 1c. This image after the retreatment procedure shows the importance of shaping the root canals, which contributes to better three-dimensional cleaning and obturation.
Rice. 1d. An X-ray 25 years after treatment demonstrates healing of the bone tissue.
PREPARATION OF ROOT CANALS WITH NI-TI INSTRUMENTS
In 1988, Walia introduced Niti-Nol, a nickel-titanium alloy for root canal preparation that is 2-3 times more flexible than stainless steel alloy for the same instrument sizes.
A revolutionary result of the use of instruments made of nickel-titanium alloy was the ability to machine curved canals using continuous rotation. By the mid-1990s, the first commercially available nickel-titanium rotary tools appeared on the market. Below is a mechanical classification of each generation of instruments. Rather than describe the myriad of tool cross-sections that exist, we will differentiate between tools with passive and active cutting capabilities. Rice. 2. These scanning electron microscope images show the cross section and lateral view of a passive cutting tool with radial edges. Rice.
3. These scanning electron microscope images show the cross section and lateral view of the active tool with sharp cutting edges. FIRST GENERATION
To appreciate the evolution of nickel-titanium tools, it is useful to know that the first generation of nickel-titanium tools had passive radial cutting edges and fixed tapers of 4% and 6% along the entire length of the active blades (Figure 2). This generation required a variety of instruments to achieve dissection goals. In the mid to late 1990s, GT instruments (Dentsply) were introduced which had a fixed taper on each individual instrument of 6%, 8%, 10%, and 12%. The single most important design feature of the first generation of nickel-titanium rotary instruments was the passive radial edges, which allowed the instrument to remain centered in the curvature of the root canal during operation.
SECOND GENERATION
The second generation of nickel-titanium rotary tools came onto the market in 2001. The main difference with this generation of instruments is that they have active cutting edges and only a few instruments are required to complete a complete root canal preparation (Figure 3). To avoid the locking cone and resulting screw-in effect associated with passive and active tapered NiTi instruments, EndoSequence (Brassler) and BioRaCe (FKG) offer instrument lines with alternating contact points.
Although this characteristic is intended to reduce the effect of the locking cone, these lines of tools have a fixed taper in the area of the active cutting part. A clinical breakthrough occurred when the ProTaper (Dentsply), which has multiple increasing and decreasing tapers throughout a single instrument, came to market. This revolutionary progressive taper shape limits the cutting action of each instrument to a specific section of the canal, allowing the use of a shorter sequence of instruments to safely reproduce the Schilder canal shape (Figure 4).
Rice. 4. ProTaper root canal shaping instruments work primarily in the coronal and middle thirds of the canal, while finishing instruments work primarily in the apical third of the canal.
During this period, manufacturers began to actively seek methods to improve tool strength. Some manufacturers have used electropolishing on their tools to remove surface irregularities created by the traditional tool grinding process. However, through clinical observations and scientific research, it was found that electropolishing dulls cutting edges. As such, the observed benefits of electropolishing were offset by the need to apply unwanted pressure inside the root canal to advance the instrument to its full working length. Excessive internal pressure, especially when using fixed taper tools, results in a locking cone effect, a screw-in effect, and excessive torque on the rotating tool during operation. To compensate for the shortcomings or ineffective operation of the tool as a result of electropolishing, other cross-sections of the tools were proposed and the rotation speeds, despite all the dangers, were increased.
THIRD GENERATION
Improvements in the metallurgy of nickel-titanium alloys have become the hallmark of the third generation of instruments for mechanical treatment of root canals. In 2007, manufacturers focused on heating and cooling processes for the alloys to reduce cyclic fatigue and improve safety when working with nickel-titanium instruments in more curved root canals. The desired point of phase transition between martensite and austenite can be identified with the search for a clinically more optimal metal than nickel-titanium. This third generation of nickel-titanium instruments is characterized by a significant reduction in cyclic fatigue and, accordingly, instrument fracture. Examples of heat treated instruments include Twisted File (SybronEndo), Hyflex (Coltene Whaledent) and GT, Vortex, and WaveOne (Dentsply).
FOURTH GENERATION
Another progressive movement in canal preparation is reciprocation, which can be defined as any repeated back-and-forth or up-and-down movement. This technology was first introduced in the late 1950s by the French dentist Blanc. Today, M4 (SybronEndo), Endo Express (Essential Dental Systems), and Endo-Eze (Ultradent) are examples of systems where the clockwise rotation angle of the instrument is equal to the counterclockwise rotation angle of the instrument. Compared to full rotation systems, a reciprocal instrument that rotates at equal angles clockwise and counterclockwise requires more pressure into the root canal to move forward, does not cut as efficiently as a rotary instrument of the same size, and is more limited in removing sawdust and debris from the root canal. channel.
Based on these early experiences, reciprocation technology has steadily developed, leading to the creation of the 4th generation of root canal preparation instruments. This generation of instruments and reciprocation technology are embodied in the much-anticipated one instrument. ReDent-Nova (Henry Schein) introduced the Self-Adaptive Instrument (SAF). This instrument has the shape of a compressible hollow tube; it is assumed that the instrument exerts uniform pressure on the dentinal walls, regardless of the cross-section of the canal. The SAF instrument is mechanically rotated by a handpiece that performs both short 0.4 mm vertical movements and vibration movements with continuous irrigation11. Another promising single tool technique is called One Shape (Micro Mega), which will be mentioned below in the chapter on 5th generation tools.
By far the most popular single instrument concept is the WaveOne (Dentsply) and Reciproc (VDW) system. WaveOne combines the best design features of 2nd and 3rd generation tools with a reciprocal motor that rotates any tool back and forth at unequal angles. The angle of movement counterclockwise is 5 times greater than the angle of movement clockwise, and it is less than the elastic limit of the tool. After 3 cycles of counterclockwise and clockwise rotations, the tool will make a full circle or 360° rotation (Figure 5). This new reciprocal movement allows the instrument to easily advance, effectively process and remove sawdust from the root canal.
FIFTH GENERATION
The fifth generation of canal preparation instruments differs in that the center of gravity and/or the center of rotation is shifted (Figure 6). When tools with a similar shape rotate, a mechanical wave of motion arises, which moves along the entire length of the tool. Like progressive
Rice. 5. The WaveOne reciprocal instrument uses unequal clockwise and counterclockwise rotation angles to improve efficiency, advance into the root canal and extract sawdust from the root canal.
Rice. 6. Cross section of the ProTaper Next instrument. Note the off-center mass of the tool, which reduces screwing into the channel, provides more space for sawdust and improves flexibility.
Taper of any ProTaper instrument, the shifted center of gravity further minimizes friction between the instrument and the dentin. Also, this design improves the removal of sawdust from the canal and improves the flexibility of the active part of the Protaper Next tool. The advantages of tools with a shifted center of gravity will be described later in this article.
The trade names for instruments based on this technology are Revo-S, One Shape (Micro Mega) and ProTaper Next (Dentsply Maillefer). Today's safest, most effective, and simplest tool systems utilize the time-tested features of past generations of tools combined with the latest technological advances. Below is a brief technical description of the ProTaper Next system.
PROTAPER NEXT
The new ProTaper Next (PTN) system (Dentsply Maillefer) features 5 instruments of varying lengths for root canal preparation, labeled X1, X2, X3, X4, and X5 (Figure 7). From 1 to 5 they are color coded yellow, red, blue, double black and double yellow stripes on the handle, corresponding to sizes 17/04, 25/06, 30/07, 40/06, and 50/06 , respectively. The taper listed is NOT fixed across the entire working portion of the ProTaper Next tool. Imagine that the ProTaper Next X1 and X2 instruments have both an increasing and decreasing taper throughout the same instrument, while the ProTaper Next X3, X4 and X5 instruments have a fixed taper for the first 3 mm of length, and then a decreasing taper for the entire remaining active part.
ProTaper Next tools are a combination of 3 significant design features such as increasing taper on the same tool, M-wire technology and an off-center section. As an example
Rice. 7. The illustration shows a sequence of 5 ProTaper Next tools. Most root canals on posterior teeth can be created with 2–3 instruments.
Take the ProTaper Next X1 tool, it has a centered mass and axis of rotation over the first 3 mm of length, whereas from 4-16 mm the X1 tool has a displaced cross-section. From 1 to 11 mm, the X1 instrument increases its taper, starting at 4%, while from 12 to 16 mm there is a decreasing taper to improve instrument flexibility and preserve root dentin during root canal preparation procedures.
ProTaper Next tools are used at 300 rpm. and torque from 2.0-5.2 N cm. However, the authors prefer a torque of 5.2 Ncm because this level of torque has been found to be safe as long as clinicians carefully create a carpet path and use gentle sweeping movements during progressive root canal preparation. 14 In the ProTaper Next technique, all instruments are used exactly the same and the sequence of use always follows the ISO color code and is always the same regardless of length, diameter, or curvature.
Rice. 8a. The radiograph shows a tooth that is supporting a bridge in the lateral region and is in need of endodontic treatment. Pay attention to the orientation of the denture relative to the roots.
Rice. 8b. The work in progress picture shows the removal of the crown, isolation and No. 10 instruments inserted into the root canals, which have different curvature radii.
Rice. 8c. This photograph shows a mechanical wave of motion moving along the active portion of the ProTaper Next X1 instrument.
PROTAPER NEXT PREPARATION TECHNIQUE
The ProTaper Next preparation technique is extremely safe, effective and simple, provided the access cavity is good and a carpet is created. As with any root canal preparation procedure, great care must be taken to create straight, linear access to each orifice. This involves widening, smoothing and finishing the internal axial walls. For estial access, the ProTaper system offers an additional instrument called the SX. The SX instrument is used in an outward sweeping motion to preliminarily widen the orifice, remove dentin triangles, move the coronal portion of the canal away from the outer curvature of the root, or create a more pronounced shape. Perhaps the greatest challenge in endodontic treatment is finding, following and predictably maintaining the shape of the root canal to the apex. Traversing and maintaining the shape of the canal using fine hand instruments requires mechanical strategy, an experienced sense of work, patience and desire. A small hand-held tool is initially used to explore, widen and smooth the inner walls of the canal. Once the entire length of the root canal is passable with a hand instrument, a continuous rotation instrument can be used to create a carpet and widen the original canal opening in preparation for shaping. To be clear, a channel is only prepared when it is empty and has a proven smooth and repeatable carpet.
With an estimated working length and in the presence of a viscous chelating agent, insert a #10 K-file instrument into the root canal and see how easily the instrument moves toward the apex of the root canal.
In shorter, wide and straight canals, the No. 10 instrument can be easily inserted to the full working length. Once it has been confirmed that it moves freely to its full working length, the carpet can be further widened either with a size 15 hand tool or with specially designed tools such as PathFile (Dentsply). The created carpet path provides sufficient space to begin machining with the ProTaper Next X1 tool.
In other cases, teeth requiring endodontic treatment may have longer, narrower, and more curved root canals (Figure 8a). In such situations, the No. 10 instrument often does not penetrate the entire length of the root canal. It is generally not necessary to use #06 and/or #08 hand instruments in an attempt to immediately reach the apical foramen. Simply and gently work the #10 hand instrument within any area of the root canal until the instrument is completely free. ProTaper Next instruments can be used to create any part of the root canal with a smooth and reproducible carpet. Although there is a glide path and a sequence of instrumentation, the ultimate goal is to complete the entire working length of the root canal, establish the working length, and check for apical patency (Figure 8b). Safe work with the canal can begin after checking the created carpet, when tool No. 10 does not stick at the working length and can slide and move again in the area of the lower third of the root canal.
When the canal is prepared, the access cavity is generously filled with a 6% NaOCl solution. You can begin canal preparation with the ProTaper Next X1. It should be emphasized that when working with ProTaper Next instruments, pumping or pecking movements directed inward are never used. In contrast, ProTaper Next tools are used in an outward sweeping motion. It is important that this method of use will allow any ProTaper Next tool to move passively inwards, following a carpet path and penetrating the entire working length. Instrument X1 is inserted into the access cavity into the previously expanded orifice and prepared canal. Before meeting resistance, consciously begin sweeping outwards (Figure 8c). Sweeping creates lateral space and allows this tool to penetrate a few millimeters inside. Sweeping movements serve to improve contact between the instrument and dentin, especially in canals with a non-standard cross-section.
Continue working with the ProTaper Next X1 along the main part of the root canal. As you immerse the tool every next few millimeters, remove it and examine it while simultaneously cleaning the blades. Before re-inserting instrument X1 into the root canal, it is strategically important to irrigate and wash out large sawdust, as well as reintroduce instrument No. 10 in order to destroy residual sawdust and decay products and put them into solution, then re-irrigate to update the solution. In one or more passes you should reach the working length of the X1 tool. For thorough mechanical preparation purposes, irrigate, recapitulate, and re-irrigate after removing any rotating instrument.
Rice. 8d. This photograph shows the ProTaper Next X2 inserted to its full working length in the mesiobuccal canal.
Rice. 8e. This photograph shows the ProTaper Next X3 inserted to its full working length in the distal canal.
Rice. 8f. This radiograph demonstrates the temporary fixation of the bridge, the smoothly created shape of the root canals, and the importance of root canal treatment.
Take the ProTaper Next X2 and let it sink into the root canal. Before resistance is encountered, apply a lateral sweeping motion away from the dentinal walls, which in turn will move the X2 instrument into the root canal passively and progressively. The X2 tool will easily follow the path created by the X1 tool, making further expansion and gradually moving along the entire length. If the tool gets stuck and stops moving, remove it, clean it and check the edges. Re-irrigate, recapitulate, and re-irrigate to meet channeling goals. Continue working with tool X2 until working length is reached; note that one or more approaches may be required, depending on the length, width and curvature of the canal (Figure 8d).
Once the ProTaper Next X2 has reached working length, it is removed. The created form can be considered final only if the grooves in the apical part of the instrument are visually filled with dentin.
Alternatively, the apex size can be checked with a 25/02 hand instrument. If the #25 hand instrument sticks at the working length, the preparation is complete. If the 25/02 hand tool moves freely at working length, this simply means that the apical foramen is wider than 0.25 mm. In this case, the apex can be calibrated using a size 30/02 hand tool. If the #30 size hand tool sticks at the working length, the mold is created. However, if a #30 size hand tool does not reach the apex, move on to the ProTaper Next X3 tool, following the same operating procedure as with the ProTaper Next X1 and ProTaper Next X2.
Most root canals will be in optimal shape after using ProTaper Next X2 or X3 (Figure 8e). The ProTaper Next X4 and X5 instruments are primarily used for the preparation and finishing of larger diameter root canals. If the apical foramen is determined to be larger than the ProTaper Next 50/06 X5 size, consider other methods for preparing similar wide, straighter canals. It is important to recognize that carefully prepared canals promote shaping, three-dimensional cleaning and obturation (Figure 8f).
DISCUSSION
From a clinical point of view, the Protaper Next continuous rotation system combines the most proven and successful design features of past instruments with the latest advances in science. This brief discussion will describe how design affects instrument performance.
The most successful design feature of the previous generation of instruments was the mechanical concept of using progressive taper on the same instrument. The patent protecting the ProTaper Universal system allows the use of both increasing and decreasing taper percentages on the same tool. This structural feature minimizes contact between the instrument and dentin, which reduces the risk of a locking cone and screw-in effect, increasing work efficiency. Compared to a fixed taper instrument of the same size, decreasing the percentage of instrument taper improves flexibility, limits preparation of the root canal body, and preserves dentin in the coronal 2/3 of the root canal. Taking advantage of the mechanical design, Protaper Next also uses progressive taper on the same tool. This design feature has contributed significantly to the ProTaper system becoming the #1 selling system in the world, the #1 tool of choice for endodontists, and the #1 system of choice for undergraduate dental school education at international schools.
Another design feature that benefits certain brands of rotary tools is metallurgy. Although nickel-titanium tools are 2 to 3 times more flexible than stainless steel tools of the same size, additional modifications to the manufacturing process in the form of heat treatment can provide certain benefits. The company's specialists paid attention to the heating and cooling of a traditional nickel-titanium alloy either before or after milling. Heat treatment creates a more optimal phase transition point between martensite and austenite. It must also be remembered that the best phase transition point depends on the cross section of the tool. Research has shown that M-wire, a metallurgically enhanced version of nickel-titanium alloy, reduces cyclic fatigue by 400% compared to tools of the same diameter, cross-section and taper. This third benefit of this generation of instruments is strategic for the overall clinical safety and performance of the Protaper Next rotary instrument system.
The third design feature of Protaper Next tools is the off-center cross section. If the main part of the continuous rotation tool is off-center, we can talk about 3 advantages of this:
1) Off-center cross-section contributes to the formation of a moving mechanical wave of motion along the entire active part of the tool. This rocking motion promotes minimal contact
Rice. 9. ProTaper Next features an off-center cross-section and progressive taper. These characteristics minimize tool screwing, increase the volume of sawdust extracted and improve flexibility. For comparison, the figure below shows a tool with a fixed taper, centered mass and axis of rotation.
Rice. 10. Like a sine wave, the ProTaper Next rotary tool creates a mechanical wave of motion or rocking effect along the active part of the tool.
Instrument and dentin compared to instrument motion with a fixed taper and mass-centered rotation (Figure 9). Reduced contact limits unwanted locking taper, screw-in effect and torque on any tool.
2) An instrument with an offset section frees up more space for dentinal filings from the root canal compared to an instrument with a centered mass and axis of rotation (Figure 9). Many tools break as a result of excessive accumulation of sawdust and debris between the cutting blades throughout the active part of the tool. It is important that an off-center instrument reduces the likelihood of lateral compaction of sawdust and blocking of the root canal anatomy (Figure 6).
3) A forming tool with an off-center rotation mass will create a mechanical wave of motion similar to vibrations recorded along a sinusoid (Figure 10). As a consequence of this design, any Protaper Next tool can create a greater range of motion compared to a similar tool with a symmetrical mass and axis of rotation (Figure 6). The clinical advantage of this is that the smaller, more flexible Protaper Next instrument can prepare a similar space to a larger, more rigid instrument with a centered mass and axis of rotation (Figure 9).
CONCLUSION
Each new generation of shaping tools offers something new, is described differently, and is intended to be an improvement over the previous one. Protaper Next is a 5th generation system that combines the proven performance characteristics of the past with the latest technological advances. This system should simplify the procedure of canal formation with rotary instruments, reducing the number of instruments and eliminating the so-called hybrid techniques. Clinically, the canal shape created by Protaper Next fulfills the 3 sacred dogmas: safety, effectiveness and simplicity. From a scientific perspective, evidence-based studies are needed to confirm the potential benefits of the system.
BIBLIOGRAPHY:
1. Schilder H: Cleaning and shaping the root canal, Dent Clin North Am 18:2, pp. 269-296, April 1974.
2. Walia HM, Brantley WA, Gerstein H: An initial investigation of the bending and torsional properties of Nitinol root canal files, J Endod 14:7, pp. 346-351, 1988.
3. Thompson SA: An overview of nickel-titanium alloys used in dentistry, Int Endod J 33:4, pp. 297-310, 2000.
4. Bryant ST, Dummer PM, Pitoni C, Bourba M, Moghal S: Shaping ability of .04 and .06 taper ProFile rotary nickel-titanium instruments in simulated root canals, Int Endod J 32:3, pp. 155-164, 1999.
5. Kramkowski TR, Bahcall J: An in vitro comparison of torsional stress and cyclic fatigue resistance of ProFile GT and ProFile GT Series X rotary nickel-titanium files, J Endod 35:3, pp. 404-407, 2009.
6. Machtou, P, Ruddle CJ: Advancements in the design of endodontic instruments for root canal preparation, Alpha Omegan 97:4, pp. 8-15, 2004.
7. Schfer E, Vlassis M: Comparative investigation of two rotary nickel-titanium instruments: ProTaper versus RaCe. Part 2. Cleaning effectiveness and shaping ability in severely curved root canals of extracted teeth, Int Endod J 37:4, pp. 239-248, 2004.
8. Ruddle CJ: The ProTaper endodontic system: geometries, features, and guidelines for use, Dent Today 20:10, pp. 60-67, 2001.
9. Boessler C, Paque F, Peters OA: The effect of electropolishing on torque and force during simulated root canal preparation with ProTaper shaping files, J Endod 35:1, pp. 102-106, 2009.
10. Gutmann JL, Gao Y: Alteration in the inherent metallic and surface properties of nickel-titanium root nickel root canal instruments enhance performance, durability and safety: a focused review, Int Endod J 45:2, pp. 113-128, 2012.
11. Metzger Z, Teperovich E, Zary R, Cohen R, Hof R: The self-adjusting file (SAF). Part 1: respecting the root canal anatomy—a new concept of endodontic files and its implementation, J Endod 36:4, pp. 679-690, 2010.
12. Yared G: Canal preparation using only one Ni-Ti rotary instrument: preliminary observations, Int Endod J 41:4, pp. 339-344, 2008.
13. Hashem AA, Ghoneim AG, Lutfy RA, Foda MY, Omar GA: Geometric analysis of root canals prepared by four rotary NiTi shaping systems, J Endod, 38:7, pp. 996-1000, 2012.
14. Blum JY, Machtou P, Ruddle CJ, Micallef JP: Analysis of mechanical preparations in extracted teeth using the ProTaper rotary instruments: value of the safety quotient, J Endod 29:9, pp. 567-575, 2003.
15. West JD: The endodontic glidepath: secret to rotary safety, Dent Today 29:9, pp. 86, 88, 90-93, 2010.
16. Dentsply International, personal communication.
17. Johnson E, Lloyd A, Kuttler S, Namerow K: Comparison between a novel nickel-titanium alloy and 508 nitinol on the cyclic fatigue life of ProFile 25/.04 rotary instruments, J Endod 34:11, pp. 1406-1409,
This article was taken from the official Dentsply Sirona resource https://www.dentsplysirona.com/
PathFile™ Tools Sequence
The sequence of using PathFile™ tools is very simple (Fig. 4):
1 – Primary navigation and examination of the root canal with a K-file No. 10, which should freely enter the canal to the working length. To speed up this stage, if necessary, use endolubricants containing EDTA.
2 – Determination of working length using an electronic apex locator and (or) radiography.
3 – Pass PathFile™ No. 1 (0.13 mm) to working length.
4 – Pass PathFile™ No. 2 (0.16 mm) to working length.
5 – Pass PathFile™ No. 3 (0.19 mm) to working length.
6 – You can then begin using the nickel titanium files using standard techniques (if using the ProTaper system, use file S1).
PathFile™ are used in a gentle reciprocating motion at 300 rpm, motor torque of approximately 5 Ncm until full working length is reached. Significant apical loading on instruments should be avoided. The use of relatively high motor torque is not harmful given the square cross-section of the tool and the results of a study by Berutti et al.38 which demonstrates that the use of high torque allows nickel-titanium machine tools to machine significantly more channels before failure.38 The time required to work with three PathFile™ files per working length does not exceed 3 – 5 seconds for each tool; increasing the working time is useless, but not dangerous, since PathFile™, thanks to their high flexibility, do not change the course of the canal even in the event of errors in determining the working length. Copious irrigation is recommended after each instrument, although PathFile™ coils do not become clogged with dentinal filings and these instruments do not cause filing blockage of the apical foramen.
Rice. 4.
Sequence of using PathFile™ tools. X-ray before treatment (4A). Determination of the working length of the palatal and medial buccal 1 canals (4D). Radiograph showing the master pin in the medial buccal 1 and medial buccal 2 (4E), and in the distal and palatal canals (4F). X-ray immediately after treatment (4G) and 1 year later (4H).
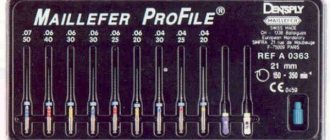
Profiles
Made from ultra-flexible, wear-resistant nickel-titanium alloy (56% nickel and 44% titanium). For traditional hand-held K-file instruments, a canal bend of more than 25° already presented additional preparation difficulties, necessitating the use of a “Step Back” preparation technique. The tip of nickel-titanium instruments can bend at an angle of 900! It must be emphasized that the creation of machine profiles required a radical change in the design of the working part of the tool. Thus, the traditional increase in ISO tool size could not be used when creating machine profiles, since the increase in tool diameter for traditional files and reamers from smaller to larger sizes is up to 50% for small tool sizes and 16% for larger ones. When moving from one size to another, the load on the tool increased significantly and there was a risk of breakage. Such an increase in machine profiles would almost inevitably lead to jamming and complications.
Therefore, when creating profiles based on scrupulous, including mathematical research, the real correspondence between the tool number and its true size is violated.
Profile tip dimensions depending on the number (according to ISO)
| NN, (according to ISO) | 15 | 20 | 25 | 30 | 35 |
| Actual profile tip size | 0,13 | 0,18 | 0,22 | 0,28 | 0,35 |
At the same time, all profile numbers are characterized by an increase in their diameter from smaller to larger by 29% compared to the previous number, which ensures a smooth transition from size to size and prevents the tool from jamming in the channel.
Standard hand instruments have a 2% taper, meaning the diameter of the instrument changes smoothly from base to tip by 2%. The taper of the produced profiles is different - 4% or 6%, which is usually written 04. or 06. Increasing the taper allows, firstly, to increase the strength of the tool and makes its fracture in the channel less likely. Secondly, the increased taper allows immediately, during preparation, to more quickly and efficiently remove softened dentin in the mouth of the canal and immediately give it a more optimal shape, expanding the coronal part of the canal and providing wider access to the apical part.
As can be seen from the figure, the cutting edge of the tool comes into contact with the channel walls over a small area, which virtually eliminates jamming. The instrument itself occupies 1/3 of the root space, and the remaining 2/3 is left to evacuate sawdust from the canal during preparation. Thus, the evacuation ability of dentin sawdust during preparation is sharply increased compared to other machine instruments traditionally used in endodontics. The problem with previous instruments was the ineffective removal of sawdust from the canals, which often led to jamming or a significant loss of time in manually evacuating these filings after using machine preparation. Moreover, the design of the working edge of the profiles, as well as the presence of nickel in the alloy when the tool jams, leads to the “unwinding” of its spiral in the opposite direction and elongation of the tool before it breaks off.
The safety of preparation with profiles is also increased by spot welding at the tool handle, which, as a rule, leads to breakage in this place and the broken tool is easy to remove from the canal.
Naturally, profiles, like any other modern tools, have a modified tip of the tool. It is blunter and does not tend to penetrate the canal wall, i.e., it avoids those complications that will be discussed in detail.
Thus, summing up all of the above, we can draw the following conclusions:
1. When working with machine profiles, preparation safety increases dramatically compared to other machine tools.
2. The efficiency of preparation is dramatically increased due to the active evacuation of sawdust from the canal, thanks to the new design of the cutting edge.
3. Profiles are universal tools that pass through, expand the canal and at the same time evacuate sawdust (clean the canal).
4. The wear resistance of profiles has sharply increased - more than 10 times compared to traditional tools.
5. Standard ISO marking - number (which, we remind you, does not reflect the actual size of the tool) and traditional color coding of handles makes it easy and quick to select the desired profile.
Special installations and tips have been created for working with profiles. The optimal speed of preparation with profiles, as calculations have shown, is 250 - 350 rpm, and the instruments were made for these preparation parameters. Special tips with a gearbox allow you to reduce the speed of rotation of the tool by 6–10 times without losing power (the angular momentum remains almost the same). So, when using a tip with a 10:1 transition at a rotation speed set at 3,000 rpm, the profile will rotate at a speed of 300 rpm (i.e., 10 times less). A similar calculation is carried out for tips with a 6:1 transition (tool rotation is 6 times lower than that specified by the installation).
Initially, profiles are recommended to be inserted to the middle of the working length, that is, to use the “from the crown down” technique, which provides wide, cone-shaped access with smooth walls, which greatly facilitates manipulations in the apical third of the canal, the preparation of which is recommended to be carried out using the standard “Step Back” technique - "step back". The use of profiles significantly saves preparation time.
We provide instructions for using profiles 04. They should be used at speeds from 150 to 350 rpm. To ensure power and speed stability, it is recommended to use geared heads, which, while reducing the rotation speed, do not reduce the angular momentum power.
Since no two canals are completely identical, surgical procedures are carried out taking into account the individual topography of the root canals. The technique described below is suitable for most cases, but is advisory in nature.
First, a diagnostic x-ray is taken and the working length of the canal is determined. Additional apical foramina and canal type are identified. After this, profile 04. N25 (with a red mark) at a speed of 250 rpm is inserted to a depth between 1/2 and 2/3 of the working length of the channel, applying light pressure on the instrument (comparable to pressure on a pencil when writing), until resistance appears . (The sensation is comparable to the resistance that occurs when working with hand tools). After this, the instrument is removed. After each procedure, we examine the instrument for deformation, and if there is any, the instrument is replaced.
Then profile 04. N30 (with a blue mark) is inserted into the canal to approximately the same depth as the previous one.
After this, profile N20 (with a yellow mark) is inserted into the canal no further than 3/4 of the working length of the canal.
Next, using a manual, pre-bent K-file or threadflex file (N10-15), the working length is accurately determined using either an apex locator or radiography and fixed with a silicone stop on profile 04. N15 (with a white mark). Then this profile is advanced into the canal with very light pressure to the working length. If, when introducing this file, significant resistance occurs before reaching the full working length, then repeat the previous stages of canal processing (with profiles N25, N30, N20) as described above.
Until sufficient proficiency in working with profiles is achieved or in very calcified canals, the last 2 or 3 mm to the apical foramen is best prepared with hand instruments, or using a special hand held profile holder.
After reaching the working length with the N15 profile, successively larger instrument sizes are used (N20, then N25, etc.) with very little pressure and expand the apical third of the canal. The size of the final instrument will depend on the size of the canal. After such preparation, the canal takes on a smoothly tapering shape from the mouth to the apical foramen.
If greater expansion of the canal is required (for example, when using certain canal filling techniques), then along with profiles, either the “step back” technique, or Gates burs, or ultrasonic preparation systems are used. in such cases, it recommends using profiles 06.
During preparation, it is recommended to rinse the canal abundantly and frequently with 2.5% sodium hypochlorite, and it is also necessary to periodically check the patency of the canal to the apex, using small K-files to the full working length.
Another recommended standard preparation technique involves the combined use of profiles 04. and 06.
First, profile 06. N25 covers 1/5 - 1/2 of the working length of the canal. Then, profile 06. N20 - 2/3 of the channel. Next, switch to profile 04. N 25 and prepare the canal to 3/4 of the working length, using profile 04. N20 - the entire canal, not reaching the apical constriction of 2 - 3 mm. Then, using profile 04. N15 – to the entire working length, and then we process the canal to the full working length with profiles 04. N20 and 04. N25. We complete the preparation with profile 06. N 20.
The canal prepared in this way is ideal for filling with the Thermafil system.
In addition, it produces profiles with a taper of 02. Profile 02. N15 can be used in narrow canals after probing them and establishing the full working length. At the same time, there is always a risk of perforation of the apical constriction, so we do not recommend the widespread use of profiles 02. N15.