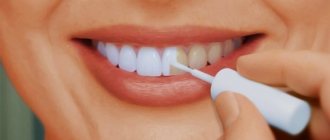
What are parapulp pins - features of the pins
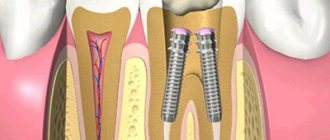
The design is a pin of small thickness, which serves as a connecting element between dental tissues and restoration material. Pins are used for fixation in dentin, that is, in the area between the pulp chamber and the periodontium. Approximately half of its length should be in the dentin, while the second half will be located in the thickness of the filling material.
The width of such pins varies from 0.3 to 1 mm, and their length usually does not exceed 5 mm. The number of fixed rods directly depends on the location of the tooth, its anatomical features and the extent of destruction. To restore the anterior incisors, a pin from each corner of the crown is usually sufficient. When restoring chewing molars, most often a pin has to be placed in place of each missing cusp.
Pins are installed in dentin
Parapulpal pins can be fixed in various ways. There are 4 installation options:
- screw: fastening is achieved by screwing the product into dentin,
- frictional: the rods are fixed due to a very tight fit, when the diameter of the pin can be slightly larger than the width of the hole,
- cement: the structure is supported by a special adhesive composition,
- combined: there can be a combination, for example, of friction and cement methods of fastening.
The pins are implanted not into the tooth cavity, but into the dentin - this is their distinctive feature. They provide additional support for the filling material and are a reliable link between the tooth tissue and the composite.
How are parapulp pins installed?
It should be noted that implanting pins is a delicate job and requires the precision of a dentist. Before installing a titanium pin, it is necessary to clean and seal the dental canal to prevent possible inflammation. The process then looks like this:
- The tip of the pin is inserted into the hard tissue of the tooth.
- The pin is fixed with dental cement.
- Further restoration (building up) of the tooth is carried out using a composite material. The shade is selected in accordance with the natural color of healthy chewing elements.
If you have a problem similar to that described in this article, be sure to contact our specialists. Don't diagnose yourself!
Why you should call us now:
- We will answer all your questions in 3 minutes
- Free consultation
- The average work experience of doctors is 12 years
- Convenient location of clinics
Single contact phone number: +7
Make an appointment
What elements can be identified in the design?
Tooth restoration using parapulp pins involves working with four main components. Let's look at each in more detail:
- drill – to install pins, use special drills made of carbon steel. They are used to process dentin tissue, while diamond drills are used to process enamel. The tool has two cutting edges, as well as a immersion limiter to a depth of no more than 2-3 mm,
- pin - the product can be made of stainless steel, an alloy of titanium and gold. However, some such systems, when in contact with intradental fluid, cause the development of corrosion,
- dentin – the thickness of the layer varies from 2 to 6 mm, while the dentin tissue is quite elastic and successfully adapts to the implanted structure. However, intense chewing loads can lead to the formation of microcracks in the dentin in the area of contact with the pin. The risk of defects is reduced when installing products into a living tooth with pulp. For the restoration of pulpless elements, intracanal pins are usually used,
- filling - the rod remains approximately 2-3 mm of its length in the thickness of the composite material from which the filling is formed, designed to replenish the destroyed tooth tissue.
The decision to use pins as part of restoration work rests with the attending physician. Only a specialist will be able to correctly assess the clinical picture and suggest the best way to restore the destroyed element.
Anatomical pin: clinical case
Endodontic treatment of teeth with significant crown destruction is a fairly common manipulation in the practice of a dentist. For better retention of the restoration in such cases, it is often necessary to use intraradicular pins, which help to achieve a certain stability of the future structure.
Anatomical pins are the design of choice for restoring the anterior group of teeth in difficult endodontic situations and with a significant amount of destruction of dentin tissue. In addition, this approach also uses a composite along with fiberglass posts, which helps to minimize the amount of space for luting cement. Thus, the combination of two restoration materials (pins and composites) helps restore not only the structure of lost dentin, but also the biomechanical parameters of the tooth.
Anatomical pins provide a very favorable prognosis for the restoration of teeth with fragile roots and defects in dentin tissue, and also help to achieve adequate results in the functional and aesthetic rehabilitation of the patient. In addition, compared to metal pins, their fiberglass counterparts are characterized by a more uniform distribution of occlusal stresses in the periapical region. Etching and silanization of the pins is mandatory to ensure their adhesion to the composite, especially in the area of core restorations. This article presents a clinical case of restoration of the coronal part of a central incisor using a fiberglass pin and composite in conditions of weakened tooth structure.
Clinical case
A young man sought dental care at the Universidade Severino Sombra University Clinic due to the need to restore 21 teeth. Clinical and radiological examination did not reveal any periapical pathologies, but the crown of the problem tooth was significantly destroyed (photos 1-3).
Photo 1
Photo 2
Photo 3
To restore the functional and aesthetic parameters of a smile, the patient was offered tooth restoration using an anatomical pin and subsequent fixation of a full ceramic crown. After removing all affected dental tissue, a glass fiber master pin (Exacto #3, Angelus) was selected, as well as additional pins (Reforpin, Angelus; Figure 4).
Photo 4
After isolating the working field, the stump was restored using composite (Fill Magic NT Premium, Vigodent/COLTENE) (photos 5 and 6), packing it with # 1/2 Suprafill with a spatula (SS White), pre-silanized and treated with adhesive (Fusion- Duralink, Angelus) (photo 7-9) Exacto master pin and additional Silano, Angelus pins.
Photo 5
Photo 6
Photo 7
Photo 8
Photo 9
Photopolymerization of the material was carried out on the side of the pin and the composite itself for 20 seconds. After this, the restoration of the stump was continued with the same composite material, applying and polymerizing its portions one after another (photo 10 and photo 11).
Photo 10
Photo 11
The pins in their cutting part were marked for subsequent adaptation of their length to the required parameters (photo 12).
Photo 12
After removing the anatomical inlay, the final polymerization of the structure was carried out within 40 seconds (photo 13).
Photo 13
Shortly thereafter, the post was adapted to the remaining coronal structure of the tooth (Figure 14).
Photo 14
After preparing the anatomical inlay, we began preparing it for fixing the future crown (photo 15).
Photo 15
The pin was etched for 30 seconds, after which it was washed and dried. After that, silane (Silano) was applied to its surface for 20 seconds, and then an adhesive (Fusion-DURALINK), followed by polymerization for 20 seconds (photo 16-18).
Photo 16
Photo 17
Photo 18
After this manipulation, the immediate remaining tooth structure was etched for 20 seconds, followed by washing its surface and gently drying to leave the etched dentin somewhat damp (photo 19).
Photo 19
After application to the tooth surface, the dentin primer and adhesive (Fusion-Duralink) was polymerized for 20 seconds (Figure 20).
Photo 20
The anatomical pin was secured using self-adhesive cement, allowing a five-minute period for chemical stabilization of the material (Figures 21 and 22).
Photo 21
Photo 22
After the cementation stage was completed, an adhesive was applied to the surface of the restored stump, which was polymerized for 20 seconds, and then portions of the composite were applied to form an adequate shape of the stump (photos 23 and 24). Preparation of the formed stump was carried out to ensure adequate fixation of the future crown (photo 25).
Photo 23
Photo 24
Photo 25
conclusions
An anatomical inlay, or an anatomical pin, represents a clinical alternative to the restoration of endodontically treated teeth with significant destruction of dentin tissue. In addition, such a design contributes to a more adequate distribution of chewing loads, minimizing the risk of fracture in the root area. This treatment option also provides opportunities for aesthetic rehabilitation through full metal-free crowns.
Authors: Profs. Frederico dos Reis Goyata, Orlando Izolani Neto (Brazil)
Indications for installation
Pins are used for the restoration of teeth with damage of varying degrees of complexity. Such pins can be used both to eliminate a chip and in case of almost complete absence of a crown. Experts in the field of dentistry highlight the following indications in this regard:
- carious destruction, in which severe damage to the enamel and cavity is observed,
- trauma or destruction of the front teeth,
- the need for restoration of chewing molars,
- creation of supports for fixation of removable and fixed dentures,
- restoration of the integrity of the crown in the presence of living pulp.
Such pins are used for restoration of anterior teeth.
“I had 2 molars restored on pins, about 3-4 years ago. The teeth are still in excellent condition, no chips or other problems. I remember that a couple of weeks after installation the sensations were unusual, it was not very convenient to get used to, but maybe it’s just like that for me...”
Timur1, from correspondence on the forum www.32top.ru
The main condition allowing the installation of parapulpal pins is a sufficient layer of dentin between the gum and the root. If this area is too thin, the structures will not be able to be securely fixed. In such a situation, you will have to turn to alternative restoration options.
Types of dental pins
Depending on the material used to create a dental device, pins are divided into two groups:
- metal (made from titanium, brass, palladium, stainless steel or gold alloys with impurities);
- non-metallic (made from fiberglass, ceramics or carbon fiber).
According to their shape, pin structures are divided into conical, cylindrical-conical, screw and cylindrical. In turn, according to the method of fixation, such devices are classified into:
- active (having a thread with which they are screwed into bone tissue);
- passive (fixed in the root canal using special cement).
The choice of one or another pin design is made taking into account:
- the degree of destruction of the tooth root, the thickness of its walls;
- degree of damage to the crown of the tooth;
- the planned load on the tooth after completion of its restoration;
- the patient's health and financial capabilities.
Indications and contraindications for the installation of dental pins
Indications for the installation of pin dental structures are:
- the presence of a need to create a strong support for removable and fixed dentures based on teeth that have undergone severe destruction;
- absence of a crown in the presence of a healthy root;
- there is a need to restore teeth whose crowns are more than half destroyed.
Meanwhile, the method of orthopedic treatment using pins also has several contraindications. Reasons for refusing to carry out such a procedure may be:
- blood diseases;
- pathologies in the functioning of the central nervous system;
- carious lesions of teeth;
- periodontal diseases;
- the presence of cystic formations and granulomas in the oral cavity;
- severe deformation of the root canals, their obstruction;
- the presence of signs indicating a superficial attitude of the patient towards compliance with oral hygiene requirements.
In what cases is installation contraindicated?
In addition to the fact that a sufficient thickness of the dentin tissue layer is required for smooth pin installation, working with such systems also places some demands on the clinical picture. So, for example, a contraindication to fixing such pins is the complete absence of the coronal part. It will also not be possible to fix the products if the height of the planned crown exceeds the length of the roots, and the root walls are of insufficient thickness - less than 0.2 mm.
Also, certain restrictions on restoration are imposed by blood diseases, psychoneurological disorders, serious damage to periodontal tissue, the presence of cysts and granulomas, and large areas affected by caries.
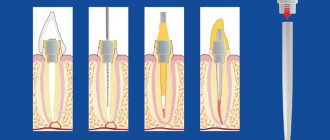
How does the fixation procedure go - the main stages
The technique for placing a parapulp pin does not involve any complex manipulations or the use of advanced technologies. This is a standard dental procedure, the steps of which are performed in a specific sequence.
Preparing the channel for the structure
After preparing the working area, isolating it from saliva and treating the tissue with an antiseptic, a hole is made in the dentin. In this case, the distance between the wall of the hole and the border of dentin and enamel should be at least 0.5 mm. Using a wide bur, the area is processed, after which a hole for the pin is made with a small bur. The main danger at this stage is damage to the pulp or periodontal tissue. An experienced doctor will not allow this situation to happen by accurately determining the appropriate location for installing the structure.
Inserting a pin into a tooth
Insertion of the pin can be done carefully by hand or using a bur. First you need to install the structure in a special clamp - an angular type clamp is usually used to restore chewing teeth. The optimal depth for pins that are set on cement is considered to be 3 mm, for structures with screw fixation - 1.5-2 mm1. Some systems have a support platform approximately in the middle - it helps to correctly distribute the load on the entire tooth, and therefore extend the service life of the restoration.
PIN insertion can be done carefully
Final crown restoration
Next, the specialist begins layer-by-layer application of the filling material. After completing the formation of the anatomical shape, the restored area is ground and polished. High-quality installed pins increase the reliability of the entire structure - such a filling can last 7-10 years, of course, with proper care and respect for the teeth.
What complications can there be?
Restoration using parapulp pins is a standard procedure in dentistry, and the technique of placing pins has long been worked out by specialists down to the smallest nuances. However, in rare cases, mistakes on the part of the doctor can lead to unpleasant consequences - let’s look at them in more detail:
- Damage to periodontal tissue – periodontal perforation usually leads to an aesthetic problem in which the root area turns red and sag, exposing the neck of the tooth. The defect can be corrected by filling the canal with phosphate cement or amalgam. Another option: insert a pin into the canal at the level of the hole and seal it again,
- breakage of the rod or drill - such a nuisance can happen when bending the drill or the pin itself. To avoid such a problem, the instrument and rod must be inserted into the canal and removed as carefully as possible, without sudden rotational movements,
- difficulties when working with a drill - the tool may be dull or the specialist may choose the wrong direction of movement. Another option is that the drill rests on the enamel, which also creates difficulties with sawing fabrics,
- excessive channel width that does not correspond to the diameter of the structure - to solve this problem, you can resort to using a cementing composition.
To assess the quality of the work done, after about 6 months it is worth taking an x-ray and showing it to the doctor. The specialist will assess the condition of the restored element under operating conditions and will be able to promptly notice signs of complications, if any.
Procedure for caring for pinned teeth
In the postoperative period, patients are recommended:
- adhere to a gentle diet, give up alcohol, cigarettes and food that can injure the epithelial tissues of the oral cavity;
- provide thorough hygienic care of teeth and oral cavity;
- floss regularly;
- do not attempt to open bottles with your teeth, do not crack the shells of nuts or seeds;
- visit the dentist at least once every six months.
It is important to understand that the appearance of pain, swelling, hyperemia or inflammation of the gums in the area of the restored tooth may indicate the development of serious complications of the procedure. For this reason, identifying the symptoms described above is the basis for contacting doctors and receiving professional medical care.
General requirements for installing pins
To summarize all of the above, it’s worth formulating the basic requirements for installing pins. Key points are listed below:
- the pin is inserted into the dentin,
- the wall of the hole for the pin should be no closer than 0.5 mm from the border of enamel and dentin, and 1-1.5 mm from the edge of the tooth,
- installation should be carried out taking into account the curvature of the roots and the location of the longitudinal furrows,
- Drilling a canal in dentin should begin with the smallest bur,
- The depth of placement of the rod should not exceed 2 mm for models with screw fixation and 3 mm when seated on cement.
The number of rods directly depends on the location of the tooth.
The number of rods directly depends on the location of the tooth and its role in distributing the chewing load throughout the jaw. For a front cutter, 2-3 additional supports are usually sufficient. As part of the restoration of the masticatory element, up to 4 parapulpal pins may be needed.
Review of popular systems
Today, several different types of pins are used in dentistry. Below in the review are the most popular systems from brands that have established themselves as manufacturers of high-quality, safe and reliable parapulpal pins.
"Stabilok-pin" from Fairfax Dental
The US manufacturer markets titanium structures and pins made of stainless steel. The company's product range includes 2 variations in different diameters - 0.76 and 0.6 mm. The kit also includes drills of appropriate parameters. A special feature of the system is the ability to use an angled tip, which helps the doctor to make the placement as accurately as possible, without the risk of damaging the walls of the formed canal.
Fihol Dental system "Philpin"
The products of the Irish company Fihol Dental are titanium pins designed for installation in the tooth stump. The kit includes a special bending tool that helps bend the structure in the desired direction and direct its top correctly in relation to the stump.
Restaurant pin system RT from Martteler
The Marteler company produces pins in diameters of 0.6 and 0.75 mm. The products are made of titanium or medical steel, reminiscent of the Stabilok-pin, but in this case the pins are bent manually. The kit also includes a special adapter for the drill.
Parapost by Coltene/Whaledent
The Coltene/Whaledent concern offers its model of a parapulp pin, the design of which is also similar to the Stabilok system. However, here one holder combines 2 pins at once. Each of the products has a small protrusion in the middle - a small detail that ensures a more correct distribution of the load on living tissues.
PCP system then Komet
One of the disadvantages of pins is the risk of them showing through the seal. To disguise such a defect, various coatings are used, including gilding. A special feature of Komet systems is the presence of a plastic coating, which certainly will not be visible through the restoration material. In addition, the filling part of the structure has a special shape to hold the amalgam, which is a definite advantage when restoring chewing molars.
Sale of pins for fixing membranes throughout Russia
In our online store you can buy different models of pins, paper or titanium pins and devices for storing and installing them (pin holders, multi-section boxes) in St. Petersburg, Moscow and other cities.
We cooperate with foreign and domestic companies that produce high-quality consumables and instruments for orthodontics. Medical pins comply with international quality standards, certificates and other documents are provided.
Order dental instruments by filling out a special form: indicate the address, the name of the clinic or your name, the number of pins and other materials. For your convenience, we offer the “One-Click Purchase” option: select a product, provide a phone number or email address. Our employees will call or write to you to discuss the time, collection address, payment method.
We offer to buy pins at prices from manufacturers, with pleasant promotions and discounts. If necessary, we give installments of up to 6 months to pay for the goods. Find out more about the terms of cooperation from our managers.
How much do parapulp pins cost?
The cost of installing parapulp pins includes the price of the products and the work of a specialist. So, one set with 12 pins and a tool for fixing them will cost approximately 1000 rubles. The average cost for installing rods as part of the restoration of one tooth is the same. To calculate the full cost of treatment, you will have to add other costs to this amount: consultation, x-ray examination, tooth preparation, use of anesthesia and antiseptics, filling material.