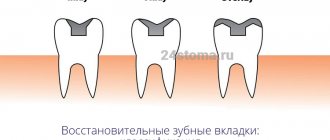
Tooth decay has not been a problem for dentists for a long time. In this case, it is not necessary to remove the root and place an implant. If the tooth is at least partially preserved, it can be restored using a pin. This design allows you to grow a new tooth or install a crown, while returning it to its original functionality and appearance. Pin technology is not complicated and quite reliable, so it is often used to solve dental problems.
What is a pin
A pin is a small, durable, rod-shaped structure that is inserted into the dental canal. Outwardly, it looks like a nail or bolt with a thread and a head. It is made of various materials, but mainly metal. Serves as a retainer and holder for an artificial tooth. Used to restore severely damaged or weak teeth.
The pin is a very strong and reliable support for removable and non-removable prosthetic structures. It is inserted directly into the tooth canal and is well fixed in the bone. Thanks to this, the artificial tooth does not collapse, does not break, and can withstand heavy loads. Typically, the pin teeth are the chewing teeth, which are located near the cheeks. But technology allows you to install a pin anywhere in the dentition.
The choice of pins is huge. It depends on the material, size, type of structure, and method of fixation. The dentist must select the best option, because its reliability and durability depend on the condition of the root system and the damaged tooth as a whole. The cost of orthodontic treatment also depends on the type of pin, so the patient’s wishes are also taken into account.
Installation of a pin in a tooth is possible only if it is partially preserved. Complete destruction of the tooth and root requires another treatment method - implantation. The feasibility and possibility of preserving the tooth and its subsequent pinning can only be determined by a dentist or orthodontist after a thorough examination and radiography.
Pros and cons
Despite the fact that the installation of pins is not indicated in all cases, this measure has many advantages. Firstly, this design allows you to securely fasten the prosthetic device with virtually no risk of it moving or falling out. Secondly, this is one of the optimal ways to restore a damaged tooth. Thirdly, such a rod successfully restores the functionality of the causative element and avoids its complete removal. It takes on the role of a kind of support, ensuring a more correct distribution of the chewing load1.
The design helps strengthen the tooth root
“I have 3 teeth on the pins, for many years now, there are no problems with them. It was placed after the nerves were removed, when there was pulpitis, it was always my main pain. I know that they installed metal ones before, but they already installed fiberglass. Those may have broken often, I don’t know, but the fiberglass ones stand like a glove.”
Nikolay_T., from correspondence on the 32top.ru forum
Despite the obvious advantages, such designs also have their disadvantages. Among them, experts in the field of endodontic treatment highlight the following disadvantages:
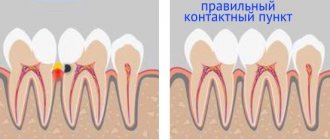
- an incorrectly fixed pin can provoke the development of caries and even complete destruction of the remaining part of the crown,
- Some types of such clamps are quite expensive,
- metal products are not able to provide a sufficiently uniform distribution of the load, since they do not have the necessary degree of flexibility,
- There are cases when a pin is not the best choice for restoring a damaged tooth - it can become damaged and seriously injure the root under chewing load, and then the tooth will have to be completely removed. In such situations, a stump inlay could be the optimal solution.
In case of a severely damaged tooth, a stump tab is installed.
Sometimes the installed rod has to be removed from the tooth after some time, for example, to re-treat it. In this case, after all the necessary manipulations have been carried out, a new structure will have to be installed - the old one is not suitable for reuse.
In what cases is it permitted and prohibited to install a pin?
A tooth destroyed by caries or mechanical damage does not always require the installation of a pin. In some cases, restoration measures are sufficient, especially when it comes to the front teeth. To restore a tooth using pin technology, there must be certain strict indications, which include:
- destruction of the crown part of the tooth by more than 50%;
- the need for support for removable and fixed dentures;
- absence of the outer part of the tooth with complete preservation of the root;
- stopping subsequent tooth decay after treatment of serious carious lesions;
- tooth restoration after surgical treatment of periodontal pathologies;
- saving a tooth after treatment for infectious diseases of the oral cavity.
The pin is installed only if the tooth walls are preserved by at least 15-20% and the root thickness is at least 2 mm. If for some reason this is not possible, then an alternative recovery method is selected.
The use of a pin for dental prosthetics also has its contraindications. These include:
- serious untreated carious damage to the walls of the tooth;
- damaged or very thin tooth roots;
- impossibility of clearing dental canals to at least 1/3 of the depth;
- insufficient root canal height;
- granuloma and cyst of the jaw in the acute period;
- chronic periodontal pathologies;
- problems with blood clotting;
- pregnancy period;
- neuropsychiatric diseases;
- history of allergic reactions to implants.
Only taking into account all the indications and contraindications is it possible to choose the right technology for treating a decayed tooth. Installing a pin involves certain restrictions that cannot be ignored by either the patient or the doctor.
Cast stump pins or standard pins?
The main question, which has not yet been given a clear answer, is what pin systems should be used to restore teeth? In what cases is it better to use standard pins (of various designs) produced by the medical industry or stump pin inlays?
Much has been said on this subject in the past, but there is still little clarity.
For many years, pin structures have been individually manufactured according to the doctor’s order (according to Richmond, according to Katz - with a supra-root protection and a semi-ring, according to Orton - solid-cast, with a supporting inlay, according to Ilina-Markosyan - with a supporting part in the form of a cast inlay of a cubic shape, according to Citrin - with a supporting part in the form of a cast inlay, consisting of two opposing triangles connected by vertices, according to Kopeikin - a supra-root stump inlay with a pin, according to Shargorodsky), were the main ones in the restoration of damaged teeth.
With the development of an arsenal of standard factory-prepared pins, dentists began to switch to their use. These pins make restoration faster and easier. At the same time, the cost of treatment for the patient and the time spent on the doctor are reduced.
The positive characteristics of standard pins, along with persistent advertising, have led to their overuse.
I believe that their use should be limited to strict indications.
All the excitement around standard pins that we currently see comes down to one simple reason - manufacturing companies need to expand and promote new products to our market. Few people care about the result of subsequent restorations, since almost all used structures withstand the warranty period and no questions seem to arise. But then, after about 2-3 years, with enviable persistence, all the tooth stumps restored using standard pins are destroyed.
I wonder which orthopedic dentist has not encountered a situation where a heavily damaged tooth with thin walls (I like the comparison with a porcelain cup) is restored by a dentist-therapist with a composite reinforced with 1-2 anchor pins. As a result, during preparation, it turns out that instead of a load-resistant tooth stump, you are left with a filling “hanging” on anchors and glued to the bottom of the pulp chamber. Then, having received a load, this entire system comes off, and the orthopedic dentist is left alone with this problem. If this is a single crown, then everything seems to be fixable, but what if the crown is part of a multi-unit bridge???
The whole point, again, is in an unreasonable choice of design and unwillingness to spend a little more effort and time on the manufacture of a stump pin insert.
Yes, for 1 hour of your highly qualified work you will receive less money, since the production of the stump tab lasts for 2 visits, and the preparation of the stump for the crown is postponed until the 3rd, but think about what fame you will gain when your crowns are on restored stumps pin inlays on the roots will last three times longer than competitors!!!
In this article, I do not touch upon the use of ceramic, carbon-containing, fiberglass pins, which have completely different indications for use.
Pros and cons of the two pin systems described
| Standard pins | Stump inlays |
Positive:
Negative:
| Positive:
Negative:
|
The characteristics described above help determine the choice of pin design.
I advise you to be a little more radical and expand the indications for the use of stump pin inlays, since what you will regret somewhere will later hit you. And the patient does not need to realize how quickly and cheaply the work was done and how much you preserved his natural tissues, but how long he will then use this design.
Indications for choosing pin structures
| Standard pins | Stump pin inlays |
|
|
If according to indications it is necessary to use standard pins, then I advise you to choose titanium or stainless steel pins.
If you decide to make a stump pin insert, then other, no less important, questions arise:
How to make a pin stump insert? What material is the inlay model made of? What alloy should the insert be cast from?
In this article I will focus on the direct method of making stump pin inlays, since I believe that it is the most optimal if accuracy is maintained.
However, if you need to make several inlays at once, it is probably easier to take an impression and hand over the work to a dental technician.
Root Requirements
It is necessary to restore teeth with stump pin inlays only with full confidence in the reliability of the root and in the absence of any inflammatory processes. The root must be longer than the height of the future crown. The walls must be thick enough (at least 1 mm) to withstand chewing pressure. The best option is when there is at least something left above the gum.
All remaining tooth walls must be removed to a level of 1-2 mm above the gum. The stump pin insert must necessarily overlap the residual tooth stump.
Sometimes it is necessary to resort to cutting or coagulation of the gums in order to expose the subgingival part of the root. After such a procedure, I usually place a dense temporary filling on the root and area of \u200b\u200bthe gum that has been trimmed or coagulated and leave it for about 2 weeks to epithelialize, or a simple tooth post can be made that will provide mechanical retraction of the gum and its formation.
Periodically, you can conduct an inspection in order to further coagulate something or add a temporary filling. Preparation of the canal and tooth cavity
Unseal the canal to at least a length equal to the height of the extra-gingival part of the future tooth crown (namely, the full crown, not the stump), and expand it to approximately 1.5-2 mm in the area of the mouth and then deeper into the cone. (Repeat this step as many times as there are canals in the tooth). Remove all undercuts in the tooth cavity. Strict parallelism of the walls of the tooth cavity is not necessary, and it is even better if they diverge slightly. If you are making an inlay for a single-rooted tooth and the root cut is even, then you need to make an additional cavity for the supporting inlay so that the structure does not subsequently decement from rotational loads. When making multi-root stump pin inlays, this manipulation is not necessary.
Selecting the material from which to make the stump pin model
I do not recommend making blanks for core post inlays from wax. There are many reasons for this. Firstly, it requires sufficient experience in working with wax and care to get an accurate model. Secondly, you are placing an extremely vulnerable model in the hands of a foundry worker, who can cause minor damage to it and not even notice it - just grab the tab with your fingers. Thirdly, with a little experience, the model of the wax inlay has to be made more voluminous to make it easier to work with, and in the end you will receive an inlay from the laboratory, which will then have to be modified and sharpened. This is especially important when working with non-precious alloys because they are very hard. The optimal material for making models is ashless injection molded plastic (Pattern resin). Personally, I use the DuraLay kit because... its kit includes both ashless pins and insulating petroleum jelly.
Selecting an alloy for casting core inlays
Alloys must have the following qualities:
- bioinertness
- hardness
- ability to withstand deforming loads (elasticity)
- low shrinkage during casting
- low thermal conductivity coefficient
The following main types of alloys are presented on the market:
| Noble | Ignoble |
|
|
From the point of view of bioinertness, titanium is preferable, but, having great hardness, it has some brittleness.
Silver and silver-palladium alloys have bactericidal properties. However, after the use of silver core pins, pigmentation of the gum surrounding the tooth is often observed, especially in the case of restoration of roots destroyed below the gum level.
Chromium-nickel alloy has a high shrinkage and, in addition, nickel has a cytotoxic effect.
Cobalt-chromium alloy has high hardness, low shrinkage, but is difficult to process.
The gold alloy is the most optimal in terms of its characteristics.
Making models of stump pin inlays
Single-root and simple double-root stump tabs
As an example, I will give a clinical case.
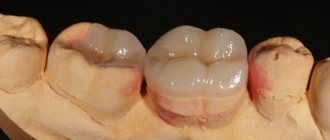
The picture on the right shows teeth 24 and 25, which are planned to be covered with artificial crowns. These teeth had previously been treated with the resorcinol-formalin method, had pronounced foci of secondary caries and were discolored. In tooth 25, after removal of the remaining filling, extensive perforation of the distal contact wall was discovered.
In tooth 24, the vestibular wall consisted almost entirely of filling composite material.
To prepare for prosthetics, repeated endodontic treatment was performed 25, the root canal was filled with gutta-percha.
The 24th tooth had severely obliterated canals, so it was impossible to fully carry out endodontic treatment. A course of copper-calcium hydroxide depophoresis was conducted. At the first stage, tooth tissue was prepared and stumps were formed. The walls of the teeth were prepared to a level of approximately 1 mm above the gum. The root canals were unsealed and prepared for stump pin inlays. The cross-section of the root canal in tooth 25 was oval, and therefore an additional cavity was not formed to withstand rotational forces. The 24th tooth previously had 2 canals. The buccal canal was processed for a pin at 1/2 the length of the root, and the palatal canal at only 1/3 of the length. The canals were slightly prepared to make them parallel. A domestic metal separating strip (matrix) was installed on the tooth stumps. The canals and inner walls of the teeth are treated with a thin layer of Vaseline, excess Vaseline is inflated with compressed air and removed.
The modeling plastic is diluted in a crucible and then poured into a 2 gram syringe. The consistency of the plastic should be thin enough to flow. Using a needle with a wide lumen, from a set of acid for etching the enamel, the plastic was introduced into the canal and applied to the walls of the cavities. Then ashless pins were inserted into the canals and the extragingival part was modeled.
Care is required when working with plastic. If the inlay is made on the upper jaw, then when introducing plastic, part of it may pour out of the cavity back, but as you gain experience, you will introduce plastic into the canal at the required viscosity. Apply the now slightly viscous plastic onto the ashless pin and insert it into the canal. If necessary, squeeze more plastic from the syringe into the cavity limited by the matrix.
If placement of the matrix is not possible, then you can simply add plastic little by little with a brush, after moistening it with monomer and touching the powder. This produces a wet lump of plastic, which is immediately applied to the desired area. After the plastic has hardened, the matrix is removed and the inlay model is removed from the tooth.
Problems may arise at this stage. If you have left any undercuts in the tooth cavity, or have bent a canal somewhere, then the inlay model will not come out just like that. Most likely, it will need to be pulled out with a clamp. Be careful though - it’s very easy to remove the entire root :-). If the inlay model cannot be removed, or during removal a part remains inside the root, then do not be alarmed, but simply carefully drill out the plastic from the tooth cavity with a bur, and from the root with a reamer, correct all mistakes and repeat all the steps again.
If the model came out without any problems, then inspect it for pores. If there are no pores, then the model is ready for further work. If there are pores, then you need to reline it using wax or liquid-diluted plastic - apply a well-heated drop of wax or a drop of liquid plastic to the pore and press the inlay model at the root again. The only thing I want to warn you is that the amount of plastic or wax should be very, very small, otherwise the excess will not be able to completely flow out and the insert will end up being even worse than it would otherwise have been.
To avoid pores - do not save plastic - put a little more into the tooth and the air bubbles will come out, you can insert and remove the ashless pin several times, each time applying a new portion of plastic to it.
Usually after this technique there is no need for any relocation. The hardened model is further processed to the required shape and size of the stump. For processing, you should use carbide cutters for a straight tip. The use of turbine burs, especially diamond ones, is not justified, since the plastic very easily melts and wraps around the bur, after which it is difficult to remove it from the bur. After making and processing the inlay model, be sure to insert a ball of cotton wool moistened with an antiseptic (cresofen or rocl) into the cavity of the stump and close the mouth with a temporary filling. Multi-root stump tabs
Making inlays for two- and three-canal teeth, provided that the canals are parallel, is no different from making a trivial single-root inlay. If the canals are not parallel, then in the case of two-canal teeth (usually premolars of the upper jaw), I would not recommend making collapsible inlays - this is technically difficult, and there are no significant advantages. Therefore, it is better to make inlays with one full-fledged pin and with a second small pin included in an artificially formed or modified second channel.
In three-channel teeth there is usually a need to make collapsible inlays. There are several methods for making them. I prefer the direct method. The simplest and most reliable way to manufacture collapsible inlays is the method of modeling a monolithic inlay with channels running through it for additional pins. In most cases, this technique is possible, and the time it takes to make such a tab is not much more than to make a single-root tab. It just adds time to process additional channels.
First you need to select the main root for the main pin. Typically these are the posterior roots of the lower and palatal roots of the upper molars.
You need to start modeling the tab from these roots. There is no need to place the matrix yet. Treat the tooth with Vaseline. Dissolve the plastic, apply it to the ashless pin and insert it into the canal. Some of the plastic will come out and may flood the mouths of other channels. After curing, remove the resulting model and use a cutter to cut off the areas that cover the mouths of the additional channels. Melt the shank of the ashless pin on the model so that it takes on the appearance of a “mushroom” so that it does not interfere with the insertion of additional pins and at the same time promotes better adhesion of the main pin to the inlay model, then place the main pin back. Select ashless pins according to the diameter of the additional channels. Pour liquid wax over these pins to create a very thin layer. This layer will prevent these pins from sticking to the surrounding plastic. Place the matrix around the root, insert additional pins, and fill the cavity defined by the matrix with liquid resin. Wait for the plastic to harden, then remove the additional pins, and only after them the main model of the tab.
Processing of finished inlays and their fixation in the teeth
The finished inlay, which came from the dental laboratory, must be prepared. The fitting procedure using a corrective layer of silicone impression mass is the same as for cast crowns. All areas of premature contact must be removed. Achieve a very thin, uniform layer of corrective mass.
Various types of cements and bonding systems can be used to fix inlays. According to the literature, the best materials for fixation of post stump inlays are composite cements.
In my work I use glass ionomer luting cement Fuji I from GC. It is more convenient to use compared to zinc phosphate and polycarboxylate cements.
Before fixation, the inlay is degreased, additional pins are filed so that after fixation they can be broken off, the tooth is treated with iodine and dried. Using a canal filler, cement is injected into all canals at once. Cement is applied to the inlay, the main pin and placed in place, then cement is applied to the additional pins and inserted into their channels. After this, the entire tab is properly pressed down. After the cement has hardened, additional pins are broken off or sawed off, and the place where they enter the body of the inlay is polished. Tooth preparation for a crown should be done at another visit.
Surkin A. Yu. Candidate of Medical Sciences, dentist, Moscow.
Types and types of dental pins
The pin is not a stable structure; it is selected to suit the individual needs of each patient. For this purpose, different types of pins have been developed, which are indicated for a particular pathology. First of all, there are several materials for making a dental rod. Depending on this, pins are divided into two types - metal and non-metal.
- The metal pin is made of metal alloys. Titanium, brass, gold, steel, palladium are used. It is difficult to find a pure gold or titanium pin, and it will be expensive. Most often there are compounds in which one or another metal predominates. The choice usually depends on the purpose of the pin, as well as the individual body's reaction to the material. All metals are inherently hypoallergenic, but cases of hypersensitivity do occur. For severe allergies, a pin with gold impurities is perfect. In case of significant tooth damage, it is better to take titanium - the strongest and most durable material that can withstand heavy loads. But it is not plastic, so it can damage the root under strong pressure. You need to inform your dentist about all your peculiarities in order to adequately select the material and then not redo the tooth.
- Non-metallic pins involve the use of carbon fiber, ceramics, and fiberglass. Carbon fiber is a very plastic material, but is rarely used in dental practice due to its low strength. And the pin should serve as the main holder of the artificial tooth.
- Ceramic knitting needles in the tooth are very aesthetic. They do not show through the crown and are not visible even upon close examination. At the same time, ceramics cannot boast of strength and wear resistance. It is advisable to use a ceramic pin on teeth that are visible when smiling and are slightly involved in the chewing process.
- The best option according to all criteria is fiberglass. This material is plastic, flexible, lightweight and completely transparent. Under heavy load, such a pin bends and then returns to its original state without damaging the walls and root of the tooth. Externally, the design is absolutely invisible, so it is suitable for any teeth.
Non-metallic structures are used by dentists much less often than metal ones, mainly due to the high cost of prosthetics.
The method of attaching and fixing the pin in the jaw plays an important role. There are two main types of pins:
- active;
- passive.
The active design implies the presence of grooves (like the threads of a bolt), thanks to which it is screwed into the bone tissue. This ensures maximum reliability and immobility. This restoration method is suitable for non-expanded dental canals. When properly installed and secured, the active pin lasts for decades without moving or breaking.
Passive pins are used less frequently and are indicated for the treatment of severely damaged teeth. A large hole in the tooth will not hold an active structure, so a passive one is used. It involves filling the cavity with cement into which a pin is inserted. Installation is simple and quick, but less reliable and durable.
The appearance and shape of the dental post also varies. The most popular and popular conical and cylindrical designs, which are considered standard. But in different situations it may be necessary to select a more exclusive form. For such a case, cylindrical and screw pins were invented. The choice depends on the characteristics of the channel and the size of the hole.
A separate group includes individual pins, which are made in a single copy for a specific person. Such a knitting needle exactly follows all the bends and expansions of the dental canal, ensuring reliable fastening of the crown.
What types of pins are there and how do they differ from each other?
In the arsenal of endodontists there are different pin designs designed for different clinical cases. They may differ in their shape, purpose, installation method and material. For example, there are two main categories: metal and non-metal. The first includes products that can be made of titanium, precious alloys, brass or palladium. Such models are also called anchor models - in most cases there is a thread on their body, and their installation occurs in an active way. They are strong and reliable, but they create excessive pressure on the root, which can lead to its fracture.
Metal-free ones include pins made of ceramics, gutta-percha, and fiberglass. Gutta-percha structures are the most elastic; they are installed to reinforce the canal during the process of filling it. They can only be used if the root walls are of sufficient thickness. Fiberglass models are also quite elastic, but at the same time more durable. At the same time, the material itself is almost completely transparent, which makes fiberglass, along with ceramics, a good solution for smile restoration. There is another option - carbon fiber rods, and it is they that are most similar in structure to dental tissue. The products are characterized by increased strength, ensure optimal distribution of the chewing load and minimize the risk of root fracture.
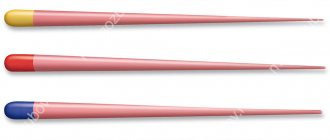
The photo shows fiberglass pins
Note! It is the fiberglass pin that has gained the greatest popularity because it is moderately elastic and does not react with the material of the prosthetic device and the moist environment of the oral cavity. To create it, solid glass fibers are used. The finished product is not subject to oxidation and is easily removed from the canal if necessary.
The shape of such systems can be conical, screw, cylindrical and cylindrical-conical. The choice of a specific type largely depends on the anatomical structure of the root canals, the characteristics of the clinical picture and the planned treatment.
Product shape may vary
Dental pins are also classified according to the method of installation - they are active and passive. The first group includes pins made of hard materials that are installed in dentin; they are durable and reliable, and are indicated for restoring completely destroyed elements. There is a thread on the body of the structure that allows you to screw the product into the tooth. On the other hand, the increased stress generated during such installation risks causing tooth fracture2. Passive-type models are placed in the root canals, for which a special substance is used.
Pins can be active or passive
It should also be noted that pin structures are divided according to the degree of elasticity. Elastic ones protect the root system from fractures; inelastic ones are more often used for installation in teeth that serve as supports for a bridge.
What are the advantages and disadvantages of pins?
To make the optimal choice of orthodontic design, you must weigh all the pros and cons of installing a pin in the tooth. After all, you will have to live with this for many years, preferably without discomfort and all sorts of complications.
A tooth that is more than half destroyed cannot be restored or filled, especially if it is chewable. In this case, the only way out is complete removal and placement of the implant. But dentistry has come up with an ideal alternative to both operations - a pin tooth. It is less painful, less time-consuming and much more economical. This is the main advantage of the pin.
But this is not all the advantages. In addition to saving a hopeless tooth, pins:
- do not damage or violate the integrity of neighboring teeth;
- suitable for installation anywhere in the dentition;
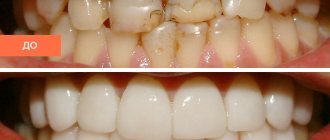
- allow you to restore a damaged tooth almost from scratch, returning it to its original appearance;
- have a long service life - from 10 to 20 years;
- are made from different materials, which allows you to choose for each individual case;
- withstand heavy loads when chewing food;
- completely restore the functionality of a damaged tooth.
Like any dental structure, pins have some disadvantages. After constant significant loads, they can gradually destroy the tooth root and crown, which will ultimately lead to its complete removal. The inelasticity of some materials contributes to this. Sometimes caries develops around the knitting needle, which cannot be seen during examination. This situation is excluded if the installation was carried out efficiently and professionally.
Very rarely, a pin can cause an allergic reaction followed by rejection. In this case, you will have to remove it and replace it with another material or install an implant. And, of course, the price for installing a pin is not small, so you need to be prepared for significant expenses. Although, a beautiful smile and lack of discomfort are worth it.
In any case, the advantages of the pins are much greater than the disadvantages. And the selection of a tooth restoration method remains up to the doctor. In most cases, it all depends on the specific situation and the severity of the tooth problem. Trust professionals who know what is best for your teeth.
previous post
Important recommendations after tooth extraction: food, drink, alcohol, smoking
next post
What factors are taken into account when choosing designs?
Before placing a pin in the dental canal, the specialist must select the appropriate type of structure, taking into account the individual characteristics of the clinical picture. To do this, he takes into account the following indicators:
- root thickness - the pin is not installed if the root thickness is less than 2 mm,
- condition of the visible part of the tooth,
- root depth,
- location of the causal element.
In the vast majority of cases, cylindrical products are used to restore teeth. In order to protect the root from damage and fractures, elastic structures that ensure uniform load distribution are often preferred.