If a tooth is destroyed by caries or as a result of injury, it must be restored, otherwise the tooth can be lost, and the absence of even one dental unit in a row is fraught with the most unpleasant consequences for health. For example, due to the absence of a tooth, an incorrect bite may develop, which leads to disruption of the correct process of chewing food and the development of various diseases of the digestive system.
If the tooth is slightly damaged, then most likely the doctor will use a regular, light-curing filling to restore it. But if the damage is significant, it would be more correct to use a stump tab.
Many people do not even know what kind of structure this is - a stump tab and for what purpose it is used by dentists. Meanwhile, the use of stump inlays makes it possible to successfully restore teeth that at first glance seem completely hopeless and must be removed.
In the article we will tell you in detail about what stump inlays are, what types of them exist, and why severely damaged teeth are best restored with inlays, and not with fillings and pins.
What is a stump tab and why is it needed?
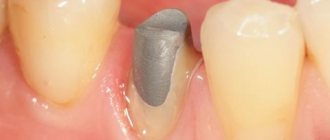
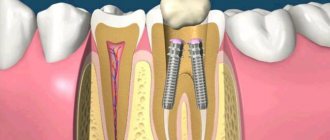
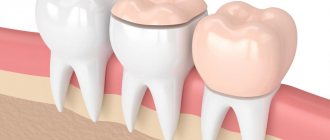
A stump inlay is not a filling or a seal on a post. This is a specialized orthopedic design that is produced in a dental laboratory and is used to restore teeth that have been more than half destroyed by caries or trauma.
Of course, even a badly damaged tooth can be restored with a filling on a pin and then a prosthesis can be placed on it. But such an approach to prosthetics will be wrong, since large fillings, even if attached to pins, are simply not capable of holding well. The load on the tooth will sooner or later lead to the filling on the pin falling out along with the prosthesis, and then the tooth will have to be re-treated.
Stump inlays help to avoid such unpleasant consequences - they are firmly fixed in the root canal of the tooth and the dental crown is fixed on them. Externally, the inlays are very similar to stumps - ground teeth - hence their name.
Why are core inlays better than fillings and pins?
Fillings and pins are only applicable if the tooth has a sufficient amount of healthy tissue remaining. If only the root or thin walls of the tooth remain, then it cannot be restored with a pin, since such a restoration method will not be distinguished by either quality or reliability.
Firstly, under load, the pin can break and in the process damage the tooth root. Trauma to the root of a tooth is a direct indication for its removal; no methods for damaging the root system will help you save your tooth.
Secondly, dentures installed on large fillings and pins most often fall out some time after prosthetics. In this case, the treatment will have to be carried out again, and this implies new and significant financial costs.
IMPORTANT: Some dentists try to fix the fallen crown and pin with cement. But this is useless: the structure will not hold firmly, and in addition, an inflammatory process may begin under it, leading to rotting and destruction of the tooth.
Therefore, in case of severe tooth decay, only a stump inlay can provide high-quality and durable prosthetic results.
Methods of dental restoration
Dental restoration can be performed in two ways:
- By means of a pin structure, for example, a core tab, if the tooth is not completely destroyed. The disadvantage of their use is the risk of possible destruction of the root part of the dental organ after their installation. The most common are linings that protect the tooth from destruction.
- Direct method of reconstruction. The use of composite materials is combined with the use of anchor pins. This method allows you to completely restore the tooth. If necessary, the tooth can be rotated using this restoration method. The composite material can harden in the following ways: under the influence of light radiation, chemical means or double hardening. The material can be of different colors, the shade is selected from a fairly wide palette. The composition is quite durable and aesthetic.
In case of severe damage or the formation of a large cavity, glass ionomer material is used. It can be applied together with another composite or independently.
Advantages of glass ionomer material:
- practically non-toxic;
- highly aesthetic;
- highly durable;
- a long curing period makes it possible to give the desired shape and aesthetic appearance.
Tooth restoration without pins
Without using pins, teeth can be restored in the following ways:
- Using a solution of special composite cement. At the same time, the bending strength is low - this is a significant drawback of this method.
- Through reinforced ceramics. With this method, ceramics, when combined with a composite, give the composition the necessary flexibility.
Restoration using cast inlays
Pin inserts are made from one type of material. They are monoblocks, gradually receding into the background and used less and less. Their main disadvantage is that there is no load absorption. This can cause the living root to collapse.
To make the structure more reliable, orthodontists use products with a collar, thereby reducing the risk of chipping and inflammation.
Types of stump inlays
Before installing a core inlay, it is imperative to treat the damaged tooth, remove all tissue damaged by caries, and also be sure to properly process and seal the root canals.
IMPORTANT: Root canal treatment is a process in which not the slightest mistake should be made! If the canals are treated poorly or improperly sealed, an inflammatory process may begin in them. In our dental clinic in Moscow - Firadent - treatment of tooth canals is carried out under a microscope, which allows the doctor to see the length and structural features of the canals and thus eliminate errors in the process of their treatment.
After treating the canals of the tooth, the orthopedic dentist begins to treat the patient: the specialist will unseal the canals to the length of the future stump inlay and take an impression for its manufacture. As we already wrote above, core inlays are produced in a dental laboratory.
There are several types of stump inlays. The classification of inlays is carried out according to the material of manufacture and the number of pins - fastenings with which the inlay will be firmly held in the tooth canals. The inlay may have several pins, their number is determined by the number of canals of the tooth being restored.
Based on the number of pins, the following types of stump inlays are distinguished:
- Single-rooted;
- Double-root collapsible and non-removable tabs;
- Three-root collapsible and non-removable stump inlays.
Multi-root inlays are most often made collapsible - this simplifies the process of securing the inlay in the tooth canals. But collapsible inlays are more expensive than non-demountable structures: the higher price is explained by the high complexity of manufacturing.
Bonding techniques
As a bonding material between fillings and teeth, composite is effective because new technologies allow the material to be bonded. Two main gluing techniques are used:
- Etching - this method uses phosphoric acid;
- Extrusion - use a binder component that comes with the composite.
When combined with such substances, the composite hardens and is correctly positioned in the tooth cavity.
Clinical use of the composite
Dental restoration with composite material can be used when installing the following types of restoration:
- Tooth filling is the most popular method that includes a substance;
- Adhesive composite bridges are a technique in which a composite tooth is installed in the place of the removed one by gluing it to adjacent teeth;
- Composite inlays are a material that dentists attach to one side of a damaged tooth to strengthen it;
- Veneers – Composite veneers are installed in two ways – directly in the patient’s mouth or in a laboratory setting.
Composite materials provide a great advantage, which allows you to create a good aesthetic effect. This condition is due to the fact that composite materials allow you to choose the optimal shade of the new tooth.
Materials for manufacturing pin stump inlays
Stump pin inlays can be made from different materials - ceramics or metal. Stump inlays with metal pins are most often made from an alloy of cobalt and chromium and are used for the installation of metal or metal-ceramic prostheses.
Cobalt-chrome core inlays have a number of specific advantages:
- They have good biocompatibility with human body tissues;
- Stump pin inlays made of this metal alloy fit quite tightly to natural tissues and therefore, when used, the risks of caries, inflammatory processes and further tooth destruction are reduced;
- Cobalt-chrome alloy has high strength and therefore a crown installed on a pin insert made of this material will not shrink during operation.
Stump inlays made of cobalt-chrome alloy allow for proper distribution of the chewing load, which reduces the risk of cracks and tooth destruction. The advantages of inlays made from this material include their affordable cost.
Ceramic pin inlays are used for the installation of metal-free dentures. This allows you to obtain impeccable aesthetics of the restored tooth. If you place a metal stump insert under the ceramic structure, it can be quite noticeable and, of course, it will spoil the appearance of the restored tooth. Therefore, only ceramic pin inlays are placed under ceramics.
Restoration of the tooth stump after root canal treatment
The use of pulpless teeth is the highest stage in the practice of dental restoration using fixed dentures. With the exception of some publications, most authors agree that pulpless teeth need to be strengthened with one or more pins.
There are several methods for restoring the tooth stump after root canal treatment:
1. Standard metal pins. Their disadvantage is that they create significant loads on the root walls during chewing.
2. Stump cast pin inlays (“Inlay-Core”). Injected pins or "Inlay-Core" are monoblock and made from a single material. About 20 years ago, these pins were considered “perfect” when restoring the crown-root part of teeth. Currently, they are being replaced by industrially manufactured pins.
3. Standard pins made of carbon fibers bundled in a Bis-GMA composite matrix (for example, “C-Post”, Bisco). Such structures are elastic and, therefore, bend along with the root under chewing loads, causing less root fractures. Unlike metal pins, they do not cause allergies and do not corrode.
4. Luminex technique (Dentatus), combining the advantages of standard pins (fast, easy to use) and cast core inlays (exact fit to the walls of the root canal along the entire length).
In this case, standard titanium pins and analogue light conductors are used.
Methodology: after preparing the canal, etching with acid is carried out, washed, dried, adhesive is introduced into the canal, then a composite light-curing material is applied from a syringe, and a transparent light-conducting analogue of the pin is installed. After polymerization with a lamp, the light conductor is removed from the canal, the walls of the root canal are again moistened with adhesive, cement is added (glass ionomer, for example, “C&B”) and a standard titanium pin is strengthened. After this, the stump is modeled from special filling materials (“Bis Core”, “Core Max II”, etc.).
5. Creation of a stump without pins.
a) the use of special composite cements (for example, “Core Past” DenMat; “Core Flo”, Bisco). Disadvantage: low bending strength.
b) reinforcement with flexible ceramics (for example, Glasspan): it is combined with the composite into a homogeneous structure (at the same time, the bending strength increases sharply). Available in the form of tape or cord of several diameters.
Standard root posts
The choice of the type and number of pins depends largely on the volume of the canal after endodontic treatment, as well as on the loss of dentinal mass.
Some authors believe that any coronal restoration as a result of endodontic treatment must be firmly strengthened with pins, no matter the degree of tooth destruction.
Others, less categorical, believe that when the crown remains intact, the resistance of the tooth is quite sufficient not to install a pin.
Ideal pin
To meet the needs of the doctor, the pin must have the following qualities:
- ensure a long service life of the endodontic obturation;
- take into account the anatomy of the canal and the resistance of the tooth root;
- ensure reliable retention of coronal obturation;
- not subject to corrosion of residual dentin;
- ensure restoration of the crown-root part of the tooth in the simplest way;
- maintain the tightness of endodontic treatment by cementing the pin;
- allow you to begin repeated endodontic treatment by trouble-free removal of the retention element;
It is very difficult to determine what the ideal pin is that would fit all clinical cases, but such a pin would have to satisfy the following requirements:
- have a cylindrical-conical shape with a modeled head, adapted in height to the coronal part of the tooth and having good retention in relation to the filling material;
- it must be made of precious or semi-precious alloys or, better yet, titanium;
- its surface must undergo minimal sandblasting and have an evacuation groove;
- the pin must neither self-lock nor screw in;
- the pin must be of different sizes so that it can be adapted to the volume of the canal (diameter, length, etc.);
- the manufacturer is required to provide a kit with various working accessories to ensure that the pin fits in its stock.
There is no universal pin that can be used in all clinical cases. No one technique can satisfy all the requirements necessary to achieve complete success. Therefore, one should resort to a compromise and every time a contradiction arises between the need to use a pin or save a tooth, solve this problem in the most conservative way: the loose pin is fixed again; the broken tooth root is removed.
Choosing a pin according to the tooth
The head of the pin should be best adapted in height to the coronal part.
Sometimes the anterior teeth do not have sufficient space regardless of the post chosen, and then only a cast post may be used.
The pin must necessarily rest on dentin, and not on the material for filling root canals, so as not to break the tightness of the apex of the root tooth. If the channel is too widened, a commercially manufactured pin cannot meet this requirement and then only a cast pin must be used.
Depending on the position of the tooth in the dentition, it is subjected to occlusal loads going in different directions. Thus, resistance to vertical load increases with increasing parallelism of the side walls of the pin.
In contrast, for transverse and tangential loads, a cast pin of non-circular cross-section, anatomically adapted to the canal structure, will be indicated.
Choosing pin size
Whatever the type of obturation, the seat of the pin always has approximately the same length. The recommended value varies from 1/2 to 2/3 of the channel length.
The seating bed must occupy at least half the length of the canal and be supported by alveolar bone to avoid root splitting under horizontal loads.
The ideal diameter is determined by the 1/3 rule, i.e. it should be equal to one third of the mesio-distal diameter of the root in which the pin is installed, and this applies to all levels.
Selection of pin shape
The main criterion for choosing a pin is its shape
1.
Cylindrical pins are the simplest and have the best retention, but their shape does not coincide with the shape of the tooth root.
They cover fragile areas, the risk of perforation is maximum. Indicated mainly for short and massive roots. 2. For tapered pins, retention decreases as the taper angle increases. They are the most adapted morphologically and the pressure at the level of the apex of the tooth root is less significant during their cementation. However, due to their shape, they cause a wedging sensation.
These pins are stronger but less stable.
3. Cylindrical-conical pins are intermediate type pins, stronger than cylindrical ones in the apex area, and more stable than conical ones due to their cylindrical part.
A particularly important factor for retention is the condition of the pin surface. Therefore, pins are distinguished: - smooth, - corrugated, - pins with screw threads, - combined.
Cylindrical Root Pins
Smooth Pins
Cement is not a truly strong support for smooth metal. Sandblasting increases retention by acting like a keyway between micro-grooves on mating surfaces.
VLOCK (Komet) - equipped with a conical head with retention protrusions. The intraradicular part of the pin has a strictly cylindrical shape with 4 grooves necessary to relieve the load in the longitudinal direction, evacuate excess cement during pin fixation and to ensure pin retention.
Screw-posts
Screw threaded pins should be used with extreme care, not screwed in, but only locked to reduce stress.
The self-screwing screw thread of the post, which initially ensures the stability of the post once it is installed, replaces the retention grooves of a smooth post.
Combination pins
RADIX-ANKER (Maillefer) - the part of the post directly below the head has a screw thread, while the lower part is smooth, the apical tip has a rounded shape.
Conical root posts
smooth posts
(Maillefer) - these posts have a helical groove that allows excess cement to escape when the pin is seated in its bed.
The heads of these pins are flattened and have grooves. Each diameter corresponds to a conical bur, which is called an auxiliary bur, as well as a bur for contra-angle handpieces.
Screw pins
UNIMETRIC (Maillefer) - these pins have square heads with retention grooves. Available in 2 diameters: 0.8 mm with short or long head.
Cylindrical-conical root pins
Combined
CYTCO pins (MAILLEFER) - this type of pins has a conical shape in its apical part and a cylindrical shape in the cervical part. Only the first third of the cylindrical part is equipped with a retention thread for self-screwing, while the conical part of the pin does not have it.
This type of pins has sufficient retention when using dense walls of the tooth root, reducing the risk of fracture.
The head is made in such a way as to ensure good retention of restorative materials. Its base is horizontal at the level of the tooth root, providing it with strong support.
The conical part of the pin without screw threads is located at the level of the apex of the tooth root, respecting its anatomy and not leading to unnecessary thinning of its walls.
Two longitudinal grooves ensure the release of excess cement during pin fixation.
Screw pins
FLEXI-POST (SDS) are titanium pins with a long and thick retention head. They have screw threads and are self-screwing, creating their own threads in the dentin.
They are equipped with annular projections that are precisely adapted to the centering calibrated hole. This design ensures correct distribution of lateral load over the entire useful height of the root.
Their originality lies in the fact that they have longitudinal slots, thanks to which it becomes possible to avoid the risk of excessive pressure when tightening the pin, which can be dangerous for the tooth root, and in addition, they provide an outlet for excess cement during fixation of the pins.
This system has the best retention. According to photoelasticity data, FLEXI-POST pins optimally distribute loads (minimizing root stress as much as possible), while SCREW-POSTS cylindrical pins have the most unfavorable characteristics (Greenfeld RS, 1989).
Length can be adjusted by simple grinding or sharpening
Preparation of the root for a post with a screw thread includes 4 stages: grinding the supra-root part of the tooth, widening the root canal, forming a seat, cutting the thread.
Preparation of the supragingival part of the root consists of grinding the hard tissues of the tooth from the labial side to the level of the gingival margin and leveling the root surface. Preparation of the supragingival part of the root should be carried out with carborundum stones of different sizes and styles. To avoid breaking it, the edge of the supragingival part of the tooth must be beveled at an angle of 450 to a height of 1-1.5 mm (“rebate”) - Fig. 1.
The root canal is expanded using a canal expander of the appropriate diameter. Then, using a drill fixed in a collet, calibration drilling is performed at low speeds of the drill (Fig. 2). Drilling should be done intermittently, with full water cooling. In this case, dentin crumbs are washed out of the root canal. In the case of continuous calibration drilling, dentin chips accumulate in the canal and stress occurs in its apical section, which can lead to root splitting.
The seat is formed with a carbide cutter. Milling is carried out at low speeds of the drill with full water cooling.
The diameter of the cutter must be smaller than the diameter of the root so that the thickness of the canal walls on any side (vestibular, oral, mesiodistal) after milling is at least 1.5 mm. The depth of the seat should not exceed 2 mm to avoid weakening the root wall.
The thread in the root canal is cut using a calibration tap with little force. After 1-2 turns of the tap, it must be turned in the opposite direction, removed from the canal and cleaned of root dentin, rinse the canal with water and continue cutting. The length of the thread in the root canal should be 1-2 mm longer than the length of the thread on the pin.
After cutting is completed, the channel is thoroughly washed with water, dried with a stream of hot air, washed with alcohol and degreased. Then the correctness of thread cutting is checked (Fig. 3) and the intra-root pin, after exactly the same preparation, is fixed in the canal with cement. The cement is mixed not too thickly and injected into the canal with a canal filler. The cement should not be mixed very liquid either - in this case it does not provide reliable fixation of the pin. The optimal consistency of cement is achieved by following the manufacturer's instructions. The cement is applied in a thin layer to the top of the root post, which is screwed into the root canal using a socket wrench. It is recommended to turn the pin first counterclockwise, then clockwise until it stops, followed by a 0.25-0.5 turn counterclockwise. With this technology of pin installation, excess cement is removed from the root canal and internal tension is reduced, therefore, the risk of root splitting is reduced.
After the cement has completely hardened, you can begin to form the supra-root part of the combined pin. To do this, select a temporary cap made of polyvinyl chloride that matches the shape of the root part of the pin. A hole with a diameter of about 1 mm is made in the bottom of the cap using a hot probe, the cap is filled with a composite material and placed on the supra-root part of the pin (Fig. 4). Excess composite material comes out through the hole. Then, after polymerization, the temporary cap is removed with a hot spatula or diamond bur and, using a cutting tool, the supra-root part of the combined intra-root pin is processed, giving it the shape of a reduced tooth stump, which can later be used as a support, for example, for a metal-ceramic crown.
It should be noted that this design of standard pins with an artificial stump is applicable for the restoration of single-rooted teeth, provided that there is no need to change the inclination axis of the stump part of the structure. In cases where it is necessary to change it (in case of anomalies in the position or inclination of the anterior teeth), the usual design of a cast stump pin with individual modeling should be used.
Modified design of cast stump pin insert
The traditional design of a cast stump pin is not optimal. It does not absorb the horizontal component of the occlusal load (F). At the top of the root post, a significant stress (F2) is concentrated, equal to 250% of the external chewing load, which can lead to destruction of the tooth root.
These shortcomings are eliminated by a design that has a “crusher” of the horizontal component of the functional load (Fig. 5). Then, stress (F2) equal to 80% of the external influence is concentrated at the top of the root pin. The optimal value of angle a should be 40-500 relative to the tooth axis.
To improve the fixation of the cast stump pin insert, with a shortened pin and to prevent chipping of the cervical part of the root, a design with a “collar” is shown (Fig. 6). It is indicated for the third degree of pathological abrasion of teeth and weakening of the walls of the root canal in the cervical region. The location of the edge of the covering crown on a ledge formed on the “collar” allows you to restore the anatomical shape of the tooth and serves to prevent inflammation of the marginal periodontium.
If there are subgingival lesions of the root walls (up to 5 mm), then the subgingival “protection” should be adjacent to the affected root wall so that a ledge with a bevel of 1350 is formed.
How stump inlays are made: an overview of the main stages
Stump inlays are made individually for each patient. Treatment begins with an examination of the patient and consultation with two specialists – a general dentist and an orthopedic dentist.
Before an impression is taken from the tooth, according to which a stump insert will be made, high-quality sanitation of the oral cavity is carried out, and all diseases of the teeth and gums diagnosed during the examination are treated. The damaged tooth is treated: the nerve (pulp) is removed from it, and the canals are filled. This is where the work of the dentist-therapist ends and the orthopedist begins to care for the patient.
Further treatment will proceed according to the following scheme:
- The prosthetist will correctly prepare the tooth for installation of the stump inlay and select its type.
- When choosing the type of stump tab, the material of its manufacture and the type of tab (single-root or multi-root, cast or collapsible stump tab) are determined.
- Then the doctor will make an impression of the patient’s jaws, which will be sent to the dental laboratory, where a stump inlay will be made from the impression taken.
- Based on the impression, a model of the stump inlay is first made, and then a permanent structure is made from the selected material.
- The dental technician passes the finished stump inlay to the orthopedist.
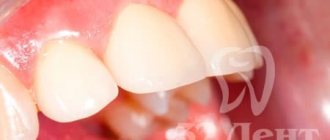
After the stump inlay is ready, the patient is invited to the prosthetist’s office and the doctor installs the stump inlay in the tooth canals. A temporary prosthesis is put on the tab and a break is taken in the treatment until the crown is made, which the doctor fixes on the stump tab.
Advantages and disadvantages of using stump inlays
The main advantage of stump pin inlays is the high reliability and durability of prosthetics. This design will firmly hold the installed dental prosthesis and, moreover, will allow for proper distribution of the chewing load. When using pin stump inlays, the risk of crown loss is reduced to zero.
Installing crowns on the stump inlay and pin allows you to increase the useful life of the prosthesis. In addition, core inlays help to obtain the ideal tooth shape and are suitable for restoration of anterior and chewing teeth.
There are only two disadvantages to the use of stump inlays - higher price and longer prosthetic time. On average, it takes about 2 weeks to make an inlay.
IMPORTANT: Only an experienced prosthetist can make a high-quality multi-root collapsible stump inlay. Therefore, it is so important to choose a clinic for your treatment that employs competent and qualified orthopedists and dental technicians and has its own, well-equipped dental laboratory. Our dentistry in Moscow, Firadent, 100% meets these conditions: your treatment with us will be carried out with impeccable quality and comfort!
Composite or ceramic
Practice shows that the use of composites and direct restoration methods is the prerogative of spot operations associated with the restoration of one or more damaged units. If more teeth are damaged or destroyed, the preferred choice would be to install ceramic dentures, since their functional properties provide less wear.
Even taking into account the fact that restoration of the front teeth with filling material is cheaper than classic prosthetics, in the long run such an operation will be more expensive, since it will require repeated adjustments after a shorter period of time.
Direct and indirect composites
In dental practice, two methods of restoring crowns using composite material are used:
- Direct restoration is a clinical procedure in which polymerization of the composition is carried out directly in the oral cavity using laser equipment, recommended for eliminating diastemas and correcting the shape of teeth;
- Indirect restoration is a technique in which polymerization occurs in laboratory conditions, using more powerful devices that ensure complete hardening of the filling structure. It is used to create inlays, replacement crowns and bridge-type prostheses.
The final decision on the choice of material, as well as the method of its processing, is made after a comprehensive examination of the dentition.
Are there any contraindications to the use of stump pins?
Unfortunately, not in all cases, stump pin inlays can be used for dental prosthetics.
Stump inlays should not be used under the following circumstances:
- When a tooth is destroyed below the gum level;
- When the quality of root canal filling is poor. In this case, it is necessary to unseal the canals, reprocess and seal them, and only then install a pin stump inlay and crown;
- A contraindication to the use of a pin stump insert would be an inflammatory process in the area of the tooth root;
- Allergy to the materials used to make the stump inlay on the pin.
Also, inlays are not placed on loose and mobile teeth.
IMPORTANT: In some cases, a stump pin can still be installed even if the tooth is destroyed below the gum level. But this will first require an additional operation - an osteotomy. The essence of this operation is to cut down the bone tissue to such an extent that the gum is below the destroyed tooth.
Dental care after the installation of a core tab
Stump inlays do not require complex specific care. All you need to do is maintain oral hygiene, brush your teeth regularly and undergo periodic dental examinations and professional hygiene procedures.
To clean crowns installed on teeth with core inlays, it is best to use brushes with soft bristles; it will also be useful to rinse your mouth after each meal - with a special balm or just clean water. When brushing your teeth, it is important to clean them from all sides and be sure to thoroughly clean the interdental spaces. For this purpose, special brushes and dental floss are used.
Prices for stump inlays
How much does a stump tab cost? Prices for stump inlays can vary greatly: the main influence on the cost of the structure will be exerted by the material of its manufacture. The most budget option is metal stump inlays. A simple non-removable (cast) metal stump inlay costs about 5,000 rubles. A collapsible multi-root metal stump inlay will cost a little more - from 6,000 rubles and more.
Ceramic and zirconium stump inlays have the highest prices. Their cost starts from 8,000 rubles.
IMPORTANT: The cost of making a core tab does not include the cost of installing a crown! Dental treatment, canal filling, production and installation of a crown are paid separately!
What to choose when doing prosthetics - restoring a tooth with a core tab or a filling?
What to choose when installing a crown - restoring a tooth with a core inlay or a filling? This question is often asked to doctors by patients who decide to restore their teeth. This question can be answered this way: if your tooth is badly damaged, and you want the installed crown to serve you for as long as possible, it is better to choose not a filling, but a stump inlay.
Yes, prosthetics with a stump inlay will be more expensive than installing a crown on a regular filling, but all costs will be repaid by the long useful life of the prosthesis and the high quality of the prosthetics. Stump inlays allow you to save and successfully restore even the most hopeless teeth!
If you still have questions about stump inlays, you want to find out their exact cost and find out the possibility of using a stump inlay in your case - come to an appointment with specialists at our dental clinic in Moscow - “Firadent”! We will be happy to help you achieve a new beautiful smile with healthy teeth!
Clinical use
One of the factors taken into account when drawing up a treatment plan in situations where tooth restoration is being prepared with filling material is the choice of gluing technique.
Thus, when installing composite fillings, there is no need for an adhesive layer, since a molecular bond is formed between the enamel coating and the polymer composition. In turn, the installation of bridges requires ensuring a strong connection between the artificial crown and adjacent units, which necessitates the application of an adhesive layer, replacing the procedure for preparing adjacent elements. Inlay fillings made from composite require pre-treatment to ensure a tight fit of the replacement element to the stump base. When installing lamellar microprostheses - veneers - dental glue is used, a thin layer of which is applied to the vestibular surface of the row, and ensures a strong fit, as well as resistance to mechanical loads.
Among the advantages provided by tooth restoration with a composite, first of all, is the aesthetics of the resulting result. A wide selection of blanks offered by manufacturers allows you to select the optimal shade of the material, indistinguishable from the natural color of the patient’s enamel.